
Одним из часто используемых инструментов у сетевых администраторов стала сетевая утилита Ping. Однако, ее использование на компьютере с только что установленной операционной системой Windows Server 2016 оказывается не возможным. Причиной этого является тот факт, что по умолчанию встроенный в серверную ОС брандмауэр блокирует пакеты принимаемые по протоколу ICMP.
Решение этого вопроса довольно простое.
В случае если установлена Windows Serverс графическим интерфейсом, то можно открыть управление правилами с помощью панели управления: Control Panel — System and Security — Windows Defender Firewall и открыть пункт Adwanced Settings.

Кстати, добраться до расширенных настроек можно ведя команду wf.msc, которая откроет соответствующую оснастку.
В расширенных настройках правил файрвола нужно выбрать подпункт Inbound Rules и открыть правило File and Printer Sharing (Echo Reuest — ICMPv4-In)

В окне свойств правило ставим галочку в чекбоксе Enabled.
В случае если серверная «операционка» установлена без графического интерфейса можно воспользоваться командой netsh и попытаться ввести что-то вроде.
netsh advfirewall firewall add rule name=»ICMP Allow incoming V4 echo request» protocol=icmpv4:8,any dir=in action=allow
Однако, запомнить этот набор символов не так уж просто.
Гораздо проще можно решить задачу разрешения ICMP-трафика с использованием Windows PowerShell выполнив командлет:
Set-NetFirewallRule -Name FPS-ICMP4-ERQ-In -Enabled True
Ping — утилита командной строки для проверки соединений в сетях TCP/IP. Она является одним из основных средств диагностики сети и входит в состав всех современных сетевых операционных систем. Принцип ее работы заключается в том, что она отправляет запросы (ICMP Echo-Request) протокола ICMP указаному узлу и фиксирует поступающие ответы (ICMP Echo-Reply).
Время между отправкой запроса и получением ответа позволяет определить задержки при передаче и частоту потери пакетов, а также оценить загруженность канала передачи данных. Полное отсутствие ICMP-ответов может означать, что удалённый узел неисправен.
В серверных ОС начиная с Windows Server 2008 входящие эхо-запросы по умолчанию запрещены и блокируются брандмауэром Windows. Сделано это скорее всего с целью предотвратить сетевые атаки типа ICMP Flooding (затопление атакуемого узла пакетами ICMP), которые могут вызвать отказ в обслуживании (Denial of Service, DoS). Безопасность конечно важна, однако в результате при попытке проверить доступность сервера мы получаем ошибку.
Для разрешения входящих эхо-запросов необходимо активировать соответствующее правило брандмауэра Windows. Вот несколько вариантов того, как это сделать.
Оснастка Windows Firewall with Adwanced Security
Самый простой способ разрешить ping — воспользоваться оснасткой «Windows Firewall with Adwanced Security». Для ее запуска нажимаем клавиши Win+R и вводим команду wf.msc.
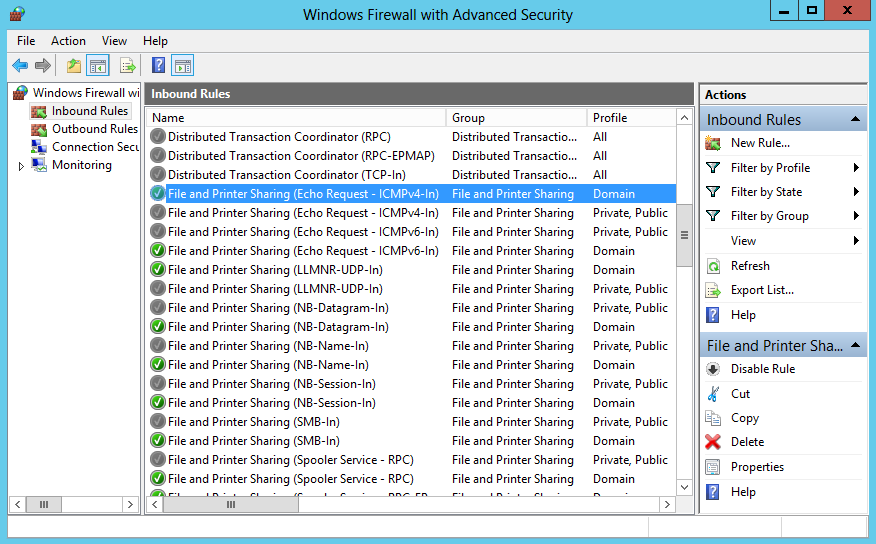
Заходим в раздел входящих правил (Inbound Rules). Здесь нас интересует предопределенное правило для IPV4 — ″File and Printer Sharing (Echo Request — ICMPv4-In)″. Обратите внимание, что в таблице присутствуют два правила с одинаковым названием. На самом деле это одно и то же правило, просто настроенное для разных профилей — одно для доменного профиля, второе для общего и частного.
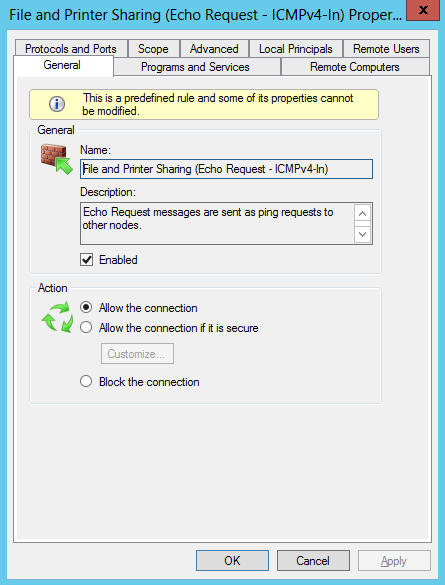
Активируем правило, отметив галочкой чекбокс Enabled и проверяем, чтобы в поле Action был выбран пункт ″Allow the connection″.
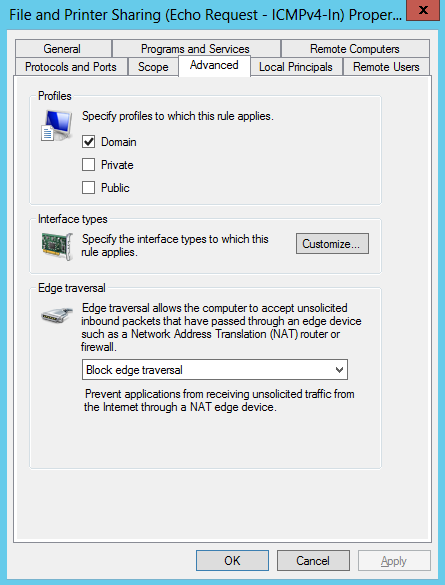
Переходим на вкладку Advanced и выбираем профили, для которых это правило будет действовать. Сохраняем правило и жмем OK. Теперь сервер можно пинговать.
При необходимости в дополнительных мерах безопасности произведем еще несколько настроек, которые защитят сервер от атак и позволят вам спокойно пользоваться Ping-ом.
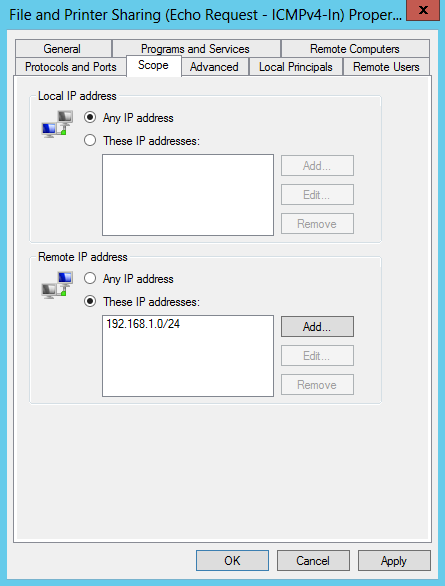
Переходим на вкладку Scope и в поле Remote IP address указываем, с каких адресов разрешено принимать входящие запросы. Здесь можно указать один адрес, диапазон адресов либо целиком подсеть.
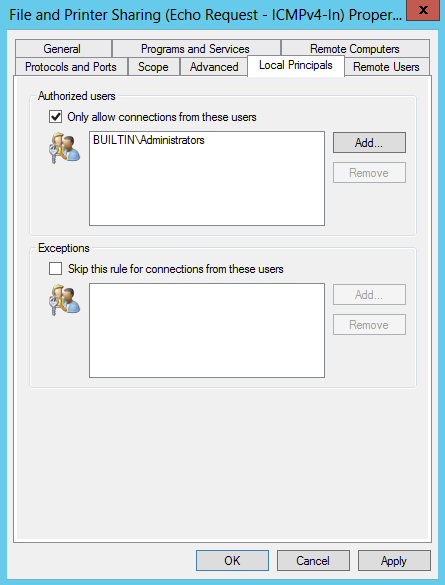
На вкладке Local Principals указываем локальных пользователей или группы, которым разрешается пинговать данный сервер. Как вариант, можно дать разрешение только группе локальных администраторов.
Групповые политики
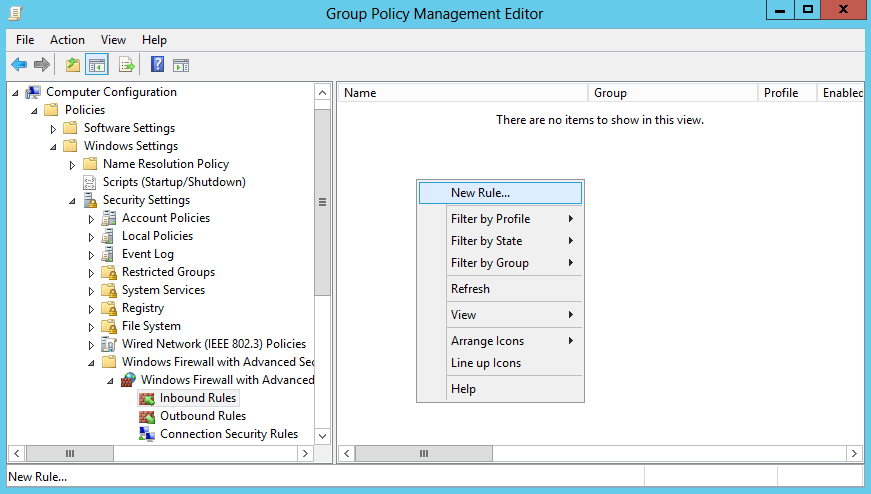
В доменной среде разрешить Ping можно централизованно, через групповые политики. Открываем в редакторе групповых политик соответствующую GPO и переходим в раздел Computer Configuration–Policies–Windows Settings–Windows Firewall with Adwanced Security. Раскрываем дерево поддразделов и переходим на вкладку Inbound Rule. Кликаем правой клавишей мыши и в контекстном меню выбираем New Rule.
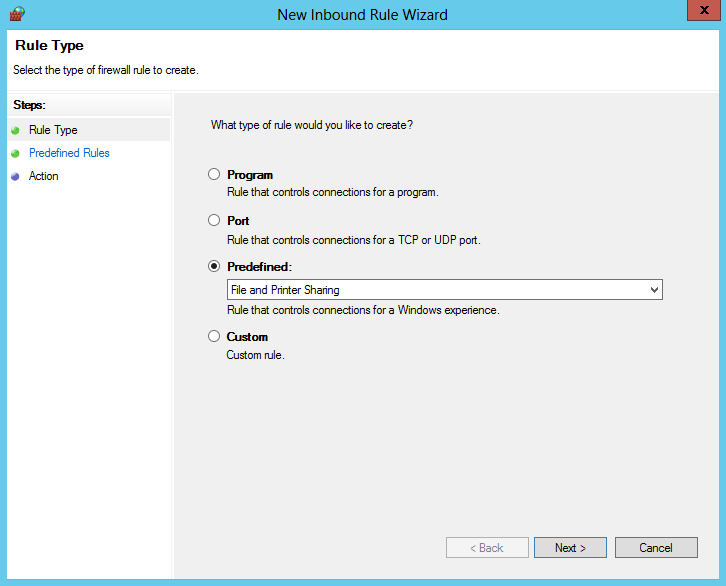
Выбираем Predefined (предопределенные правила) и находим в списке группу правил «File and Printer Sharing».
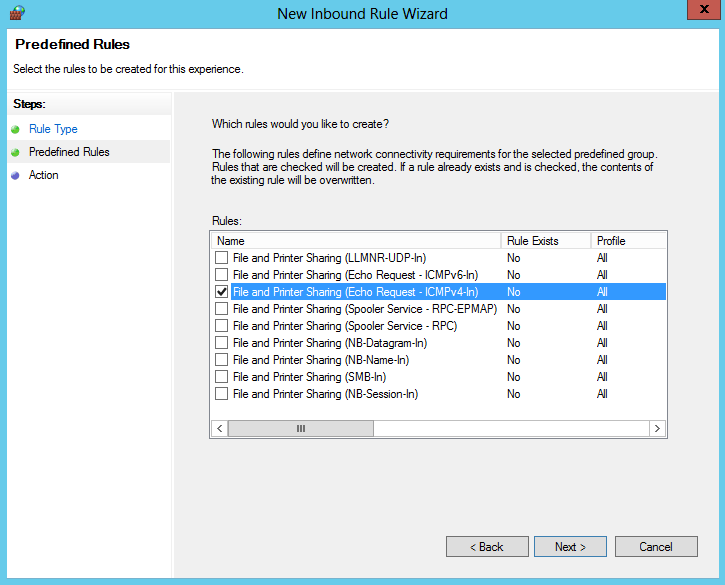
Находим правило ICMPv4-In и убираем выделение с остальных.
Выбираем для правила действие Allow the connection (разрешить подключениe) и жмем Finish, сохраняя правило.
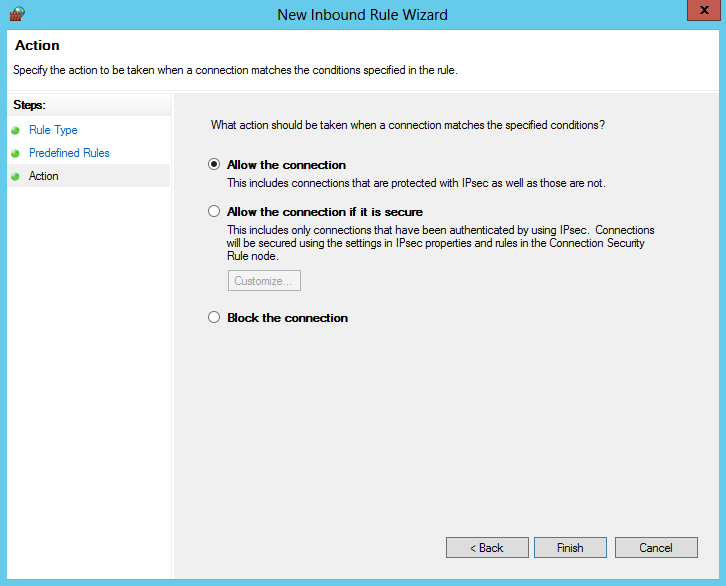
После того как правило создано, его можно открыть и отредактировать, точно так же как и в локальной оснастке брандмауэра.
Утилита Netsh
Кроме графических средств для управления правилами можно воспользоваться утилитой командной строки netsh. В качестве примера активируем правило ICMPv4-In для всех профилей брандмауэра и ограничим удаленные IP подсетью 192.168.1.0/24:
netsh adwfirewall firewall set rule name= ″File and Printer Sharing (Echo Request — ICMPv4-In)″ new enable= yes action= allow profile= any remoteip= 192.168.1.0/24
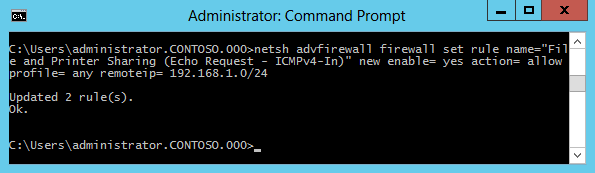
Если вы используете Windows Server 2008 (не R2), то команда будет выглядеть немного по другому. Для включения правила:
netsh firewall set icmpsetting 8
И для отключения:
netsh firewall set icmpsetting 8 disable
PowerShell
Также разрешить эхо-запросы можно с помощью PowerShell. Правда воспользоваться этим способом можно только в Windows Server 2012, в остальных ОС отсутствует соответствующий PowerShell модуль. Для активации правила воспользуемся следующей командой:
Set-NetFirewallRule -Name FPS-ICMP-ERQ-In -Enabled True -Profile Any -Action Allow

Вроде бы все. Хотя нет, вспомнил еще один интересный момент. Для нормальной работы службы каталогов Active Directory необходимо, чтобы брандмауэр пропускал ICMP пакеты от клиентских компьютеров к контроллеру домена. Это нужно для получения клиентами сведений групповой политики. Поэтому на контроллерах домена есть отдельное правило брандмауэра, разрешающее входящий ping — ″Active Directory Domain Controller — Echo Request (ICMPv4-In)″. Это правило активно по умолчанию.
На чтение 3 мин Просмотров 3к. Обновлено 29.04.2021
В этом руководстве мы узнаем, как включить (и отключить) ответ ping на серверах Windows 2019/2016 и 2012 R2. Хотя исходный пост был написан со снимками экрана с сервера Windows 2012 R2, те же шаги применимы к любым последним серверам Windows.
Включение ping поможет вам отслеживать и устранять сетевые проблемы в вашей сети. В зависимости от политик и настроек среды вашего домена запрос проверки связи будет работать соответствующим образом. Если он работает по умолчанию, мы также покажем вам, как отключить пинг на серверах Windows. Кстати, мы упомянули команды Powershell, если вы хотите работать в удаленной системе или в версии Core ОС Windows.
Разрешить Ping в Windows Server 2019/2016 — графический интерфейс
1) Перейдите в панель управления и откройте «Брандмауэр Windows». Есть много способов получить доступ к панели управления на сервере Windows.

2) Щелкните «Дополнительные настройки».

Кроме того, вы можете выполнить поиск «Брандмауэр» в поиске Windows, чтобы получить доступ к расширенным настройкам брандмауэра, как показано ниже.

3) В более ранних операционных системах нам нужно создать правило брандмауэра, разрешающее эхо-пакеты ICMP. К счастью, правило уже существует, и нам просто нужно его включить.
Чтобы включить входящее правило, разрешающее пакеты ICMP, выберите «Входящие правила». Найдите «Общий доступ к файлам и принтерам (эхо-запрос —ICMPv4-In»), щелкните его правой кнопкой мыши и выберите » Включить правило».

Это позволит принимать входящие запросы ping и отвечать на них без полного отключения службы брандмауэра Windows. Поскольку мы включили это правило только для пакетов IPv4, нам нужно включить отдельное аналогичное правило для ICMPv6-In для сети IPv6.
На скриншоте ниже показано, что сервер Windows начал отвечать на запрос ping, если было включено указанное выше правило.

В аналогичном сценарии, если сервер отвечает на запросы ping / ICMP, но вам нужно остановить его для повышения безопасности, вы можете просто отключить то же правило.
Посетите брандмауэр Windows, расширьте настройки и отключите правило » Общий доступ к файлам и принтерам (эхо-запрос —ICMPv4-In«).
Включение / отключение проверки связи с помощью команд PowerShell
Вундеркинды любят командные строки, особенно администраторы ОС Windows любят PowerShell. Ниже приведены команды, которые можно использовать для включения / отключения ping в Windows Server и клиентских операционных системах. Особенно, если вы работаете с удаленными системами через PowerShell или у вас есть Server Core OS без графического интерфейса.
Обязательно запускайте указанные ниже команды «от имени администратора» в командной строке или PowerShell.
Включить IPv4 — это создаст исключение в правиле брандмауэра Windows по умолчанию.
netsh advfirewall firewall add rule name = «ICMP Разрешить входящий эхо-запрос V4» protocol = «icmpv4: 8, any» dir = in action = allow
Для IPv6:
netsh advfirewall firewall add rule name = «ICMP Разрешить входящий эхо-запрос V6» protocol = «icmpv6: 8, any» dir = in action = allow
Чтобы отключить пинг на IPv4:
netsh advfirewall firewall add rule name = «ICMP Allow incoming V4 echo request» protocol = icmpv4: 8, any dir = in action = block
Для IPv6:
брандмауэр netsh advfirewall добавить правило name = «ICMP Разрешить входящий эхо-запрос V6» протокол = icmpv6: 8, любой dir = in action = block
Поскольку ping — полезная утилита для устранения неполадок и определения наличия сетевого устройства, ее включение или отключение полностью зависит от политик сетевой безопасности вашей среды. В этом руководстве мы упомянули простые шаги, которые вы можете выполнить с помощью графического интерфейса и командной строки.
Характерной особенностью сетевой безопасности Windows Server 2012 и Windows Server 2012 R2 является то, что ответ на ICMP-запросы отключен в системе по умолчанию, иными словами, система не пингуется. Для того чтобы исправить эту проблему существует два системных способа:
1. Разрешить пинги через настройки брандмауэра Windows.
2. Воспользоваться программной оболочкой Powershell.
Первый способ.
1. В главном меню открываем “Администрирование”, затем “Брандмауэр Windows в режиме повышенной безопасности”.
Альтернативный путь — Пуск -> Панель управления -> Система и безопасность -> Брандмауэр Windows -> Дополнительные параметры.


2. В новом окне, в левой части, выбираем Правила для входящих подключений, а в основной части ищем “Общий доступ к файлам и принтерам (эхо-запрос — входящий трафик ICMPv4)”. Кликаем правой кнопкой мыши и из контекстного меню выбираем “Включить правило”.

3. Проверяем результаты с другой машины.

Второй способ.
Если вы не сторонник пользовательского интерфейса и/или он по какой-то причине не работает, то можно воспользоваться PowerShell.

2. Поочередно вводим две команды
Import-Module NetSecurity
Set-NetFirewallRule -DisplayName “Общий доступ к файлам и принтерам (эхо-запрос — входящий трафик ICMPv4)” -enabled True
Важно! Имена существующих правил следует указывать как они вписаны в общий список и на том же языке. В английской версии правило называется “File and Printer Sharing (Echo Request – ICMPv4-In)”
Следует обратить внимание, что если в сети используется протокол IPv6, то следует выполнять аналогичные действия подставляя протокол IPv6.
Если указанные методы решения проблем не помогли, то рекомендуем:
-проверить используется ли Firewall стороннего производителя и проверить его настройки;
-проверить разрешено ли хождение ICMP-трафика через шлюз;
Аналогичную проверку нужно сделать и на удаленной машине.
Аverage rating : 5
Оценок: 1
191028
Санкт-Петербург
Литейный пр., д. 26, Лит. А
+7 (812) 403-06-99

700
300
ООО «ИТГЛОБАЛКОМ ЛАБС»
191028
Санкт-Петербург
Литейный пр., д. 26, Лит. А
+7 (812) 403-06-99
700
300
ООО «ИТГЛОБАЛКОМ ЛАБС»
700
300
Как разрешить эхо-ответ ICMP на Windows Server 2019?
По умолчанию брандмауэр Windows Server блокирует ICMP.
Это означает, что Сервер никогда не будет отвечать на пинг-пакеты с других хостов, даже внутри вашей локальной сети.
Здесь я покажу вам шаги, как разрешить эхо-ответ ICMP на Windows Server.
Разрешить echo-ответы ICMP на Windows Server 2019
Войдите в Windows Server 2019 с экрана входа в систему или через RDP и нажмите Server Manager:
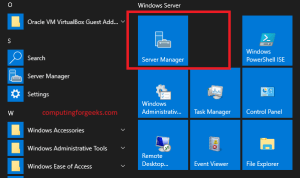
Затем перейдите в:
Tools > Windows Defender Firewall with Advanced Security
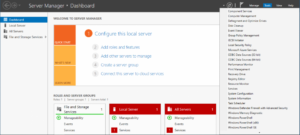
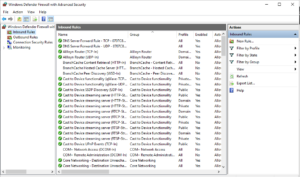
Выберите Inbound Rules на левой панели и нажмите New Rule в разделе Actions на правой панели.
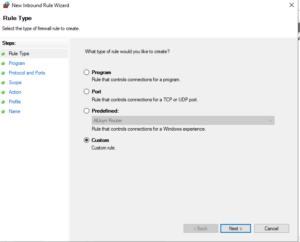
Выберите Custom rule для добавления и нажмите «Next».
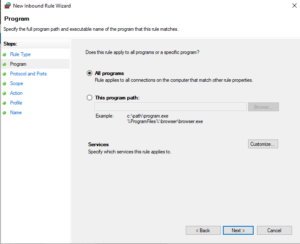
Выберите All programs в следующем окне. затем нажмите Next.
Как тип протокола выберите ICMPv4.
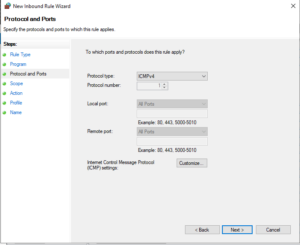
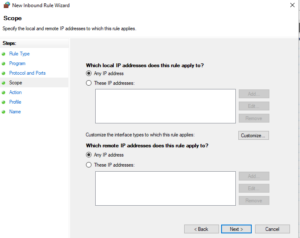
Укажите исходный IP-адрес или сеть для приема пинга.
Вы можете использовать «Any IP address», чтобы принимать пинг с любого IP-адреса.
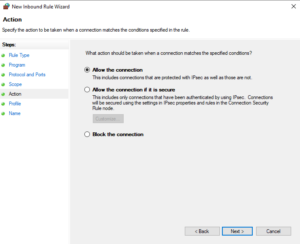
Примите соединение, соответствующее правилу.
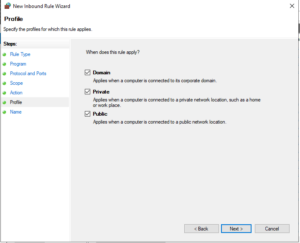
Выберите профили, к которым будет применяться правило.
Дайте правилу имя и описание [ необязательно ], затем сохраните настройки, используя Finish.
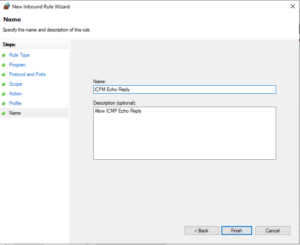
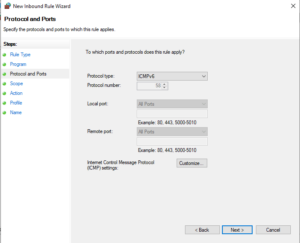
Если вы используете IPv6, сделайте то же самое и выберите ICMPv6 в поле Protocol Type
This guide will teach us how to enable ping response in Windows 2019/2016 and 2012 R2 servers. Though the original post was written with the screenshots from Windows 2012 R2 server, the same steps apply to any recent Windows servers, including version 2022.
Enabling ping will help you to monitor and troubleshoot network issues on your network. The ping request will work according to your domain environment policies and settings. If it works by default, we will also show you how to disable the ping in Windows servers. We have mentioned the Powershell commands if you want to work on a remote system or Core edition of Windows OS.
Read Also: How to enable ping on Windows 10/11 client PC
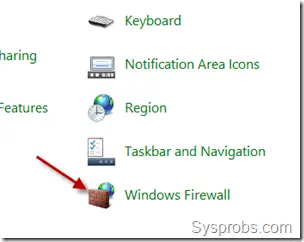
1) Go to the control panel and open ‘Windows Firewall’. There are plenty of ways to reach the control panel on a Windows server.
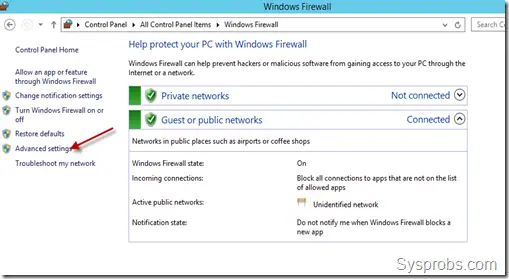
2) Click on ‘Advanced Settings.’
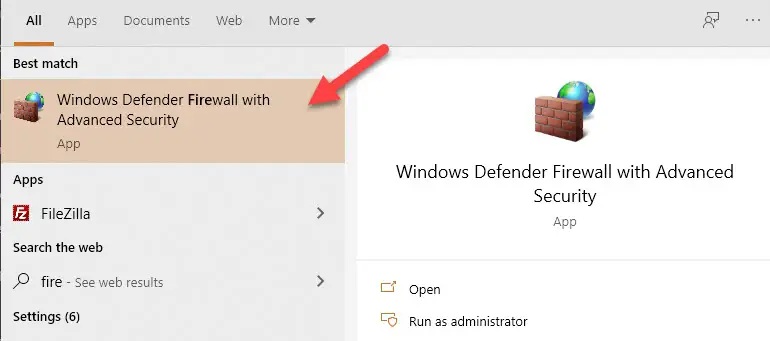
Additionally, you can search for ‘Firewall’ in Windows search to reach the advanced Firewall settings as below.
3) In the earlier Operating Systems, we need to create a firewall rule to allow ICMP echo packets. Luckily the rule is already there, and we just need to enable it.
To enable the inbound rule allowing ICMP packets, select ‘Inbound Rules.’
Locate the ‘File and Printer Sharing (Echo Request –ICMPv4-In’), right-click on it and select Enable Rule.
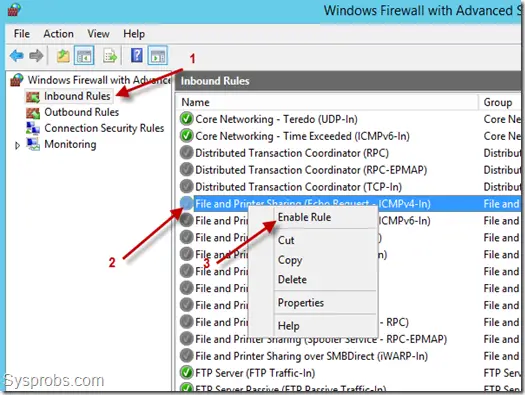
That will allow incoming ping requests and respond to them without completely disabling the Windows firewall service. As we enabled this rule only for IPv4 packets, we need to enable a separate similar rule for ICMPv6-In for the IPv6 network.
The below screenshot shows a Windows server started responding to ping requests once the above rule was enabled.
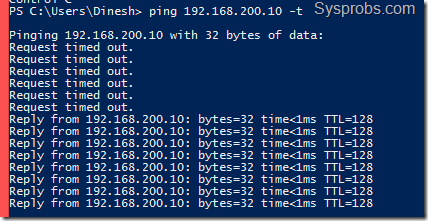
In a similar scenario, if a server is responding to ping/ICMP requests but needs to stop it for tight security, you can simply disable the same rule.
Visit the Windows firewall advances settings and disable the ‘File and Printer Sharing (Echo Request –ICMPv4-In’) rule.
Enable Ping by PowerShell Commands in Windows Servers
Geeks like command lines, especially the Windows OS admins love PowerShell. We can use the below commands to enable/disable ping on Windows Server and Client Operating Systems. Especially if you work on remote systems via PowerShell or have the Server Core OS without GUI.
Make sure to run the below commands ‘as administrator’ on the command prompt or PowerShell.
Enable IPv4 – This will create an exception in the default Windows firewall rule.
netsh advfirewall firewall add rule name="ICMP Allow incoming V4 echo request" protocol="icmpv4:8,any" dir=in action=allow
For IPv6:
netsh advfirewall firewall add rule name="ICMP Allow incoming V6 echo request" protocol="icmpv6:8,any" dir=in action=allow
To disable ping on IPv4:
netsh advfirewall firewall add rule name="ICMP Allow incoming V4 echo request" protocol=icmpv4:8,any dir=in action=block
For IPv6:
netsh advfirewall firewall add rule name="ICMP Allow incoming V6 echo request" protocol=icmpv6:8,any dir=in action=block
As ping is a useful utility to troubleshoot and find the presence of a network device, it completely depends on the network security policies of your environment to enable or disable it. We mentioned the easy steps you can do by GUI and command prompt in this guide.

На чтение 3 мин Просмотров 3к. Обновлено 29.04.2021
В этом руководстве мы узнаем, как включить (и отключить) ответ ping на серверах Windows 2019/2016 и 2012 R2. Хотя исходный пост был написан со снимками экрана с сервера Windows 2012 R2, те же шаги применимы к любым последним серверам Windows.
Включение ping поможет вам отслеживать и устранять сетевые проблемы в вашей сети. В зависимости от политик и настроек среды вашего домена запрос проверки связи будет работать соответствующим образом. Если он работает по умолчанию, мы также покажем вам, как отключить пинг на серверах Windows. Кстати, мы упомянули команды Powershell, если вы хотите работать в удаленной системе или в версии Core ОС Windows.
1) Перейдите в панель управления и откройте «Брандмауэр Windows». Есть много способов получить доступ к панели управления на сервере Windows.
2) Щелкните «Дополнительные настройки».
Кроме того, вы можете выполнить поиск «Брандмауэр» в поиске Windows, чтобы получить доступ к расширенным настройкам брандмауэра, как показано ниже.
3) В более ранних операционных системах нам нужно создать правило брандмауэра, разрешающее эхо-пакеты ICMP. К счастью, правило уже существует, и нам просто нужно его включить.
Чтобы включить входящее правило, разрешающее пакеты ICMP, выберите «Входящие правила». Найдите «Общий доступ к файлам и принтерам (эхо-запрос —ICMPv4-In»), щелкните его правой кнопкой мыши и выберите » Включить правило».
Это позволит принимать входящие запросы ping и отвечать на них без полного отключения службы брандмауэра Windows. Поскольку мы включили это правило только для пакетов IPv4, нам нужно включить отдельное аналогичное правило для ICMPv6-In для сети IPv6.
На скриншоте ниже показано, что сервер Windows начал отвечать на запрос ping, если было включено указанное выше правило.
В аналогичном сценарии, если сервер отвечает на запросы ping / ICMP, но вам нужно остановить его для повышения безопасности, вы можете просто отключить то же правило.
Посетите брандмауэр Windows, расширьте настройки и отключите правило » Общий доступ к файлам и принтерам (эхо-запрос —ICMPv4-In«).
Включение / отключение проверки связи с помощью команд PowerShell
Вундеркинды любят командные строки, особенно администраторы ОС Windows любят PowerShell. Ниже приведены команды, которые можно использовать для включения / отключения ping в Windows Server и клиентских операционных системах. Особенно, если вы работаете с удаленными системами через PowerShell или у вас есть Server Core OS без графического интерфейса.
Обязательно запускайте указанные ниже команды «от имени администратора» в командной строке или PowerShell.
Включить IPv4 — это создаст исключение в правиле брандмауэра Windows по умолчанию.
netsh advfirewall firewall add rule name = «ICMP Разрешить входящий эхо-запрос V4» protocol = «icmpv4: 8, any» dir = in action = allow
Для IPv6:
netsh advfirewall firewall add rule name = «ICMP Разрешить входящий эхо-запрос V6» protocol = «icmpv6: 8, any» dir = in action = allow
Чтобы отключить пинг на IPv4:
netsh advfirewall firewall add rule name = «ICMP Allow incoming V4 echo request» protocol = icmpv4: 8, any dir = in action = block
Для IPv6:
брандмауэр netsh advfirewall добавить правило name = «ICMP Разрешить входящий эхо-запрос V6» протокол = icmpv6: 8, любой dir = in action = block
Поскольку ping — полезная утилита для устранения неполадок и определения наличия сетевого устройства, ее включение или отключение полностью зависит от политик сетевой безопасности вашей среды. В этом руководстве мы упомянули простые шаги, которые вы можете выполнить с помощью графического интерфейса и командной строки.
Posted by
on December 21, 2018
By default in Windows Server 2019 the Windows Firewall is configured to drop all inbound ICMP traffic. This includes echo requests which are used by the ping command, which can make network troubleshooting difficult.
In this guide we will cover how to allow ping through Windows Firewall in Windows Server 2019.
A common response is usually to simply disable Windows Firewall entirely, however this is not recommended as the Windows Firewall does a good job at providing a basic level of system protection. We will only be allowing the specific rules required to allow ping to succeed.
Allow ping through Windows Firewall
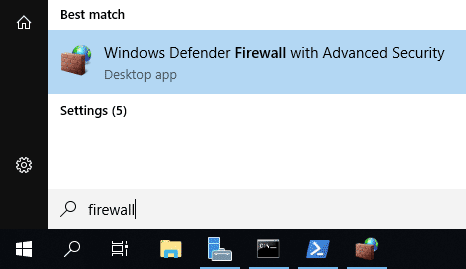
- First we need to open Windows Firewall, this can be done a few ways. My favourite method is to simply hit the Windows key to open start, then start typing firewall. As shown below Windows Firewall with Advanced Security should show, click this.

Alternatively you can simply type ‘firewall’ and press enter in PowerShell to open the basic firewall interface, then click “Advanced settings” on the left hand side – this will open the same interface listed in the start menu.
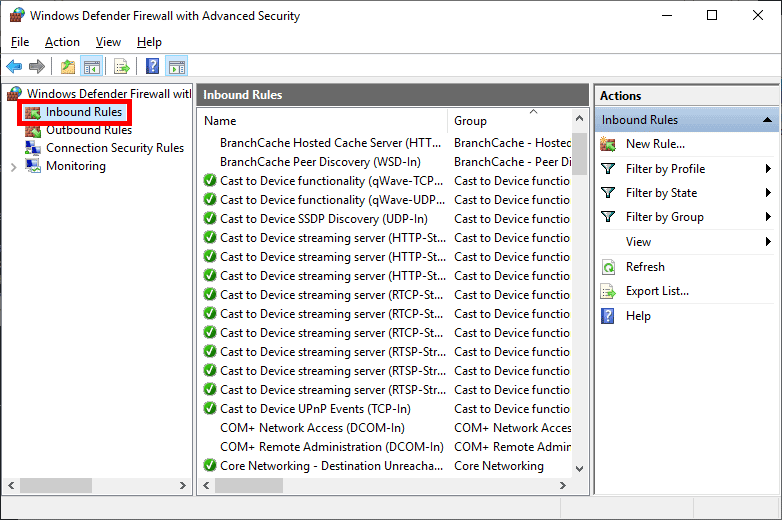
- From the Windows Firewall with Advanced Security window that opens up, select Inbound Rules from the menu on the left.

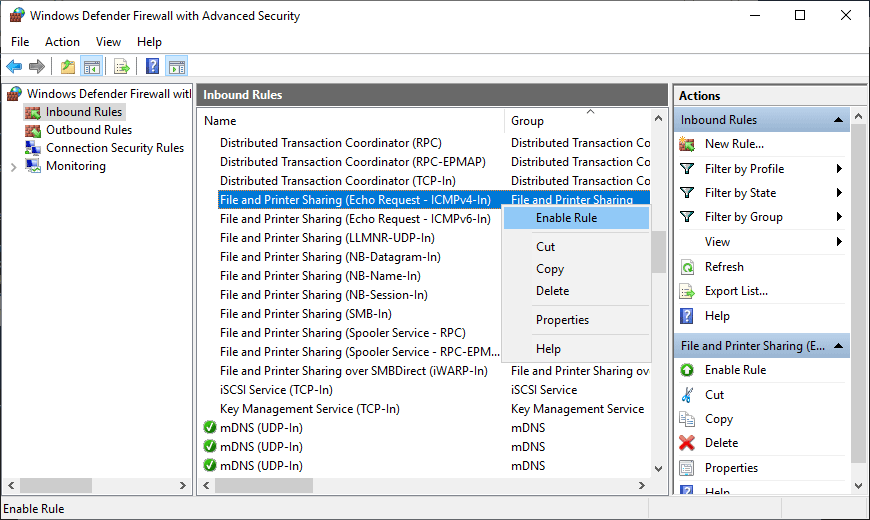
- From the rules listed under Inbound Rules, select “File and printer Sharing (Echo Request – ICMPv4-In)” and enable the rule.

Note that this will only allow IPv4 requests in, if you need IPv6 then you will want to enable the “File and Printer Sharing (Echo Request – ICMPv6-In)” rule, listed just below.
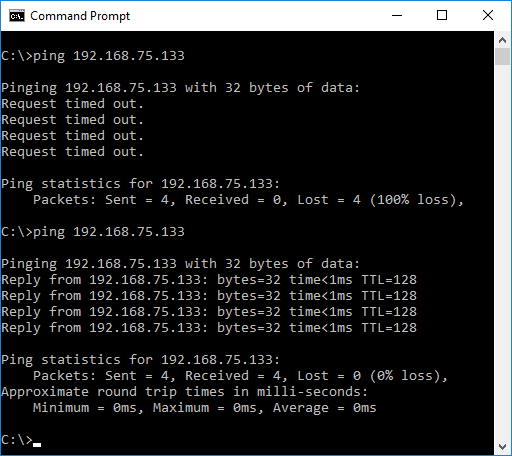
- Once enabled the server should now respond to ping requests. From my desktop I begun to ping my Windows Server 2019 virtual machine at 192.168.75.133 before enabling the rule, and then again after enabling it. You can see below that the first requests timed out, as inbound ICMP requests were disabled by default in Windows Server 2019. After enabling the ICMP rule, the ping requests succeed, confirming that this is working as expected.

Summary
By Default Windows Firewall prevents ICMP echo requests, this results in the server not responding to ping. By enabling this firewall rule we have enabled ping in Windows Server 2019, which can help us with network troubleshooting.
Поскольку команда ping говорит/показывает, что удаленный компьютер подключен к сети, то это полезная команда для системных администраторов.
Если Вам для каких-то своих целей или же для мониторинга необходимо включить ICMP пакеты, или же ping, то можно воспользоваться ниже приведенной инструкцией.
Его можно включить вручную без использования групповых политик.
Если ICMP пакеты на вашем компьютере не включены, вы получите сообщение об истечении времени ожидания.

Как включить Ping в брандмауэре Windows
Чтобы включить проверку связи в брандмауэре, выполните следующие действия:
Откройте брандмауэр, нажав Win+R и напишите команду firewall.cpl. В открывшемся окне нажмите Advanced Settings на правой панели.
Выберите Inbound Rules на левой панели и на правой панели New Rule .

Выберите File and Printer Sharing в разделе PredefinedRules. И нажмите Next.
Выберите следующие два правила:
- Общий доступ к файлам и принтерам (Echo Request – ICMPv6-In )
- Общий доступ к файлам и принтерам (Echo Request – ICMPv4-In )

И нажмите Next.
Выберите пункт Allow the connection. Нажмите Finish .

Как включить ICMP (Ping) с командной строки или PowerShell
Для этого откройте командную строку, нажав Win+R и напишите команду cmd.
Разрешить пинг IPv4 с командной строки:
netsh advfirewall firewall add rule name="ICMP Allow Ping V4" protocol="icmpv4:8,any" dir=in action=allowРазрешить ping IPv4 с помощью PowerShell:
New-NetFirewallRule -DisplayName "ICMP Allow Ping V4" -Direction Inbound -Protocol ICMPv4 -IcmpType 8 -RemoteAddress <localsubnet> -Action AllowЕсли после тестирования и настроек необходимо отключить ICMP пакеты, то так же можем воспользоваться командной строкой для этого.
Заблокировать ping IPv4 с командной строки:
netsh advfirewall firewall add rule name="ICMP Allow Ping V4" protocol="icmpv4:8,any" dir=in action=block
Заблокировать ping IPv4 с помощью PowerShell:
New-NetFirewallRule -DisplayName "ICMP Allow Ping V4" -Direction Inbound -Protocol ICMPv4 -IcmpType 8 -RemoteAddress <localsubnet> -Action BlockThis guide will teach us how to enable ping response in Windows 2019/2016 and 2012 R2 servers. Though the original post was written with the screenshots from Windows 2012 R2 server, the same steps apply to any recent Windows servers, including version 2022.
Enabling ping will help you to monitor and troubleshoot network issues on your network. The ping request will work according to your domain environment policies and settings. If it works by default, we will also show you how to disable the ping in Windows servers. We have mentioned the Powershell commands if you want to work on a remote system or Core edition of Windows OS.
Read Also: How to enable ping on Windows 10/11 client PC
1) Go to the control panel and open ‘Windows Firewall’. There are plenty of ways to reach the control panel on a Windows server.
2) Click on ‘Advanced Settings.’
Additionally, you can search for ‘Firewall’ in Windows search to reach the advanced Firewall settings as below.
3) In the earlier Operating Systems, we need to create a firewall rule to allow ICMP echo packets. Luckily the rule is already there, and we just need to enable it.
To enable the inbound rule allowing ICMP packets, select ‘Inbound Rules.’
Locate the ‘File and Printer Sharing (Echo Request –ICMPv4-In’), right-click on it and select Enable Rule.
That will allow incoming ping requests and respond to them without completely disabling the Windows firewall service. As we enabled this rule only for IPv4 packets, we need to enable a separate similar rule for ICMPv6-In for the IPv6 network.
The below screenshot shows a Windows server started responding to ping requests once the above rule was enabled.
In a similar scenario, if a server is responding to ping/ICMP requests but needs to stop it for tight security, you can simply disable the same rule.
Visit the Windows firewall advances settings and disable the ‘File and Printer Sharing (Echo Request –ICMPv4-In’) rule.
Enable Ping by PowerShell Commands in Windows Servers
Geeks like command lines, especially the Windows OS admins love PowerShell. We can use the below commands to enable/disable ping on Windows Server and Client Operating Systems. Especially if you work on remote systems via PowerShell or have the Server Core OS without GUI.
Make sure to run the below commands ‘as administrator’ on the command prompt or PowerShell.
Enable IPv4 – This will create an exception in the default Windows firewall rule.
netsh advfirewall firewall add rule name="ICMP Allow incoming V4 echo request" protocol="icmpv4:8,any" dir=in action=allow
For IPv6:
netsh advfirewall firewall add rule name="ICMP Allow incoming V6 echo request" protocol="icmpv6:8,any" dir=in action=allow
To disable ping on IPv4:
netsh advfirewall firewall add rule name="ICMP Allow incoming V4 echo request" protocol=icmpv4:8,any dir=in action=block
For IPv6:
netsh advfirewall firewall add rule name="ICMP Allow incoming V6 echo request" protocol=icmpv6:8,any dir=in action=block
As ping is a useful utility to troubleshoot and find the presence of a network device, it completely depends on the network security policies of your environment to enable or disable it. We mentioned the easy steps you can do by GUI and command prompt in this guide.
— Advertisement —
Hello, how are you? In this post, we are going to talk a little about PING. Packet Internet Groper, abbreviated as PING, is a diagnostic tool that tests connectivity between two nodes or devices across a network. Additionally, check if a network data packet is capable of being distributed to an address without errors. It also determines the network accessibility of a specific IP address. On the other hand, it is used to determine and ensure that a host computer that a user is trying to reach is actually operating. Its main use is to check for network errors. Due to security policies, it is disabled by default in Windows Server. However, It is a very useful program to measure the quality of the connection. So I’m going to show you how to enable PING in Windows Server 2019.
Edit Windows Firewall
As mentioned earlier, PING is disabled by default. So what we will do is edit the Windows Firewall inbound rules. With this intention, please type defender in the search bar. After the results appear, please enter in Windows Defender Firewall with Advanced Security:

Once the Windows Firewall is deployed, please select the inbound rules. Then scroll down to locate File and Printer Sharing (Echo Request – ICMPv4-In).

Then, double-click on it to enter the properties. In this section, it is necessary to modify two aspects. First, check the box to Enable the rule. Additionally, modify the action to Allow connections. Then, press Apply and OK to set the rule.

Back to the previous screen, you can see the rule with a check sign. This means that it is enabled correctly.

Testing PING
Once the previous modifications have been made, it is time to try PING. With this intention, please open a command prompt. Next, test the connection with an IP address or domain name. In this case, we will use www.osradar.com. Please enter the following command and press enter:
ping www.osradar.com

Conclusion
Finally, we have seen how to enable PING in Windows Server 2019. It is a popular diagnostic utility in the computer network environment. In addition, it is widely used to measure latency. This is all for now before I say goodbye I invite you to review our post on EasyPHP in Windows 10.
ICMP or Ping is disabled by default on Windows Server and Windows 11 / Windows 10. Keeping Ping disabled makes the system safer, but troubleshooting becomes more difficult.
As ping indicates that the remote computer is connected to the network and capable of communicating, it is a useful command, especially for sysadmins.
As a sysadmin myself, I have to install Windows Server and client frequently. Since our network is secured by hardware firewalls, it’s safe to allow ping on Windows Server and Windows client computers.
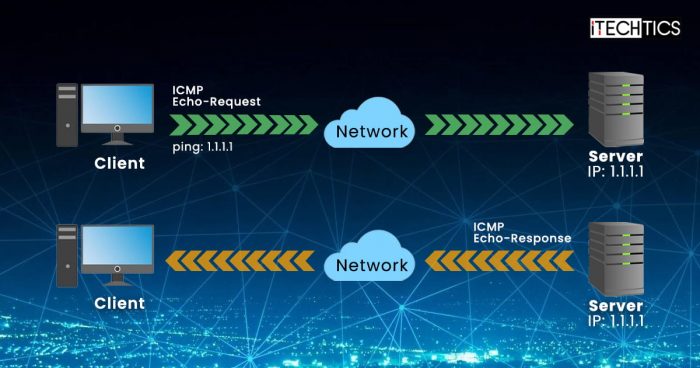
I prefer to enable Ping manually and not use Group Policy. In this article, we will go through the step-by-step process of enabling Ping through Windows Firewall.
If ping is not enabled on your computer, you will get a request timed out message when you ping the computer.
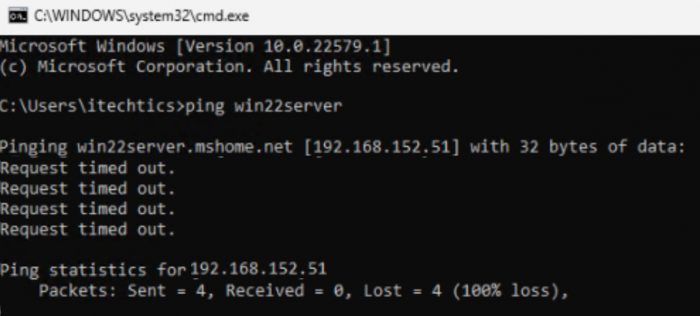
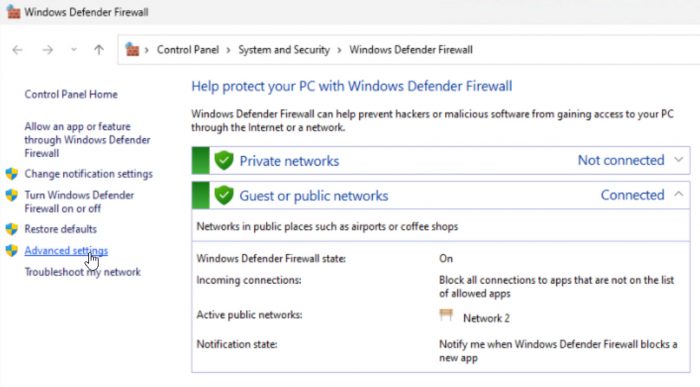
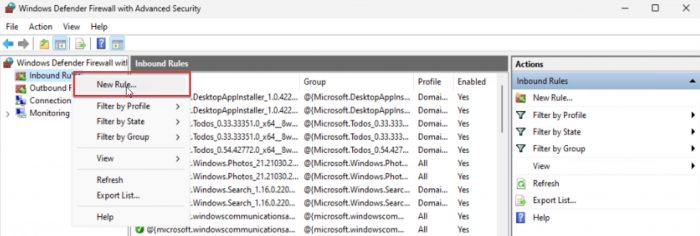
To enable ping on Firewall, follow the steps below:
-
Open Firewall by going to Run –> firewall.cpl
-
Click on Advanced Settings from the right-hand pane

Firewall advanced settings -
Right-click on Inbound Rules on the left-hand pane and select New Rule

New inbound rule in Firewall -
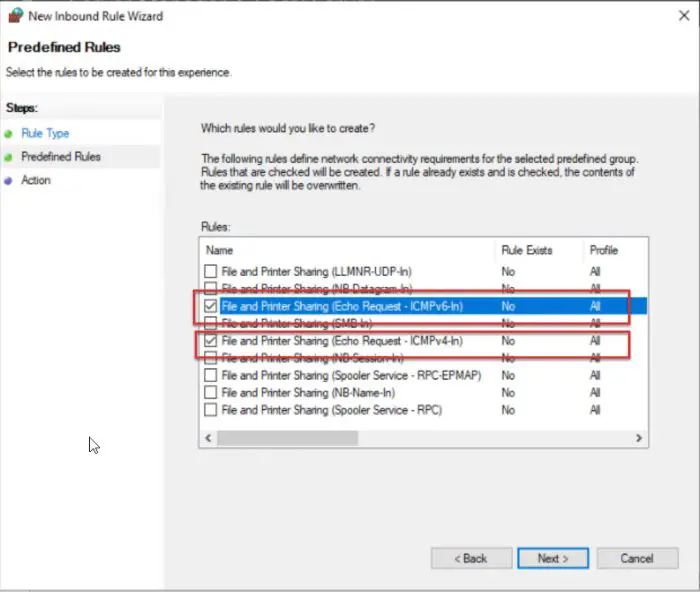
Select File and Printer Sharing under Predefined. Click on Next.
-
Select the following two rules:
- File and Printer Sharing (Echo Request – ICMPv6-In)
- File and Printer Sharing (Echo Request – ICMPv4-In)

Enable ICMP rules from Group Policy Click on Next.
-
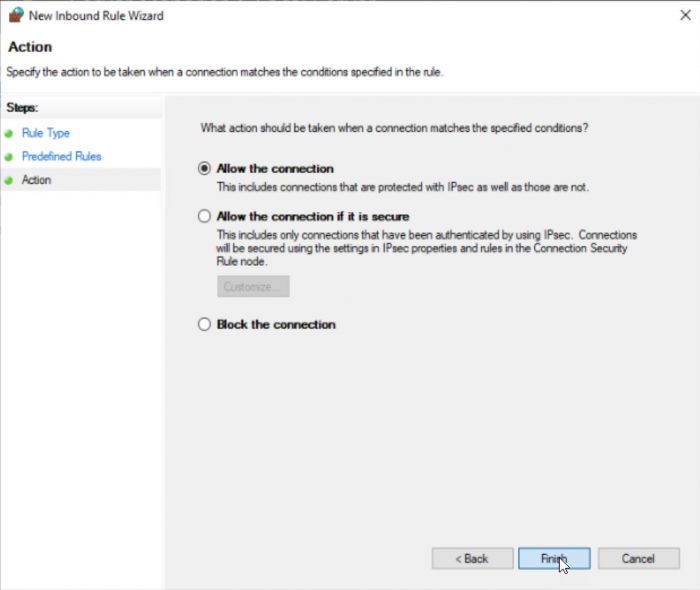
Make sure “Allow the connection” is selected. Click on Finish.

Allow the connection rule for ping
How to enable Ping using Command Line
To enable Ping using Command Line, open Command Prompt or PowerShell and run the following commands:
Allow IPv4 ping using cmd:
netsh advfirewall firewall add rule name="ICMP Allow Ping V4" protocol="icmpv4:8,any" dir=in action=allowAllow IPv4 ping using PowerShell:
New-NetFirewallRule -DisplayName "ICMP Allow Ping V4" -Direction Inbound -Protocol ICMPv4 -IcmpType 8 -RemoteAddress <localsubnet> -Action AllowAllow IPv6 ping using cmd:
netsh advfirewall firewall add rule name="ICMP Allow Ping V6" protocol="icmpv6:8,any" dir=in action=allowAllow IPv6 ping using PowerShell:
New-NetFirewallRule -DisplayName "ICMP Allow Ping V6" -Direction Inbound -Protocol ICMPv4 -IcmpType 8 -RemoteAddress <localsubnet> -Action AllowTo disable Ping using Command Line, open Command Prompt or PowerShell and run the following commands:
Block IPv4 ping using cmd:
netsh advfirewall firewall add rule name="ICMP Allow Ping V4" protocol=icmpv4:8,any dir=in action=blockBlock IPv4 ping using PowerShell:
New-NetFirewallRule -DisplayName "ICMP Allow Ping V6" -Direction Inbound -Protocol ICMPv4 -IcmpType 8 -RemoteAddress <localsubnet> -Action BlockBlock IPv6 ping using cmd:
netsh advfirewall firewall add rule name="ICMP Allow Ping V6" protocol="icmpv6:8,any" dir=in action=blockBlock IPv6 ping using PowerShell:
New-NetFirewallRule -DisplayName "ICMP Allow Ping V6" -Direction Inbound -Protocol ICMPv4 -IcmpType 8 -RemoteAddress <localsubnet> -Action BlockHow to enable Ping through Firewall using Group Policy
Sometimes it becomes cumbersome to go through each computer in the network and enable ping. A rather easier way would be to disable Windows Firewall by default. This could be a security rick. Alternatively, we can enable ping for all computers (or a set of computers) in the network using the Group Policy.
Here’s how to enable ping using Group Policy:
-
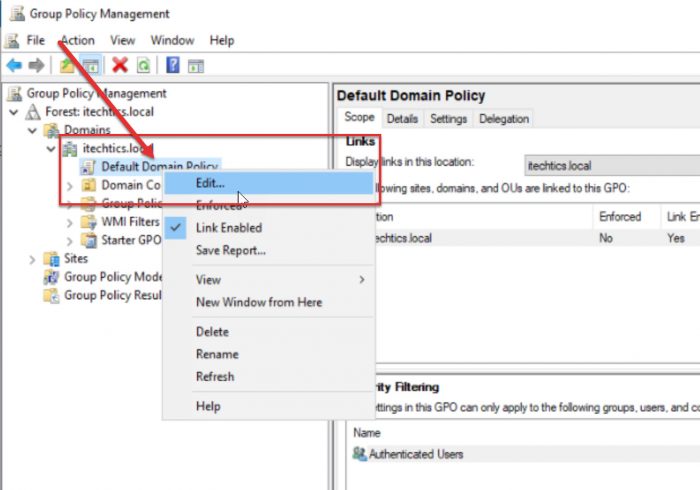
Open the Group Policy Management Console on your Domain Controller from Server Manager –> Tools –> Group Policy Management.
-
You can either create a new Group Policy Object and apply it to relevant computers or edit the already existing universal GPO.

Edit Default Domain Policy -
Navigate to the following:
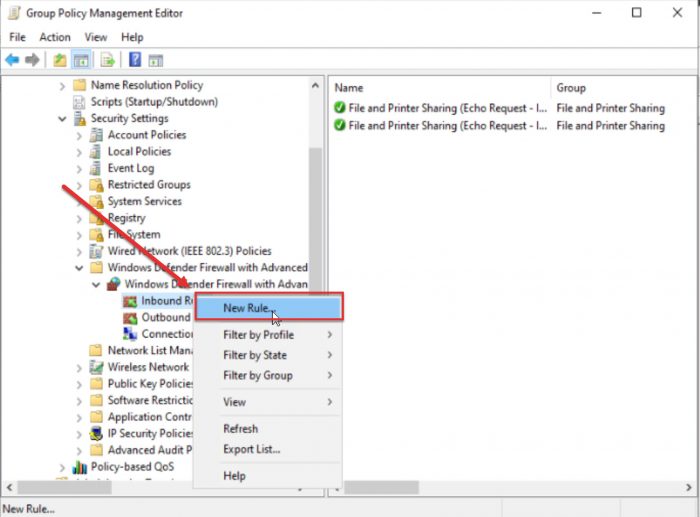
Computer Configuration -> Policies -> Windows Settings -> Security Settings -> Windows Defender Firewall with Advanced Security -> Windows Defender Firewall with Advanced Security -> Inbound Rules
-
Right-click Inbound Rules and create a New Rule.

New inbound rule -
Select File and Printer Sharing under Predefined. Click on Next.
-
Select the following two rules:
- File and Printer Sharing (Echo Request – ICMPv6-In)
- File and Printer Sharing (Echo Request – ICMPv4-In)
Enable ICMP rules from Group Policy Click on Next.
-
Make sure “Allow the connection” is selected. Click on Finish.
Allow the connection rule for ping
That’s it. Now ping is enabled across the internal network. If any computer still does not allow ping traffic, please run the following command on that computer:
gpupdate /force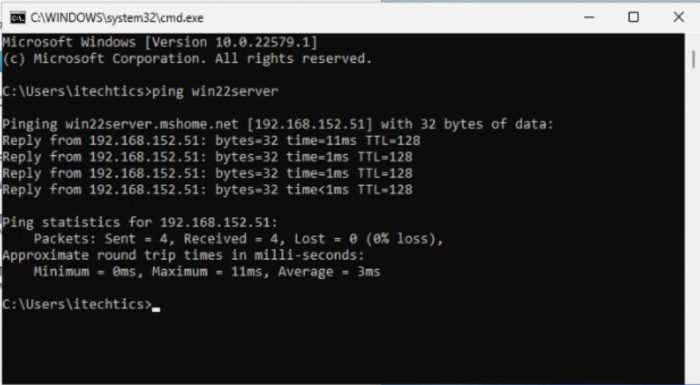
Also see:
Usman Khurshid is a seasoned IT Pro with over 15 years of experience in the IT industry. He has experience in everything from IT support, helpdesk, sysadmin, network admin, and cloud computing. He is also certified in Microsoft Technologies (MCTS and MCSA) and also Cisco Certified Professional in Routing and Switching.
Enabling Ping will make network troubleshooting easier which allows all inbound ICMP traffics and this also includes the echo requests by using this common command.
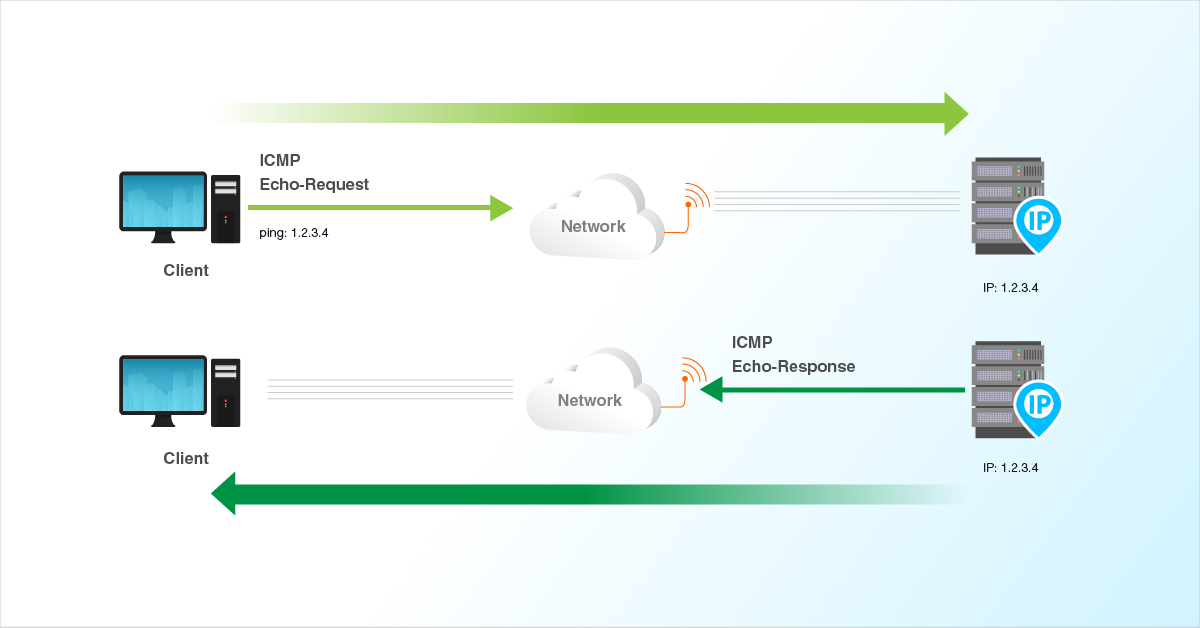
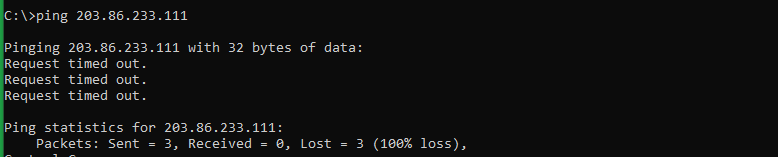
Requests will expire as shown in the image below before Ping is enabled.
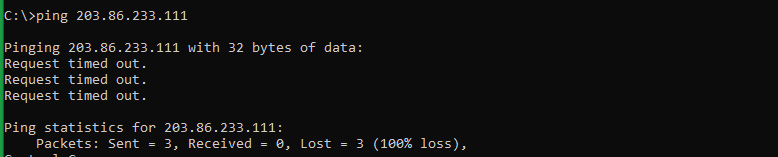
This guide outlines the basic steps to enable and disable Ping from the Windows firewall on the Windows server.
Step A — Opening Windows firewall
-
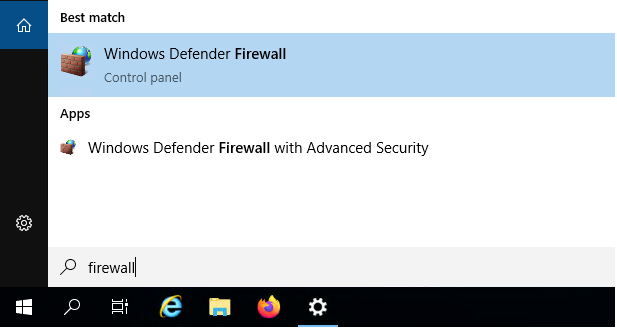
To open the Windows firewall, just click on the Windows key to open
startand searchfirewall, and then click on theWindows Defender Firewall with Advanced Securitywhich is shown in the below image.
-
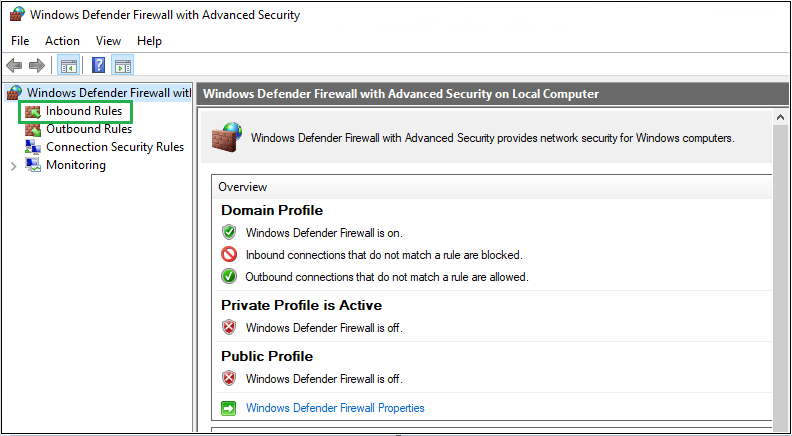
From the menu on the left, select the
Inbound Rulesspecified in the image below.
Step B — Enabling OR Disabling the rule
To Enable for IPv4
-
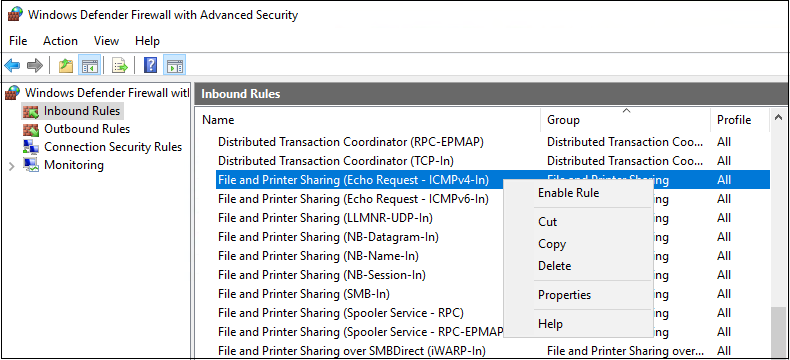
Select
File and Printer Sharing (Echo Request – ICMPv4-In)from the rules listed underInbound Rulesand enable the rule as shown in the below image.
To Enable for IPv6
-
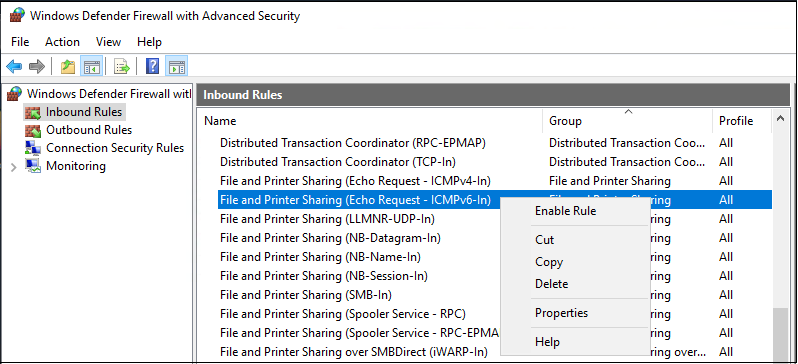
Select
File and Printer Sharing (Echo Request – ICMPv6-In)from the rules listed underInbound Rulesand enable the rule as shown in the below image.
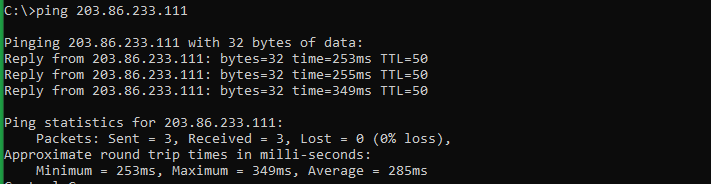
Once the ping is enabled, the server should now respond to ping requests for both IPv4 and IPv6. That is shown in the below image.
To Disable for IPv4
-
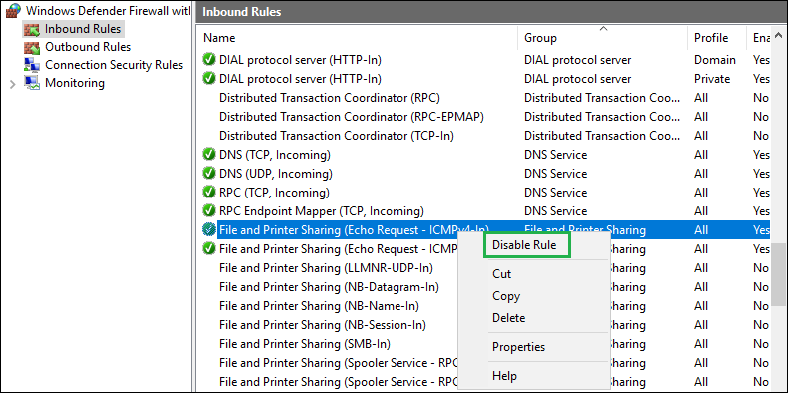
Select
File and Printer Sharing (Echo Request – ICMPv4-In)from the rules listed under Inbound Rules and disable the rule as shown in the below image.
To Disable for IPv6
-
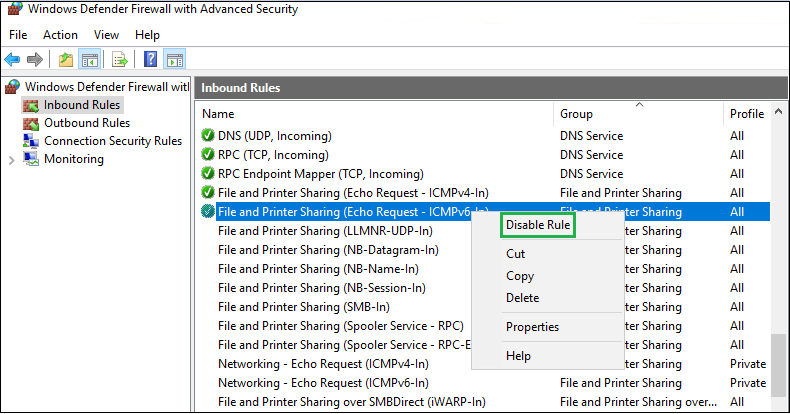
Select
File and Printer Sharing (Echo Request – ICMPv6-In)from the rules listed under Inbound Rules and disable the rule as shown in the below image.Once the ping is disabled, the server should now respond to ping requests for both IPv4 and IPv6. That is shown in the below image.
Related Tutorials
-
Installing telnet on Linux and Windows Cloud Servers
-
How to check if TCP / UDP port is open on Linux & Windows Cloud Servers
-
Basic Firewall Information and Rule Setting
-
Setting up Windows Firewall on Windows Cloud Servers 2019
-
Firewall Configuration using Iptables on Ubuntu 14.04
-
How to enable & disable Ping (ICMP Echo Requests) from IPTables on Linux Cloud Servers
-
How to Enable & Disable Ping (ICMP Echo Requests) in Windows Server 2022 Firewall
Other Information
- How to choose a data center when deploying LayerStack Cloud Servers
Как разрешить эхо-ответ ICMP на Windows Server 2019?
По умолчанию брандмауэр Windows Server блокирует ICMP.
Это означает, что Сервер никогда не будет отвечать на пинг-пакеты с других хостов, даже внутри вашей локальной сети.
Здесь я покажу вам шаги, как разрешить эхо-ответ ICMP на Windows Server.
Разрешить echo-ответы ICMP на Windows Server 2019
Войдите в Windows Server 2019 с экрана входа в систему или через RDP и нажмите Server Manager:
Затем перейдите в:
Tools > Windows Defender Firewall with Advanced Security
Выберите Inbound Rules на левой панели и нажмите New Rule в разделе Actions на правой панели.
Выберите Custom rule для добавления и нажмите «Next».
Выберите All programs в следующем окне. затем нажмите Next.
Как тип протокола выберите ICMPv4.
Укажите исходный IP-адрес или сеть для приема пинга.
Вы можете использовать «Any IP address», чтобы принимать пинг с любого IP-адреса.
Примите соединение, соответствующее правилу.
Выберите профили, к которым будет применяться правило.
Дайте правилу имя и описание [ необязательно ], затем сохраните настройки, используя Finish.
Если вы используете IPv6, сделайте то же самое и выберите ICMPv6 в поле Protocol Type