
Вопрос экономии времени и удобства окружения разработчика — штука сложная. Работая с Node.js, иногда приходится тестировать своё приложение не только в той версии, которую используете вы, но и в тех, что были выпущены до неё или даже после. В большинстве своём, это касается пакетов (библиотек), которые распространяются через npm. Разумеется, вы можете использовать для этих целей Travis CI, но этот инструмент создан не для этого.
Наиболее простым способом устанавливать и переключать версии Node.js на Linux является использование утилиты nvm. Для разработчиков, которые «сидят» на Windows, существует порт этой утилиты, хотя и менее продвинутый. Разбираемся в управлении версиями Node.js через консоль в Windows.
nvm (Node Version Manager) — это довольно простой скрипт, который позволяет устанавливать, переключать и удалять версии Node.js на лету. Проще говоря, nvm даёт вам возможность держать на одной машине любое количество версий Node.js. При установке новой версии для неё создаётся отдельная директория, например, 5.0.0 или 4.2.2. При переключении версий скрипт подменяет путь до Node.js в PATH.
При этом нужно помнить, что глобальные пакеты для каждой версии свои и никак не пересекаются. Это значит, что если вы глобально установили пакет, используя Node.js версии 4.2.2 и переключились на версию 5.1.0, то этот же пакет вам придётся устанавливать повторно уже для этой версии.
Установка nvm
Напомню, что речь сейчас идёт про Windows, и установить nvm здесь так же «сложно», как и любую другую программу или игру. Для этого вам придётся перейти в репозиторий nvm-windows и загрузить установочный пакет. Далее процедура полностью стандартна, как и для любого другого установочного файла в Windows: выбираете директорию установки и несколько раз кликаете на «Далее».
Установка Node.js
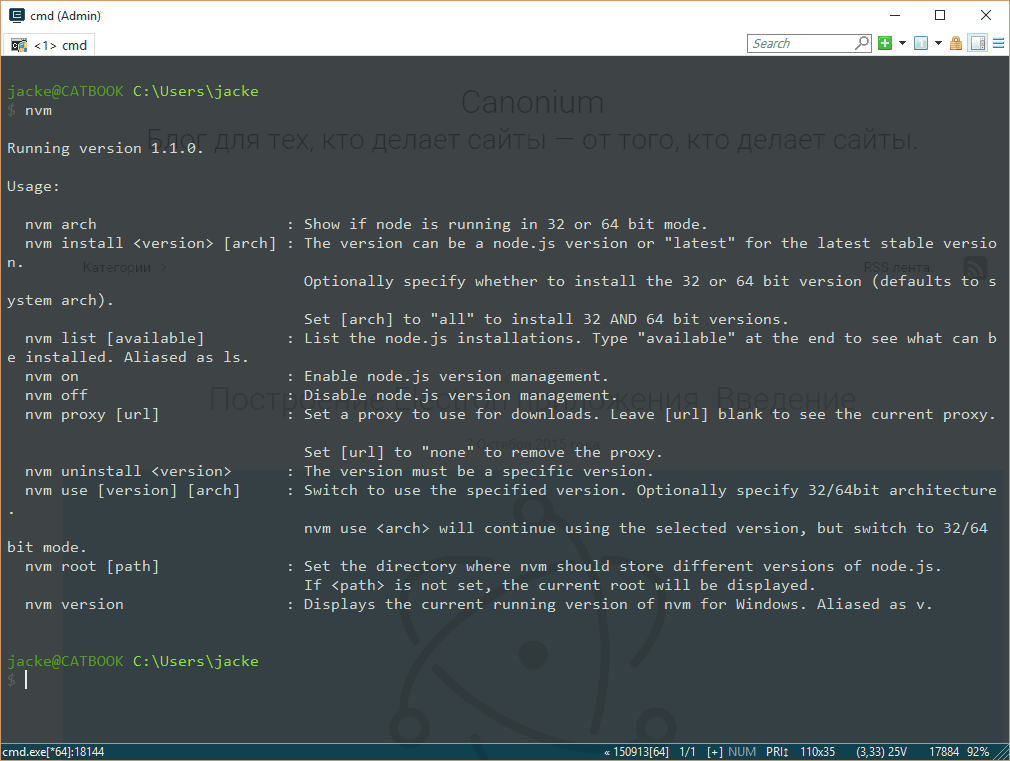
Теперь, когда у вас установлен nvm, пришло время добавить новую версию Node.js. Для этого потребуется прочитать справку, которую можно вызвать, используя команду nvm.
Сначала посмотрим на список доступных для установки версий Node.js, который можно открыть командой $ nvm list available. В этом списке доступны как стабильные, так и нестабильные релизы.
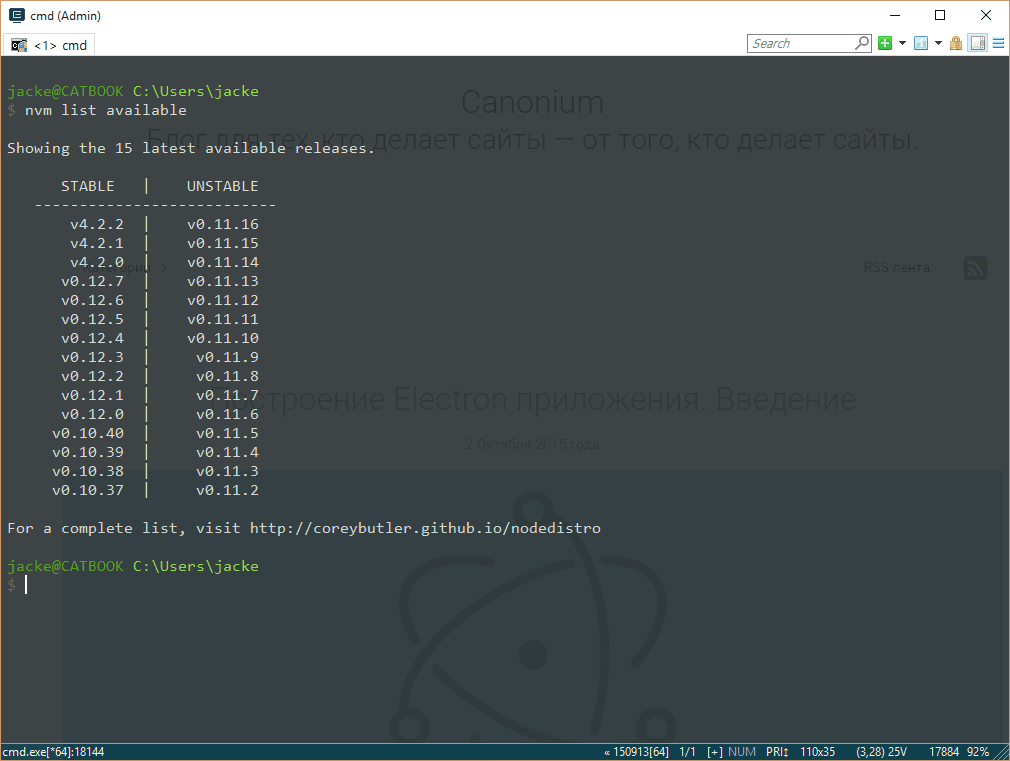
Обратите внимание, что здесь не хватает 5-ой версии Node.js. Дело в том, что создатель nvm для Windows ещё не подготовил новый релиз, добавляющий 5-ую версию Node.js в этот список.
Итак, установим последнюю версию Node.js четвертой ветки. Для этого, к сожалению, потребуется полностью прописать версию Node.js, хотя в версии под Linux и OSX можно просто указывать мажорную цифру (4 или 5).
$ nvm install 4.2.2
Тоже самое можно проделать с пятой веткой:
$ nvm install 5.1.0
Помимо версии, при установке есть возможность указать разрядность, например, для установки Node.js 5.1.0 32-битной разрядности следует выполнить
$ nvm install 5.1.0 32
Переключение версий
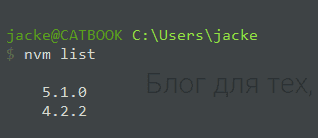
Посмотрим на список уже установленных версий Node.js на вашей машине, выполнив в консоли команду $ nvm list:
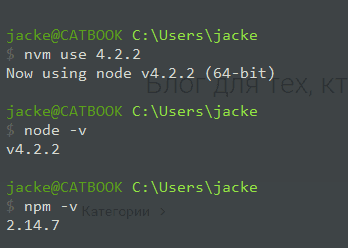
Для того, чтобы начать использовать Node.js версии 4.2.2, нужно прописать в консоли $ nvm use 4.2.2. После этого из консоли станет доступна именно эта версия Node.js и поставляемая вместе с ней версия npm:
Соответственно, чтобы переключиться на Node.js версии 5.1.0, нужно выполнить команду:
$ nvm use 5.1.0
Теперь, когда вы выполняете команду $ nvm list, в выводе будет присутствовать указатель текущей версии:
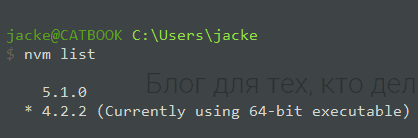
Создание синонимов
Я вынужден был создать этот заголовок в виду того, что «настоящий» nvm позволяет назначать установленным версиям Node.js синонимы. К сожалению, пока что nvm для Windows не умеет этого.
Немного про глобальные пакеты
Как я уже говорил в начале, nvm разделяет версии Node.js по директориям, и, из-за этого, устанавливаемые глобально пакеты доступны лишь в той версии, в которой они были установлены.
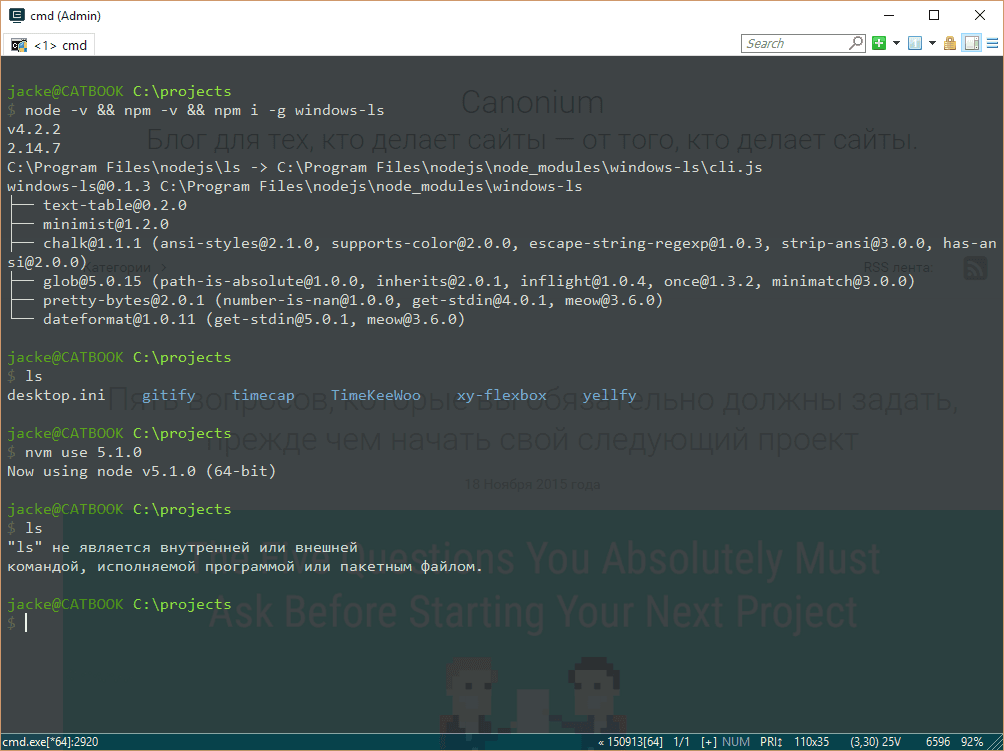
Для примера я установлю свой же пакет windows-ls в версии 4.2.2 и попытаюсь использовать его в версии 5.1.0. В итоге я получаю ошибку, говорящую о том, что такого пакета нет.
Итоги
Все мы знаем, что Windows — это не та платформа, на которую ориентированы разработчики инструментов, которые нужны веб-разработчикам. Примеров, отображающих эту ситуацию довольно много и для каждого они свои, поэтому приводить я их здесь не буду. Рассмотренная в этой статье утилита делает жизнь разработчикам на Windows чуточку лучше, позволяя сконцентрироваться на работе, а не загрузке, установке и удалении различных версий Node.js.
Время прочтения
5 мин
Просмотры 135K
Наш прошлый перевод про новые функции 15-й версии Node.js был очень хорошо принят читателями «Хабра», поэтому сегодня мы решили продолжить тему и рассказать, как настроить NVM с версией Node.js 15 и NPM 7.
Версия Node.js 15 была выпущена 20 октября 2020 года. Она поставляется с npm 7 и множеством новых функций. Вы уже успели опробовать новую версию?
Но подождите минутку! Node.js 15 и npm 7 содержат критические изменения. Не повредит ли тогда обновление существующим проектам?
Теоретически может повредить!

К счастью, у нас есть NVM (Node Version Manager), который избавит нас от этой опасности. Давайте детально рассмотрим данный инструмент, чтобы без проблем обновить версии node.js и npm.
Установка NVM
nvm управляет версиями node.js и npm. Он устанавливается для конкретного пользователя и может быть вызван отдельно для каждой оболочки. nvm работает с любой POSIX-совместимой оболочкой (sh, dash, ksh, zsh, bash), в том числе на платформах: unix, macOS и windows WSL.
nvm можно установить с помощью команд curl или wget:
$ curl -o- https://raw.githubusercontent.com/nvm-sh/nvm/v0.37.2/install.sh | bash
$ wget -qO- https://raw.githubusercontent.com/nvm-sh/nvm/v0.37.2/install.sh | bash
Скрипт install.sh клонирует репозиторий nvm в ~/.nvm и пытается добавить исходные строки из приведенного ниже фрагмента в нужный файл профиля (~/.bash_profile, ~/.zshrc, ~/.profile или ~/.bashrc).
export NVM_DIR="$([ -z "${XDG_CONFIG_HOME-}" ] && printf %s "${HOME}/.nvm" || printf %s "${XDG_CONFIG_HOME}/nvm")"
[ -s "$NVM_DIR/nvm.sh" ] && . "$NVM_DIR/nvm.sh" # This loads nvm
В ~/.bash_profile мы видим, что строки добавлены:
export NVM_DIR="/Users/fuje/.nvm"
[ -s "$NVM_DIR/nvm.sh" ] && . "$NVM_DIR/nvm.sh"  # This loads nvm
[ -s "$NVM_DIR/bash_completion" ] && . "$NVM_DIR/bash_completion"  # This loads nvm bash_completion
Использование NVM
Итак, мы установили nvm. Теперь используем данную команду для установки последней версии node.js:
$ nvm install node
Downloading and installing node v15.4.0...
Downloading https://nodejs.org/dist/v15.4.0/node-v15.4.0-darwin-x64.tar.xz...
######################################################################## 100.0%
Computing checksum with shasum -a 256
Checksums matched!
Now using node v15.4.0 (npm v7.0.15)
В выходных данных из примера выше указано, что npm 7.0.15 используется вместе с node.js 15.4.0. Проверим:
$ node -v
v15.4.0
$ npm -v
7.0.15
Также мы можем указать нужную версию для установки. Семантический формат версии определяется SemVer:
$ nvm install 10.14.0
Downloading and installing node v10.14.0...
Downloading https://nodejs.org/dist/v10.14.0/node-v10.14.0-darwin-x64.tar.xz...
######################################################################## 100.0%
Computing checksum with shasum -a 256
Checksums matched!
Now using node v10.14.0 (npm v6.4.1)
Если указанная версия уже была установлена, она не переустанавливается:
$ nvm install 10.14.0
v10.14.0 is already installed.
Now using node v10.14.0 (npm v6.4.1)
Мы можем вывести на экран все установленные версии:
$ nvm ls
->     v10.14.0
       v10.15.0
       v10.16.0
       v12.16.0
        v13.9.0
        v15.4.0
         system
default -> 12.16.0 (-> v12.16.0)
node -> stable (-> v15.4.0) (default)
stable -> 15.4 (-> v15.4.0) (default)
iojs -> N/A (default)
unstable -> N/A (default)
lts/* -> lts/fermium (-> N/A)
lts/argon -> v4.9.1 (-> N/A)
lts/boron -> v6.17.1 (-> N/A)
lts/carbon -> v8.17.0 (-> N/A)
lts/dubnium -> v10.23.0 (-> N/A)
lts/erbium -> v12.20.0 (-> N/A)
lts/fermium -> v14.15.1 (-> N/A)
В приведенных выше примерах вывода символ -> указывает, что текущая версия node.js — 10.14.0. Стрелка также представляет значения для default (12.16.0), node (15.4.0) и stable (15.4.0).
nvm use заменяет текущую версию:
$ nvm use 12.16.0
Now using node v12.16.0 (npm v6.14.8)
$ nvm use 10.16.0
Now using node v10.16.0 (npm v6.14.5)
$ nvm use 13.9.0
Now using node v13.9.0 (npm v6.13.7)
$ nvm use default
Now using node v12.16.0 (npm v6.14.8)
$ nvm use node
Now using node v15.4.0 (npm v7.0.15)
$ nvm use stable
Now using node v15.4.0 (npm v7.0.15)
Возможно, вы спросите, как так получилось, что v10.16.0 использует более позднюю версию npm, чем v13.9.0. Эту задачу можно решить с помощью следующих команд:
$ nvm use 10.16.0
$ npm install -g npm@6.14.5
Данная команда позволяет получить последнюю поддерживаемую версию npm для текущей версии Node.js:
$ nvm install-latest-npmnvm use устанавливает нужную версию только для текущей оболочки. Если вы измените оболочку, только что обновленная версия node.js будет потеряна.
Как сделать определенную версию Node.js постоянной?
Версия по умолчанию — такая версия, которая распространяется на все оболочки.
Команда nvm alias позволяет установить версию по умолчанию.
$ nvm alias default 10.16.0Для удобства можно создать файл .nvmrc, который принимает формат SemVer, node или default. После этого nvm use, nvm install, nvm exec, nvm run и nvm which будут использовать версию, указанную в файле .nvmrc, если в командной строке не указана другая.
$ cat .nvmrc
15.4.0
$ nvm use
Found '/Users/fuje/.nvmrc' with version <15.4.0>
Now using node v15.4.0 (npm v7.0.15)
Мы можем проверить текущую версию с помощью следующей команды:
$ nvm current
v15.4.0
ls-remote выводит на экран все доступные версии, но будьте готовы к очень длинному списку.
$ nvm ls-remoteОбратим внимание, что название версии в сокращенной форме значительно сокращает весь список.
$ nvm ls-remote 15
        v15.0.0
        v15.0.1
        v15.1.0
        v15.2.0
        v15.2.1
        v15.3.0
->      v15.4.0
nvm which указывает путь к исполняемому файлу, где nvm был установлен. Мы установили такие версии node.js, как 10.14.0, 10.15.0 и 10.16.0. Вот результаты nvm which:
$ nvm which 10.14.0
/Users/fuje/.nvm/versions/node/v10.14.0/bin/node
$ nvm which 10.15.0
/Users/fuje/.nvm/versions/node/v10.15.0/bin/node
$ nvm which 10.16.0
/Users/fuje/.nvm/versions/node/v10.16.0/bin/node
$ nvm which 10.15
/Users/fuje/.nvm/versions/node/v10.15.0/bin/node
$ nvm which 10.12
N/A: version "v10.12" is not yet installed.
You need to run "nvm install 10.12" to install it before using it.
$ nvm which 10
/Users/fuje/.nvm/versions/node/v10.16.0/bin/node
Указанную версию Node.js можно использовать непосредственно для запуска приложений:
$ nvm run 10.15.0 app.js
Как вариант, данная команда запускает node app.js с переменной PATH, указывающей на версию 10.15.0.
$ nvm exec 10.15.0 node app.js
Если вам нужно больше nvm-команд, запустите команду help:
$ nvm --helpОбновление NVM
Мы можем использовать nvm для обновления node.js и npm. Но как обновить сам nvm?
Давайте попробуем!
Перед обновлением у нас установлен nvm 0.34.0.
Обновляем до версии 0.37.2.
$ curl -o- https://raw.githubusercontent.com/nvm-sh/nvm/v0.37.2/install.sh | bash
  % Total    % Received % Xferd  Average Speed   Time    Time     Time  Current
                                 Dload  Upload   Total   Spent    Left  Speed
100 13527  100 13527    0     0  23046      0 --:--:-- --:--:-- --:--:-- 23083
=> nvm is already installed in /Users/fuje/.nvm, trying to update using git
=> => Compressing and cleaning up git repository
=> nvm source string already in /Users/fuje/.bash_profile
=> bash_completion source string already in /Users/fuje/.bash_profile
=> Close and reopen your terminal to start using nvm or run the following to use it now:
export NVM_DIR="$HOME/.nvm"
[ -s "$NVM_DIR/nvm.sh" ] && . "$NVM_DIR/nvm.sh"  # This loads nvm
[ -s "$NVM_DIR/bash_completion" ] && . "$NVM_DIR/bash_completion"  # This loads nvm bash_completion
Как указано в выводе, нам нужно закрыть и снова открыть терминал, чтобы использовать новую версию:
$ nvm --version
0.37.2
По сравнению с версией 0.34.0, в версии 0.37.2 добавлена функция nvm set-colors для вывода на консоль.
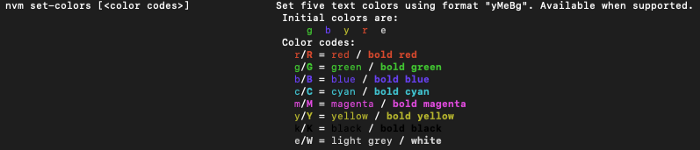
По умолчанию nvm ls показывает следующие цвета:
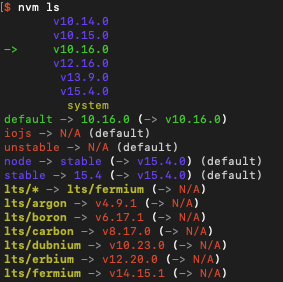
Установим новые цвета:
$ nvm set-colors cgYmWnvm ls отображает вывод с новыми цветами:

Заключение
nvm упрощает управление версиями node.js и npm. Теперь мы точно готовы перейти на node.js 15 и npm 7. Надеюсь, статья была полезной. Другие публикации автора можно найти здесь.
With package.json — The Maintainable and Portable Way 🎉🎉🎉🎉🎉🎉🎉🎉🎉🎉🎉
Lets each project specify its own version
You can add node as a dependency in package.json and control which version is used for a particular project. Upon executing a package.json «script», npm (and yarn) will use that version to run the script instead of the globally installed Node.js.
The node package accomplishes this by downloading a node binary for your local system and puts it into the node_modules/.bin directory.
You can also do this with the npm (or yarn) packages but you’ll need to set your PATH up specifically or use something like npx that handles it for you.
Ubuntu — The Official Way (manually) 😵
If you’re on node 12 and want to downgrade to node 10, just remove node and follow the instructions for the desired version:
# Remove the version that is currently installed
sudo apt remove -y nodejs

# Setup sources for the version you want
curl -sL https://deb.nodesource.com/setup_10.x | sudo -E bash -

# (Re-)Install Node
sudo apt-get install -y nodejs
Windows — The Official Way (manually) 😵
I found myself wanting to downgrade to LTS on Windows from the bleeding edge. If you’re not using a package manager like Chocolatey or a node version manager like nvm or n, just download the .msi for the version you want and install it. You might want to remove the currently installed version via «Add or remove programs» tool in Windows.
Windows Package Manager — winget 🎉🎉
The Open Source Windows Package Manager Way
winget install -e --id OpenJS.Nodejs -v 14.9.0
Chocolatey — The Independent Package Manager Way 🎉
Chocolatey is good for keeping installations up to date easily and it is a common way to install Node.js on Windows. I had to remove the bleeding edge version before installing the LTS version:
choco uninstall nodejs

choco install nodejs-lts
Node Version Manager — The «Screw it, I’ll do it myself!» Way 😢😢😢😭😭😭😭😭
While not very portable or easily maintainable, some developers like manually switching which global version of node is active at any given point in time and think the official ways of doing this are too slow. There are two popular Npm packages that provide helpful CLI interfaces for selecting (and automatically installing) whichever version you want for your system: nvm and n. Using either is beyond the scope of this answer.
I highly recommend staying away from this option. Even though it’s popular, it’s an anti-pattern that is sure to cause headaches in the future. Sure, .nvmrc exists, but this is reinventing something that’s already a part of Npm. Just npm i node the version you want.

Node Version Manager 
Table of Contents
- Intro
- About
- Installing and Updating
- Install & Update Script
- Additional Notes
- Troubleshooting on Linux
- Troubleshooting on macOS
- Ansible
- Verify Installation
- Important Notes
- Git Install
- Manual Install
- Manual Upgrade
- Install & Update Script
- Usage
- Long-term Support
- Migrating Global Packages While Installing
- Default Global Packages From File While Installing
- io.js
- System Version of Node
- Listing Versions
- Setting Custom Colors
- Persisting custom colors
- Suppressing colorized output
- Restoring PATH
- Set default node version
- Use a mirror of node binaries
- .nvmrc
- Deeper Shell Integration
- bash
- Automatically call
nvm use
- Automatically call
- zsh
- Calling
nvm useautomatically in a directory with a.nvmrcfile
- Calling
- fish
- Calling
nvm useautomatically in a directory with a.nvmrcfile
- Calling
- bash
- Running Tests
- Environment variables
- Bash Completion
- Usage
- Compatibility Issues
- Installing nvm on Alpine Linux
- Alpine Linux 3.13+
- Alpine Linux 3.5 — 3.12
- Uninstalling / Removal
- Manual Uninstall
- Docker For Development Environment
- Problems
- macOS Troubleshooting
- WSL Troubleshooting
- Maintainers
- License
- Copyright notice
Intro
nvm allows you to quickly install and use different versions of node via the command line.
Example:
$ nvm use 16
Now using node v16.9.1 (npm v7.21.1)
$ node -v
v16.9.1
$ nvm use 14
Now using node v14.18.0 (npm v6.14.15)
$ node -v
v14.18.0
$ nvm install 12
Now using node v12.22.6 (npm v6.14.5)
$ node -v
v12.22.6
Simple as that!
About
nvm is a version manager for node.js, designed to be installed per-user, and invoked per-shell. nvm works on any POSIX-compliant shell (sh, dash, ksh, zsh, bash), in particular on these platforms: unix, macOS, and windows WSL.
Installing and Updating
Install & Update Script
To install or update nvm, you should run the install script. To do that, you may either download and run the script manually, or use the following cURL or Wget command:
curl -o- https://raw.githubusercontent.com/nvm-sh/nvm/v0.39.3/install.sh | bash
wget -qO- https://raw.githubusercontent.com/nvm-sh/nvm/v0.39.3/install.sh | bash
Running either of the above commands downloads a script and runs it. The script clones the nvm repository to ~/.nvm, and attempts to add the source lines from the snippet below to the correct profile file (~/.bash_profile, ~/.zshrc, ~/.profile, or ~/.bashrc).
export NVM_DIR="$([ -z "${XDG_CONFIG_HOME-}" ] && printf %s "${HOME}/.nvm" || printf %s "${XDG_CONFIG_HOME}/nvm")"
[ -s "$NVM_DIR/nvm.sh" ] && . "$NVM_DIR/nvm.sh" # This loads nvm
Additional Notes
-
If the environment variable
$XDG_CONFIG_HOMEis present, it will place thenvmfiles there. -
You can add
--no-useto the end of the above script (…nvm.sh --no-use) to postpone usingnvmuntil you manuallyuseit. -
You can customize the install source, directory, profile, and version using the
NVM_SOURCE,NVM_DIR,PROFILE, andNODE_VERSIONvariables.
Eg:curl ... | NVM_DIR="path/to/nvm". Ensure that theNVM_DIRdoes not contain a trailing slash. -
The installer can use
git,curl, orwgetto downloadnvm, whichever is available.
Troubleshooting on Linux
On Linux, after running the install script, if you get nvm: command not found or see no feedback from your terminal after you type command -v nvm, simply close your current terminal, open a new terminal, and try verifying again.
Alternatively, you can run the following commands for the different shells on the command line:
bash: source ~/.bashrc
zsh: source ~/.zshrc
ksh: . ~/.profile
These should pick up the nvm command.
Troubleshooting on macOS
Since OS X 10.9, /usr/bin/git has been preset by Xcode command line tools, which means we can’t properly detect if Git is installed or not. You need to manually install the Xcode command line tools before running the install script, otherwise, it’ll fail. (see #1782)
If you get nvm: command not found after running the install script, one of the following might be the reason:
-
Since macOS 10.15, the default shell is
zshand nvm will look for.zshrcto update, none is installed by default. Create one withtouch ~/.zshrcand run the install script again. -
If you use bash, the previous default shell, your system may not have
.bash_profileor.bashrcfiles where the command is set up. Create one of them withtouch ~/.bash_profileortouch ~/.bashrcand run the install script again. Then, run. ~/.bash_profileor. ~/.bashrcto pick up thenvmcommand. -
You have previously used
bash, but you havezshinstalled. You need to manually add these lines to~/.zshrcand run. ~/.zshrc. -
You might need to restart your terminal instance or run
. ~/.nvm/nvm.sh. Restarting your terminal/opening a new tab/window, or running the source command will load the command and the new configuration. -
If the above didn’t help, you might need to restart your terminal instance. Try opening a new tab/window in your terminal and retry.
If the above doesn’t fix the problem, you may try the following:
-
If you use bash, it may be that your
.bash_profile(or~/.profile) does not source your~/.bashrcproperly. You could fix this by addingsource ~/<your_profile_file>to it or follow the next step below. -
Try adding the snippet from the install section, that finds the correct nvm directory and loads nvm, to your usual profile (
~/.bash_profile,~/.zshrc,~/.profile, or~/.bashrc). -
For more information about this issue and possible workarounds, please refer here
Note For Macs with the M1 chip, node started offering arm64 arch darwin packages since v16.0.0 and experimental arm64 support when compiling from source since v14.17.0. If you are facing issues installing node using nvm, you may want to update to one of those versions or later.
Ansible
You can use a task:
- name: Install nvm
  ansible.builtin.shell: >
    curl -o- https://raw.githubusercontent.com/nvm-sh/nvm/v0.39.3/install.sh | bash
  args:
    creates: "{{ ansible_env.HOME }}/.nvm/nvm.sh"
Verify Installation
To verify that nvm has been installed, do:
which should output nvm if the installation was successful. Please note that which nvm will not work, since nvm is a sourced shell function, not an executable binary.
Note: On Linux, after running the install script, if you get nvm: command not found or see no feedback from your terminal after you type command -v nvm, simply close your current terminal, open a new terminal, and try verifying again.
Important Notes
If you’re running a system without prepackaged binary available, which means you’re going to install nodejs or io.js from its source code, you need to make sure your system has a C++ compiler. For OS X, Xcode will work, for Debian/Ubuntu based GNU/Linux, the build-essential and libssl-dev packages work.
Note: nvm also support Windows in some cases. It should work through WSL (Windows Subsystem for Linux) depending on the version of WSL. It should also work with GitBash (MSYS) or Cygwin. Otherwise, for Windows, a few alternatives exist, which are neither supported nor developed by us:
- nvm-windows
- nodist
- nvs
Note: nvm does not support Fish either (see #303). Alternatives exist, which are neither supported nor developed by us:
- bass allows you to use utilities written for Bash in fish shell
- fast-nvm-fish only works with version numbers (not aliases) but doesn’t significantly slow your shell startup
- plugin-nvm plugin for Oh My Fish, which makes nvm and its completions available in fish shell
- fnm — fisherman-based version manager for fish
- fish-nvm — Wrapper around nvm for fish, delays sourcing nvm until it’s actually used.
Note: We still have some problems with FreeBSD, because there is no official pre-built binary for FreeBSD, and building from source may need patches; see the issue ticket:
- [#900] [Bug] nodejs on FreeBSD may need to be patched
- nodejs/node#3716
Note: On OS X, if you do not have Xcode installed and you do not wish to download the ~4.3GB file, you can install the Command Line Tools. You can check out this blog post on how to just that:
- How to Install Command Line Tools in OS X Mavericks & Yosemite (Without Xcode)
Note: On OS X, if you have/had a «system» node installed and want to install modules globally, keep in mind that:
- When using
nvmyou do not needsudoto globally install a module withnpm -g, so instead of doingsudo npm install -g grunt, do insteadnpm install -g grunt - If you have an
~/.npmrcfile, make sure it does not contain anyprefixsettings (which is not compatible withnvm) - You can (but should not?) keep your previous «system» node install, but
nvmwill only be available to your user account (the one used to install nvm). This might cause version mismatches, as other users will be using/usr/local/lib/node_modules/*VS your user account using~/.nvm/versions/node/vX.X.X/lib/node_modules/*
Homebrew installation is not supported. If you have issues with homebrew-installed nvm, please brew uninstall it, and install it using the instructions below, before filing an issue.
Note: If you’re using zsh you can easily install nvm as a zsh plugin. Install zsh-nvm and run nvm upgrade to upgrade.
Note: Git versions before v1.7 may face a problem of cloning nvm source from GitHub via https protocol, and there is also different behavior of git before v1.6, and git prior to v1.17.10 can not clone tags, so the minimum required git version is v1.7.10. If you are interested in the problem we mentioned here, please refer to GitHub’s HTTPS cloning errors article.
Git Install
If you have git installed (requires git v1.7.10+):
- clone this repo in the root of your user profile
cd ~/from anywhere thengit clone https://github.com/nvm-sh/nvm.git .nvm
cd ~/.nvmand check out the latest version withgit checkout v0.39.3- activate
nvmby sourcing it from your shell:. ./nvm.sh
Now add these lines to your ~/.bashrc, ~/.profile, or ~/.zshrc file to have it automatically sourced upon login:
(you may have to add to more than one of the above files)
export NVM_DIR="$HOME/.nvm"
[ -s "$NVM_DIR/nvm.sh" ] && . "$NVM_DIR/nvm.sh"  # This loads nvm
[ -s "$NVM_DIR/bash_completion" ] && . "$NVM_DIR/bash_completion"  # This loads nvm bash_completion
Manual Install
For a fully manual install, execute the following lines to first clone the nvm repository into $HOME/.nvm, and then load nvm:
export NVM_DIR="$HOME/.nvm" && (
  git clone https://github.com/nvm-sh/nvm.git "$NVM_DIR"
  cd "$NVM_DIR"
  git checkout `git describe --abbrev=0 --tags --match "v[0-9]*" $(git rev-list --tags --max-count=1)`
) && . "$NVM_DIR/nvm.sh"
Now add these lines to your ~/.bashrc, ~/.profile, or ~/.zshrc file to have it automatically sourced upon login:
(you may have to add to more than one of the above files)
export NVM_DIR="$HOME/.nvm"
[ -s "$NVM_DIR/nvm.sh" ] && . "$NVM_DIR/nvm.sh" # This loads nvm
[ -s "$NVM_DIR/bash_completion" ] && . "$NVM_DIR/bash_completion"  # This loads nvm bash_completion
Manual Upgrade
For manual upgrade with git (requires git v1.7.10+):
- change to the
$NVM_DIR - pull down the latest changes
- check out the latest version
- activate the new version
(
  cd "$NVM_DIR"
  git fetch --tags origin
  git checkout `git describe --abbrev=0 --tags --match "v[0-9]*" $(git rev-list --tags --max-count=1)`
) && . "$NVM_DIR/nvm.sh"
Usage
To download, compile, and install the latest release of node, do this:
nvm install node # "node" is an alias for the latest version
To install a specific version of node:
nvm install 14.7.0 # or 16.3.0, 12.22.1, etc
The first version installed becomes the default. New shells will start with the default version of node (e.g., nvm alias default).
You can list available versions using ls-remote:
And then in any new shell just use the installed version:
Or you can just run it:
Or, you can run any arbitrary command in a subshell with the desired version of node:
nvm exec 4.2 node --version
You can also get the path to the executable to where it was installed:
In place of a version pointer like «14.7» or «16.3» or «12.22.1», you can use the following special default aliases with nvm install, nvm use, nvm run, nvm exec, nvm which, etc:
node: this installs the latest version ofnodeiojs: this installs the latest version ofio.jsstable: this alias is deprecated, and only truly applies tonodev0.12and earlier. Currently, this is an alias fornode.unstable: this alias points tonodev0.11— the last «unstable» node release, since post-1.0, all node versions are stable. (in SemVer, versions communicate breakage, not stability).
Long-term Support
Node has a schedule for long-term support (LTS) You can reference LTS versions in aliases and .nvmrc files with the notation lts/* for the latest LTS, and lts/argon for LTS releases from the «argon» line, for example. In addition, the following commands support LTS arguments:
nvm install --lts/nvm install --lts=argon/nvm install 'lts/*'/nvm install lts/argonnvm uninstall --lts/nvm uninstall --lts=argon/nvm uninstall 'lts/*'/nvm uninstall lts/argonnvm use --lts/nvm use --lts=argon/nvm use 'lts/*'/nvm use lts/argonnvm exec --lts/nvm exec --lts=argon/nvm exec 'lts/*'/nvm exec lts/argonnvm run --lts/nvm run --lts=argon/nvm run 'lts/*'/nvm run lts/argonnvm ls-remote --lts/nvm ls-remote --lts=argonnvm ls-remote 'lts/*'/nvm ls-remote lts/argonnvm version-remote --lts/nvm version-remote --lts=argon/nvm version-remote 'lts/*'/nvm version-remote lts/argon
Any time your local copy of nvm connects to https://nodejs.org, it will re-create the appropriate local aliases for all available LTS lines. These aliases (stored under $NVM_DIR/alias/lts), are managed by nvm, and you should not modify, remove, or create these files — expect your changes to be undone, and expect meddling with these files to cause bugs that will likely not be supported.
To get the latest LTS version of node and migrate your existing installed packages, use
nvm install 'lts/*' --reinstall-packages-from=current
Migrating Global Packages While Installing
If you want to install a new version of Node.js and migrate npm packages from a previous version:
nvm install node --reinstall-packages-from=node
This will first use «nvm version node» to identify the current version you’re migrating packages from. Then it resolves the new version to install from the remote server and installs it. Lastly, it runs «nvm reinstall-packages» to reinstall the npm packages from your prior version of Node to the new one.
You can also install and migrate npm packages from specific versions of Node like this:
nvm install 6 --reinstall-packages-from=5
nvm install v4.2 --reinstall-packages-from=iojs
Note that reinstalling packages explicitly does not update the npm version — this is to ensure that npm isn’t accidentally upgraded to a broken version for the new node version.
To update npm at the same time add the --latest-npm flag, like this:
nvm install 'lts/*' --reinstall-packages-from=default --latest-npm
or, you can at any time run the following command to get the latest supported npm version on the current node version:
If you’ve already gotten an error to the effect of «npm does not support Node.js», you’ll need to (1) revert to a previous node version (nvm ls & nvm use <your latest _working_ version from the ls>, (2) delete the newly created node version (nvm uninstall <your _broken_ version of node from the ls>), then (3) rerun your nvm install with the --latest-npm flag.
Default Global Packages From File While Installing
If you have a list of default packages you want installed every time you install a new version, we support that too — just add the package names, one per line, to the file $NVM_DIR/default-packages. You can add anything npm would accept as a package argument on the command line.
# $NVM_DIR/default-packages

rimraf
object-inspect@1.0.2
stevemao/left-pad
io.js
If you want to install io.js:
If you want to install a new version of io.js and migrate npm packages from a previous version:
nvm install iojs --reinstall-packages-from=iojs
The same guidelines mentioned for migrating npm packages in node are applicable to io.js.
System Version of Node
If you want to use the system-installed version of node, you can use the special default alias «system»:
nvm use system
nvm run system --version
Listing Versions
If you want to see what versions are installed:
If you want to see what versions are available to install:
Setting Custom Colors
You can set five colors that will be used to display version and alias information. These colors replace the default colors.
Initial colors are: g b y r e
Color codes:
r/R = red / bold red

g/G = green / bold green

b/B = blue / bold blue

c/C = cyan / bold cyan

m/M = magenta / bold magenta

y/Y = yellow / bold yellow

k/K = black / bold black

e/W = light grey / white
Persisting custom colors
If you want the custom colors to persist after terminating the shell, export the NVM_COLORS variable in your shell profile. For example, if you want to use cyan, magenta, green, bold red and bold yellow, add the following line:
export NVM_COLORS='cmgRY'
Suppressing colorized output
nvm help (or -h or --help), nvm ls, nvm ls-remote and nvm alias usually produce colorized output. You can disable colors with the --no-colors option (or by setting the environment variable TERM=dumb):
nvm ls --no-colors
nvm help --no-colors
TERM=dumb nvm ls
Restoring PATH
To restore your PATH, you can deactivate it:
Set default node version
To set a default Node version to be used in any new shell, use the alias ‘default’:
Use a mirror of node binaries
To use a mirror of the node binaries, set $NVM_NODEJS_ORG_MIRROR:
export NVM_NODEJS_ORG_MIRROR=https://nodejs.org/dist
nvm install node

NVM_NODEJS_ORG_MIRROR=https://nodejs.org/dist nvm install 4.2
To use a mirror of the io.js binaries, set $NVM_IOJS_ORG_MIRROR:
export NVM_IOJS_ORG_MIRROR=https://iojs.org/dist
nvm install iojs-v1.0.3

NVM_IOJS_ORG_MIRROR=https://iojs.org/dist nvm install iojs-v1.0.3
nvm use will not, by default, create a «current» symlink. Set $NVM_SYMLINK_CURRENT to «true» to enable this behavior, which is sometimes useful for IDEs. Note that using nvm in multiple shell tabs with this environment variable enabled can cause race conditions.
.nvmrc
You can create a .nvmrc file containing a node version number (or any other string that nvm understands; see nvm --help for details) in the project root directory (or any parent directory).
Afterwards, nvm use, nvm install, nvm exec, nvm run, and nvm which will use the version specified in the .nvmrc file if no version is supplied on the command line.
For example, to make nvm default to the latest 5.9 release, the latest LTS version, or the latest node version for the current directory:
$ echo "5.9" > .nvmrc

$ echo "lts/*" > .nvmrc # to default to the latest LTS version

$ echo "node" > .nvmrc # to default to the latest version
[NB these examples assume a POSIX-compliant shell version of echo. If you use a Windows cmd development environment, eg the .nvmrc file is used to configure a remote Linux deployment, then keep in mind the "s will be copied leading to an invalid file. Remove them.]
Then when you run nvm:
$ nvm use
Found '/path/to/project/.nvmrc' with version <5.9>
Now using node v5.9.1 (npm v3.7.3)
nvm use et. al. will traverse directory structure upwards from the current directory looking for the .nvmrc file. In other words, running nvm use et. al. in any subdirectory of a directory with an .nvmrc will result in that .nvmrc being utilized.
The contents of a .nvmrc file must be the <version> (as described by nvm --help) followed by a newline. No trailing spaces are allowed, and the trailing newline is required.
Deeper Shell Integration
You can use avn to deeply integrate into your shell and automatically invoke nvm when changing directories. avn is not supported by the nvm maintainers. Please report issues to the avn team.
If you prefer a lighter-weight solution, the recipes below have been contributed by nvm users. They are not supported by the nvm maintainers. We are, however, accepting pull requests for more examples.
bash
Automatically call nvm use
Put the following at the end of your $HOME/.bashrc:
cdnvm() {
    command cd "$@" || return $?
    nvm_path=$(nvm_find_up .nvmrc | tr -d 'n')

    # If there are no .nvmrc file, use the default nvm version
    if [[ ! $nvm_path = *[^[:space:]]* ]]; then

        declare default_version;
        default_version=$(nvm version default);

        # If there is no default version, set it to `node`
        # This will use the latest version on your machine
        if [[ $default_version == "N/A" ]]; then
            nvm alias default node;
            default_version=$(nvm version default);
        fi

        # If the current version is not the default version, set it to use the default version
        if [[ $(nvm current) != "$default_version" ]]; then
            nvm use default;
        fi

    elif [[ -s $nvm_path/.nvmrc && -r $nvm_path/.nvmrc ]]; then
        declare nvm_version
        nvm_version=$(<"$nvm_path"/.nvmrc)

        declare locally_resolved_nvm_version
        # `nvm ls` will check all locally-available versions
        # If there are multiple matching versions, take the latest one
        # Remove the `->` and `*` characters and spaces
        # `locally_resolved_nvm_version` will be `N/A` if no local versions are found
        locally_resolved_nvm_version=$(nvm ls --no-colors "$nvm_version" | tail -1 | tr -d '->*' | tr -d '[:space:]')

        # If it is not already installed, install it
        # `nvm install` will implicitly use the newly-installed version
        if [[ "$locally_resolved_nvm_version" == "N/A" ]]; then
            nvm install "$nvm_version";
        elif [[ $(nvm current) != "$locally_resolved_nvm_version" ]]; then
            nvm use "$nvm_version";
        fi
    fi
}
alias cd='cdnvm'
cd "$PWD"
This alias would search ‘up’ from your current directory in order to detect a .nvmrc file. If it finds it, it will switch to that version; if not, it will use the default version.
zsh
Calling nvm use automatically in a directory with a .nvmrc file
Put this into your $HOME/.zshrc to call nvm use automatically whenever you enter a directory that contains an
.nvmrc file with a string telling nvm which node to use:
# place this after nvm initialization!
autoload -U add-zsh-hook
load-nvmrc() {
  local nvmrc_path="$(nvm_find_nvmrc)"

  if [ -n "$nvmrc_path" ]; then
    local nvmrc_node_version=$(nvm version "$(cat "${nvmrc_path}")")

    if [ "$nvmrc_node_version" = "N/A" ]; then
      nvm install
    elif [ "$nvmrc_node_version" != "$(nvm version)" ]; then
      nvm use
    fi
  elif [ -n "$(PWD=$OLDPWD nvm_find_nvmrc)" ] && [ "$(nvm version)" != "$(nvm version default)" ]; then
    echo "Reverting to nvm default version"
    nvm use default
  fi
}
add-zsh-hook chpwd load-nvmrc
load-nvmrc
fish
Calling nvm use automatically in a directory with a .nvmrc file
This requires that you have bass installed.
# ~/.config/fish/functions/nvm.fish
function nvm
  bass source ~/.nvm/nvm.sh --no-use ';' nvm $argv
end

# ~/.config/fish/functions/nvm_find_nvmrc.fish
function nvm_find_nvmrc
  bass source ~/.nvm/nvm.sh --no-use ';' nvm_find_nvmrc
end

# ~/.config/fish/functions/load_nvm.fish
function load_nvm --on-variable="PWD"
  set -l default_node_version (nvm version default)
  set -l node_version (nvm version)
  set -l nvmrc_path (nvm_find_nvmrc)
  if test -n "$nvmrc_path"
    set -l nvmrc_node_version (nvm version (cat $nvmrc_path))
    if test "$nvmrc_node_version" = "N/A"
      nvm install (cat $nvmrc_path)
    else if test "$nvmrc_node_version" != "$node_version"
      nvm use $nvmrc_node_version
    end
  else if test "$node_version" != "$default_node_version"
    echo "Reverting to default Node version"
    nvm use default
  end
end

# ~/.config/fish/config.fish
# You must call it on initialization or listening to directory switching won't work
load_nvm > /dev/stderr
Running Tests
Tests are written in Urchin. Install Urchin (and other dependencies) like so:
There are slow tests and fast tests. The slow tests do things like install node
and check that the right versions are used. The fast tests fake this to test
things like aliases and uninstalling. From the root of the nvm git repository,
run the fast tests like this:
Run the slow tests like this:
Run all of the tests like this:
Nota bene: Avoid running nvm while the tests are running.
Environment variables
nvm exposes the following environment variables:
NVM_DIR— nvm’s installation directory.NVM_BIN— where node, npm, and global packages for the active version of node are installed.NVM_INC— node’s include file directory (useful for building C/C++ addons for node).NVM_CD_FLAGS— used to maintain compatibility with zsh.NVM_RC_VERSION— version from .nvmrc file if being used.
Additionally, nvm modifies PATH, and, if present, MANPATH and NODE_PATH when changing versions.
Bash Completion
To activate, you need to source bash_completion:
[[ -r $NVM_DIR/bash_completion ]] && . $NVM_DIR/bash_completion
Put the above sourcing line just below the sourcing line for nvm in your profile (.bashrc, .bash_profile).
Usage
nvm:
$ nvmTab
alias               deactivate          install             list-remote         reinstall-packages  uninstall           version
cache               exec                install-latest-npm  ls                  run                 unload              version-remote
current             help                list                ls-remote           unalias             use                 which
nvm alias:
$ nvm aliasTab
default iojs lts/* lts/argon lts/boron lts/carbon lts/dubnium lts/erbium node stable unstable
$ nvm alias my_aliasTab
v10.22.0 v12.18.3 v14.8.0
nvm use:
$ nvm useTab
my_alias default v10.22.0 v12.18.3 v14.8.0
nvm uninstall:
$ nvm uninstallTab
my_alias default v10.22.0 v12.18.3 v14.8.0
Compatibility Issues
nvm will encounter some issues if you have some non-default settings set. (see #606)
The following are known to cause issues:
Inside ~/.npmrc:
Environment Variables:
$NPM_CONFIG_PREFIX
$PREFIX
Shell settings:
Installing nvm on Alpine Linux
In order to provide the best performance (and other optimizations), nvm will download and install pre-compiled binaries for Node (and npm) when you run nvm install X. The Node project compiles, tests and hosts/provides these pre-compiled binaries which are built for mainstream/traditional Linux distributions (such as Debian, Ubuntu, CentOS, RedHat et al).
Alpine Linux, unlike mainstream/traditional Linux distributions, is based on BusyBox, a very compact (~5MB) Linux distribution. BusyBox (and thus Alpine Linux) uses a different C/C++ stack to most mainstream/traditional Linux distributions — musl. This makes binary programs built for such mainstream/traditional incompatible with Alpine Linux, thus we cannot simply nvm install X on Alpine Linux and expect the downloaded binary to run correctly — you’ll likely see «…does not exist» errors if you try that.
There is a -s flag for nvm install which requests nvm download Node source and compile it locally.
If installing nvm on Alpine Linux is still what you want or need to do, you should be able to achieve this by running the following from you Alpine Linux shell, depending on which version you are using:
Alpine Linux 3.13+
apk add -U curl bash ca-certificates openssl ncurses coreutils python3 make gcc g++ libgcc linux-headers grep util-linux binutils findutils
curl -o- https://raw.githubusercontent.com/nvm-sh/nvm/v0.39.3/install.sh | bash
Alpine Linux 3.5 — 3.12
apk add -U curl bash ca-certificates openssl ncurses coreutils python2 make gcc g++ libgcc linux-headers grep util-linux binutils findutils
curl -o- https://raw.githubusercontent.com/nvm-sh/nvm/v0.39.3/install.sh | bash
Note: Alpine 3.5 can only install NodeJS versions up to v6.9.5, Alpine 3.6 can only install versions up to v6.10.3, Alpine 3.7 installs versions up to v8.9.3, Alpine 3.8 installs versions up to v8.14.0, Alpine 3.9 installs versions up to v10.19.0, Alpine 3.10 installs versions up to v10.24.1, Alpine 3.11 installs versions up to v12.22.6, Alpine 3.12 installs versions up to v12.22.12, Alpine 3.13 & 3.14 install versions up to v14.20.0, Alpine 3.15 & 3.16 install versions up to v16.16.0 (These are all versions on the main branch). Alpine 3.5 — 3.12 required the package python2 to build NodeJS, as they are older versions to build. Alpine 3.13+ requires python3 to successfully build newer NodeJS versions, but you can use python2 with Alpine 3.13+ if you need to build versions of node supported in Alpine 3.5 — 3.15, you just need to specify what version of NodeJS you need to install in the package install script.
The Node project has some desire but no concrete plans (due to the overheads of building, testing and support) to offer Alpine-compatible binaries.
As a potential alternative, @mhart (a Node contributor) has some Docker images for Alpine Linux with Node and optionally, npm, pre-installed.
Uninstalling / Removal
Manual Uninstall
To remove nvm manually, execute the following:
Edit ~/.bashrc (or other shell resource config) and remove the lines below:
export NVM_DIR="$HOME/.nvm"
[ -s "$NVM_DIR/nvm.sh" ] && . "$NVM_DIR/nvm.sh" # This loads nvm
[[ -r $NVM_DIR/bash_completion ]] && . $NVM_DIR/bash_completion
Docker For Development Environment
To make the development and testing work easier, we have a Dockerfile for development usage, which is based on Ubuntu 18.04 base image, prepared with essential and useful tools for nvm development, to build the docker image of the environment, run the docker command at the root of nvm repository:
$ docker build -t nvm-dev .
This will package your current nvm repository with our pre-defined development environment into a docker image named nvm-dev, once it’s built with success, validate your image via docker images:
$ docker images

REPOSITORY         TAG                 IMAGE ID            CREATED             SIZE
nvm-dev            latest              9ca4c57a97d8        7 days ago          650 MB
If you got no error message, now you can easily involve in:
$ docker run -h nvm-dev -it nvm-dev

nvm@nvm-dev:~/.nvm$
Please note that it’ll take about 8 minutes to build the image and the image size would be about 650MB, so it’s not suitable for production usage.
For more information and documentation about docker, please refer to its official website:
- https://www.docker.com/
- https://docs.docker.com/
Problems
-
If you try to install a node version and the installation fails, be sure to run
nvm cache clearto delete cached node downloads, or you might get an error like the following:curl: (33) HTTP server doesn’t seem to support byte ranges. Cannot resume.
-
Where’s my
sudo node? Check out #43 -
After the v0.8.6 release of node, nvm tries to install from binary packages. But in some systems, the official binary packages don’t work due to incompatibility of shared libs. In such cases, use
-soption to force install from source:
- If setting the
defaultalias does not establish the node version in new shells (i.e.nvm currentyieldssystem), ensure that the system’s nodePATHis set before thenvm.shsource line in your shell profile (see #658)
macOS Troubleshooting
nvm node version not found in vim shell
If you set node version to a version other than your system node version nvm use 6.2.1 and open vim and run :!node -v you should see v6.2.1 if you see your system version v0.12.7. You need to run:
sudo chmod ugo-x /usr/libexec/path_helper
More on this issue in dotphiles/dotzsh.
nvm is not compatible with the npm config «prefix» option
Some solutions for this issue can be found here
There is one more edge case causing this issue, and that’s a mismatch between the $HOME path and the user’s home directory’s actual name.
You have to make sure that the user directory name in $HOME and the user directory name you’d see from running ls /Users/ are capitalized the same way (See this issue).
To change the user directory and/or account name follow the instructions here
Homebrew makes zsh directories unsecure
zsh compinit: insecure directories, run compaudit for list.
Ignore insecure directories and continue [y] or abort compinit [n]? y
Homebrew causes insecure directories like /usr/local/share/zsh/site-functions and /usr/local/share/zsh. This is not an nvm problem — it is a homebrew problem. Refer here for some solutions related to the issue.
Macs with M1 chip
Experimental support for the M1 architecture was added in node.js v15.3 and full support was added in v16.0.
Because of this, if you try to install older versions of node as usual, you will probably experience either compilation errors when installing node or out-of-memory errors while running your code.
So, if you want to run a version prior to v16.0 on an M1 Mac, it may be best to compile node targeting the x86_64 Intel architecture so that Rosetta 2 can translate the x86_64 processor instructions to ARM-based Apple Silicon instructions.
Here’s what you will need to do:
-
Install Rosetta, if you haven’t already done so
$ softwareupdate --install-rosetta
You might wonder, «how will my M1 Mac know to use Rosetta for a version of node compiled for an Intel chip?».
If an executable contains only Intel instructions, macOS will automatically use Rosetta to translate the instructions. -
Open a shell that’s running using Rosetta
Note: This same thing can also be accomplished by finding the Terminal or iTerm App in Finder, right clicking, selecting «Get Info», and then checking the box labeled «Open using Rosetta».
Note: This terminal session is now running in
zsh.
Ifzshis not the shell you typically use,nvmmay not besource‘d automatically like it probably is for your usual shell through your dotfiles.
If that’s the case, make sure to sourcenvm.$ source "${NVM_DIR}/nvm.sh"
-
Install whatever older version of node you are interested in. Let’s use 12.22.1 as an example.
This will fetch the node source code and compile it, which will take several minutes.$ nvm install v12.22.1 --shared-zlib
Note: You’re probably curious why
--shared-zlibis included.
There’s a bug in recent versions of Apple’s systemclangcompiler.
If one of these broken versions is installed on your system, the above step will likely still succeed even if you didn’t include the--shared-zlibflag.
However, later, when you attempt tonpm installsomething using your old version of node.js, you will seeincorrect data checkerrors.
If you want to avoid the possible hassle of dealing with this, include that flag.
For more details, see this issue and this comment -
Exit back to your native shell.
Note: If you selected the box labeled «Open using Rosetta» rather than running the CLI command in the second step, you will see
i386here.
Unless you have another reason to have that box selected, you can deselect it now. -
Check to make sure the architecture is correct.
x64is the abbreviation forx86_64, which is what you want to see.$ node -p process.arch x64
Now you should be able to use node as usual.
WSL Troubleshooting
If you’ve encountered this error on WSL-2:
curl -o- https://raw.githubusercontent.com/nvm-sh/nvm/v0.39.3/install.sh | bash
% Total    % Received % Xferd  Average Speed   Time    Time     Time  Current
                                Dload  Upload  Total   Spent    Left  Speed
0     0    0     0    0     0      0      0 --:--:--  0:00:09 --:--:--     0curl: (6) Could not resolve host: raw.githubusercontent.com
It may be due to your antivirus, VPN, or other reasons.
Where you can ping 8.8.8.8 while you can’t ping google.com
This could simply be solved by running this in your root directory:
sudo rm /etc/resolv.conf
sudo bash -c 'echo "nameserver 8.8.8.8" > /etc/resolv.conf'
sudo bash -c 'echo "[network]" > /etc/wsl.conf'
sudo bash -c 'echo "generateResolvConf = false" >> /etc/wsl.conf'
sudo chattr +i /etc/resolv.conf
This deletes your resolve.conf file thats automatically generated when u run WSL, creates a new file and puts nameserver 8.8.8.8, then creates a wsl.conf file and adds [network] and generateResolveConf = false to prevent auto generation of that file.
You can check the contents of the file by running:
Maintainers
Currently, the sole maintainer is @ljharb — more maintainers are quite welcome, and we hope to add folks to the team over time. Governance will be re-evaluated as the project evolves.
License
See LICENSE.md.
Copyright notice
Copyright OpenJS Foundation and nvm contributors. All rights reserved. The OpenJS Foundation has registered trademarks and uses trademarks. For a list of trademarks of the OpenJS Foundation, please see our Trademark Policy and Trademark List. Node.js is a trademark of Joyent, Inc. and is used with its permission. Trademarks and logos not indicated on the list of OpenJS Foundation trademarks are trademarks™ or registered® trademarks of their respective holders. Use of them does not imply any affiliation with or endorsement by them.
The OpenJS Foundation | Terms of Use | Privacy Policy | OpenJS Foundation Bylaws | Trademark Policy | Trademark List | Cookie Policy
Один из простейших путей как установить Node.Js это пойти на официальный сайт, скачать установочный файл и установить его. Позже разработчики столкнулись с ситуацией, когда им нужно сменить версию Node.js на другую или обновить текущую версию.
Это все еще возможно — установить другую версию с официального сайта, но как много нод уже установлено в системе?
Может быть это хорошее время для удаления их всех и настроить возможность системе переключаться между нодами за секунды, всегда зная количество установленных версий и иметь возможность удалить любые из них одной простой командой.
Как удалить Node.Js с Mac OS
Обо всем по порядку, мы должны удалить старые версии ноды и все связанное с этим. Вы счастливчик, если вы установили прошлые версии с помощью Homebrew. Метод Homebrew это один из простейших вариантов для установки и удаления ноды на маке.
brew uninstall —force node
Напишите эту команду в терминале. Brew удалит все установленные версии Node.Js
После этого, лучше всего, запустить brew cleanup, это удалит все неиспользуемые зависимости и папки.
brew cleanup
Если ваша Node.js была установлена по другому, это не проблема. Вы можете удалить вручную. Есть куча папок, они могут быть удалены одна за одной через файндер или терминал.
Список папок, где находятся Node.js и npm
- node и/или node_modules в папке /usr/local/lib
- node и/или node_modules в папке /usr/local/include
- node, node-debug, и node-gyp в /usr/local/bin
- .npmrc в вашей домашней директории (Это настройки npm, не удаляйте этот файл, если хотите далее переустановить Node.js)
- .npm в вашей домашней директории
- .node-gyp в вашей домашней директории
- .node_repl_history в вашей домашней директории
- node* в /usr/local/share/man/man1/
- npm* в /usr/local/share/man/man1/
- node.d в /usr/local/lib/dtrace/
- node в /opt/local/bin/
- node в /opt/local/include/
- node_modules в /opt/local/lib/
- node в /usr/local/share/doc/
- node.stp в /usr/local/share/systemtap/tapset/
В случае, если вы не хотите вручную искать и удалять все эти папки и файлы, вы можете ввести одну простую команду в терминал:
sudo rm -rf /usr/local/{lib/node{,/.npm,_modules},bin,share/man}/{npm*,node*,man1/node*}
Эта команда не трогает вашу домашнюю директорию, так что в дальнейшем вы можете сами решить, что делать с сохранившимися файлами.
Сейчас мы можем удалить все глобальные пакеты, установленные с npm
rm -rf ~/.npm
После всех этих команд, Node.js и npm будут полностью удалены с вашего компьютера.
Как установить Node.js на Mac OS
После очистки, мы можем продолжить с установкой новой версии Node.js. Но мы сделаем это не прямым путем. Потому что если мы сделаем это по обычному, мы все еще будем иметь ту же проблему с кучей версий в будущем.
У данного скрипта есть единственная зависимость — установленная Command Line Tools. Если у вас все еще это не установлено, вы должны запустит команду в терминале:
xcode-select —install
Итак, мы готовы установить NVM. Простейший путь это сделать — .sh скрипт.
Скачать и установить данный скрипт мы можем с помощью следующей команды:
curl -o- https://raw.githubusercontent.com/nvm-sh/nvm/v0.37.2/install.sh | bash
0.37.2 — последняя версия на день написания статьи. Версия может быть проверена на странице NVM в GitHub
Конечно, это может быть установлено вручную. Вы нужно склонировать репозиторий и добавить необходимы файлы в PATH. Детальная инструкция описана в NVM ReadMe. Это будет полезно если вам нужно использовать NVM в CI пайплайн. Я бы рекомендовал добавить NVM в Docker image, который использует ваш пайплайн.
Не забудьте перезапустить окно терминала для обновления переменных окружения
Мы почти закончили. Сейчас мы легко можем установить любую версию Node.js. Для примера, эта команда установит самую свежую версию:
nvm install node
Если вы хотите установит LTS версию, но с последней версией npm, сделайте следующее:
nvm install —lts —latest-npm
Используя флаги, вроде —lts вы можете использовать любую версию.
nvm install 8.9.1 # or 10.10.0, 12, etc
Для того, что бы увидеть список установленных версий, вам нужно запустить команду:
nvm list
После установки, вам нужно выбрать дефолтную версию для вашей системы:
nvm use —lts
Что о пользователях Windows?
Для windows доступен похожий скрипт: Node Version Manager (nvm) for Windows. Это другой проект, который делает то же самое. Вы так-же можете устанавливать/удалять/выводить список и переключать любые версии Node.js
Итоги
С NVM вы получаете:
- Простую установку/удаление любой версии Node.js
- Лучший скрипт для переключения между нодами.
- Удаление такое же простое, как и установка
Вы почувствуете это в будущем, особенно, когда в следующий раз будете обновлять свою Node.js.
Спасибо за прочтение!
Переведено: Голдобин Антон
All Platforms (Mac, Linux & Windows) 2023
If you just need to upgrade your old version of Node.js to the latest one and don’t need multiple versions, simply over-write your existing executable with the new one.
Download the Latest Node.js from nodejs.org/en/download

This Just Works! TM on all platforms and is the easiest/fastest method.
When you run node -v in your terminal you will see the the latest version.
Mac
If you originally installed Node.js using brew then run:
brew upgrade node
Managing Multiple Versions of Node.js:
If you need to run multiple versions of Node.js on your machine e.g. if you have an older project that targets a specific version on AWS Lambda, then NVM (Node Version Manger) is your friend!
Step 1 — Get NVM
curl -o- https://raw.githubusercontent.com/nvm-sh/nvm/v0.39.1/install.sh | bash
If you’re curious about the installation command read the source code
… its been reviewed by several node.js security experts
Step 2 — Install the version of node.js you need
Once you’ve got NVM you can install a specific version of Node.js using the nvm command:
nvm install v18.12.1
Note: you may need to close & re-open your terminal window for nvm command to be available.
You should expect to see something like this in your terminal:
Now using node v18.12.1
You now have the latest Node.js on your machine.
And if you need to temporarily switch to a different/previous version, you can do it with a simple nvm command.
Note: avoid using
sudowith Node/NPM as it violates the security principal of least privilege
NVM is considered «better» than N for managing multiple Node.js versions because the verbose commands mean it is much easier to keep track of what you are doing in your Terminal/SSH Log. It is used by the team at NPM the creators/custodians of the Node.js World!
All Platforms (Mac, Linux & Windows) 2023
If you just need to upgrade your old version of Node.js to the latest one and don’t need multiple versions, simply over-write your existing executable with the new one.
Download the Latest Node.js from nodejs.org/en/download
This Just Works! TM on all platforms and is the easiest/fastest method.
When you run node -v in your terminal you will see the the latest version.
Mac
If you originally installed Node.js using brew then run:
brew upgrade node
Managing Multiple Versions of Node.js:
If you need to run multiple versions of Node.js on your machine e.g. if you have an older project that targets a specific version on AWS Lambda, then NVM (Node Version Manger) is your friend!
Step 1 — Get NVM
curl -o- https://raw.githubusercontent.com/nvm-sh/nvm/v0.39.1/install.sh | bash
If you’re curious about the installation command read the source code
… its been reviewed by several node.js security experts
Step 2 — Install the version of node.js you need
Once you’ve got NVM you can install a specific version of Node.js using the nvm command:
nvm install v18.12.1
Note: you may need to close & re-open your terminal window for nvm command to be available.
You should expect to see something like this in your terminal:
Now using node v18.12.1
You now have the latest Node.js on your machine.
And if you need to temporarily switch to a different/previous version, you can do it with a simple nvm command.
Note: avoid using
sudowith Node/NPM as it violates the security principal of least privilege
NVM is considered «better» than N for managing multiple Node.js versions because the verbose commands mean it is much easier to keep track of what you are doing in your Terminal/SSH Log. It is used by the team at NPM the creators/custodians of the Node.js World!
Introduction
Node.js is an open-source JavaScript runtime environment. Since Node.js has an active community of users, minor updates of the software come out every few weeks.
You may be using Node.js as a layer of the MEAN stack or in a different JS framework. Either way, make sure to update Node.js regularly to ensure system security.
There are several ways to install Node.js and NPM. Likewise, there are several ways to update your Node.js version, depending on the operating system running on your machine.
In this article, you will learn how to update to the latest Node.js version on Linux, Windows, and macOS.
3 Ways to Update Node.js to Latest Version on Linux Systems
There are different ways to update Node.js if you are using a Linux-based system. Although using the Node Version Manager is the easiest and most recommended option, you can also update with the local package manager or by downloading the binary packages.
Option 1: Update Node.js with NVM (Node Version Manager)
The best way to upgrade Node.js is with NVM, a practical tool for managing multiple Node.js versions.
1. Start by updating the package repository with the command:
sudo apt update2. Install NVM using the curl command:
curl -o- https://raw.githubusercontent.com/nvm-sh/nvm/v0.38.0/install.sh | bashNote: If you don’t have curl, install the utility by running the command: sudo apt install curl.
Alternatively, you use wget and run the command:
wget -q0- https://raw.githubusercontent.com/nvm-sh/nvm/v0.38.0/install.sh | bash3. Close and reopen the terminal for system to recognize the changes or run the command:
source ~/.bashrc5. Then, verify if you have successfully installed NVM:
nvm --version
6. Before upgrading Node.js, check which version you have running on the system:
nvm ls7. Now you can check for newly available releases with:
nvm ls-remote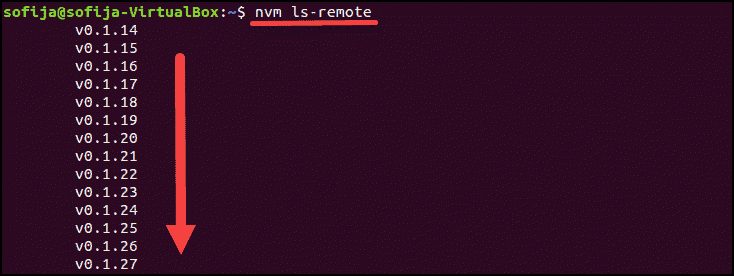
8. To install the latest version, use the nvm command with the specific Node.js version:
nvm install [version.number]Option 2: Update Node.js with NPM (Node Package Manager)
As an alternative, you can use Node’s official package manager to update Node.js. NPM is a tool for installing and managing package dependencies.
If you have Node on your system, you have NPM, as well. With the npm command, you can check running Node.js versions and install the latest release.
By adding the n module, you can interactively manage Node.js versions.
1. First, clear the npm cache:
npm cache clean -f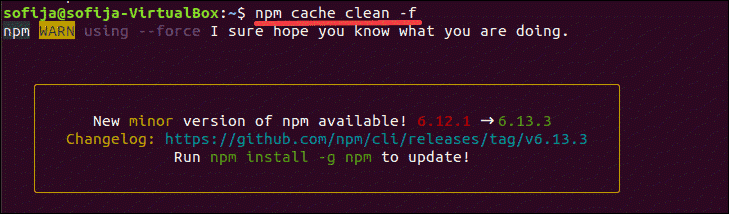
2. Install n, Node’s version manager:
npm install -g n
3. With the n module installed, you can use it to:
Install the latest stable version:
sudo n stable
Note: Some Ubuntu distros may respond with the command not found output after running the n command. To fix this issue run sudo -E env "PATH=$PATH" [command]. For example, to install the latest stable version, as in the example above, you would run sudo -E env "PATH=$PATH" n stable.
Install the latest release:
sudo n latest
Install a specific version:
sudo n [version.number]
Option 3: Update Node.js with Binary Packages
Updating Node.js with binary packages is the least recommended option. However, if it is the only way you can upgrade to the latest Node.js version, follow the steps outlined below.
1. Navigate to Node’s official downloads page where you can find all available packages. There you can download the source code or pre-built installer for the LTS versions or the latest release.
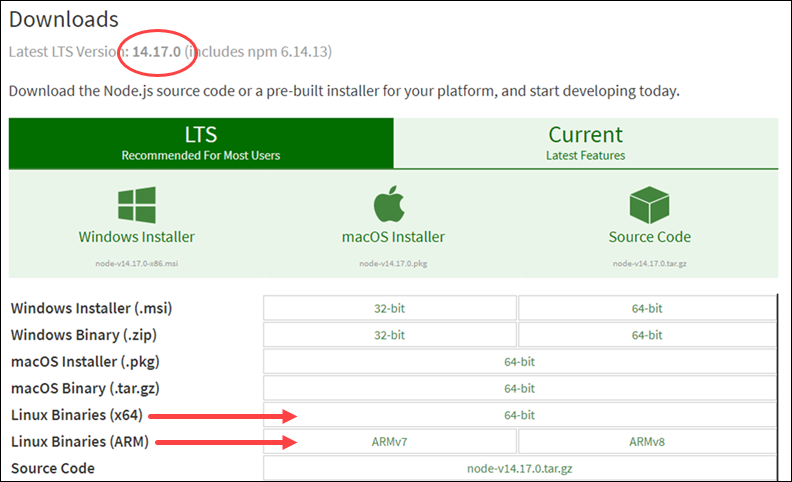
2. You can either download the package from your browser or find the version number you need and add it to the wget command:
wget https://nodejs.org/dist/v14.17.0/node-v14.17.0-linux-x64.tar.xz3. Next, install xz-utils used to extract the binary package:
sudo apt-get install xz-utils4. Extract and install the package with the command:
sudo tar -C /usr/local --strip-components 1 -xJf node-v14.17.0-linux-x64.tar.xzUpdating Node.js on Windows and macOS follows the same principles.
There are two simple ways to upgrade:
- Download the latest Node.js release from its official download page and install the new Node.js release.
- Install the n module and update Node.js inside the terminal window.
Option 1: Update Node.js on Windows and macOS with Installer
One way to update your Node.js is to go to its official download page and install the newest release. Bz doing so, the system should overwrite the older version with the updated one.
1. Navigate to the Node.js website and click on the latest stable version or the newest current release (with the latest features).
2. After deciding the version, click on the Windows or the macOS Installer, depending on the system you are using. The system downloads the package and stores it in the specified directory.
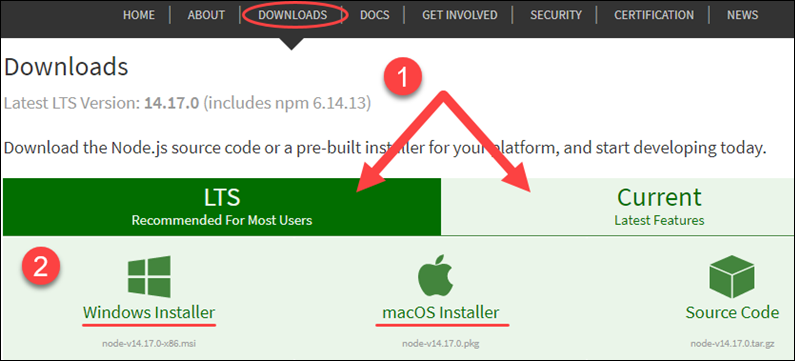
3. Once the download is complete, run the installer.
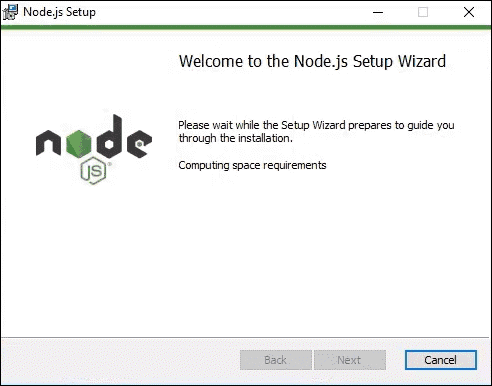
4. The Node.js Setup Wizard appears and guides you through the installation.
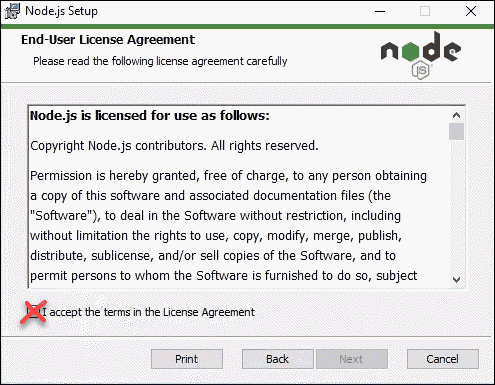
5. Accept the License Agreement by checking the box and click Next.
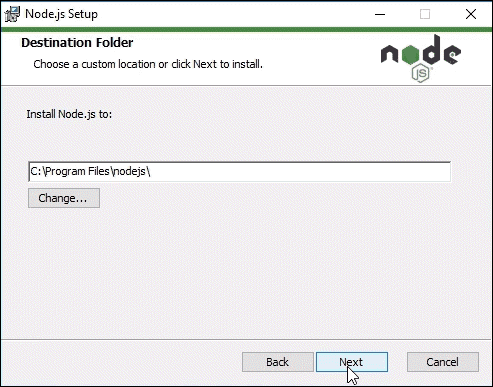
6. Choose the destination folder where you want to install Node.js.
7. Node.js allows you to select how you want to install the Node features. Change the way the features are installed by clicking on the icons in the tree.
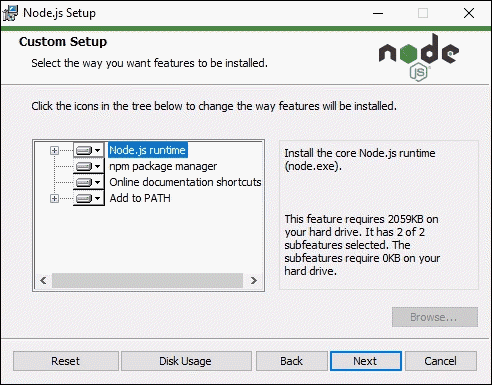
8. With that, the latest Node.js is ready to install. Click Install to confirm, wait until the installation completes, and click Finish.
9. Check the Node.js version with the command:
node -vNote: Sometimes, the system fails to overwrite the older Node.js release and you may end up with two versions. If such problems occur, you may want to consider updating with NPM, outlined in the section below.
Option 2: Update Node.js on Windows and macOS with NPM
If you want to upgrade Node.js from the command line, use the n model within the npm command. The n feature allows you to interact with different Node.js versions.
1. Before updating the Node.js release, check which version you are currently using with:
node -v2. Next, clear npm cache with the command:
npm cache clean -f3. Install n globally:
npm install -g n4. Now that you have n installed, you can use the module to install the latest stable release of Node.js:
sudo n stableAlternatively, you can install the Node.js release with the latest features:
sudo n latestOr, install a specific version number with:
n [version.number]Conclusion
The best part of open-source technology is its strong community of users constantly working on upgrading the software.
Node.js is a good example of such software as new versions come out regularly. Users can choose whether they want to work with the LTS (the long-term supported version) or the latest version with the newest features.
This article should have helped you update Node.js on any operating system.