
Curl (client URL) — это инструмент командной строки на основе библиотеки libcurl для передачи данных с сервера и на сервер при помощи различных протоколов, в том числе HTTP, HTTPS, FTP, FTPS, IMAP, IMAPS, POP3, POP3S, SMTP и SMTPS. Он очень популярен в сфере автоматизации и скриптов благодаря широкому диапазону функций и поддерживаемых протоколов. В этой статье мы расскажем, как использовать curl в Windows на различных примерах.
▍ Установка в Windows
Во всех современных версиях Windows, начиная с Windows 10 (версия 1803) и Server 2019, исполняемый файл curl поставляется в комплекте, поэтому ручная установка не требуется. Чтобы определить местоположение curl и его версию в системе, можно использовать следующие команды:
where curl
curl --version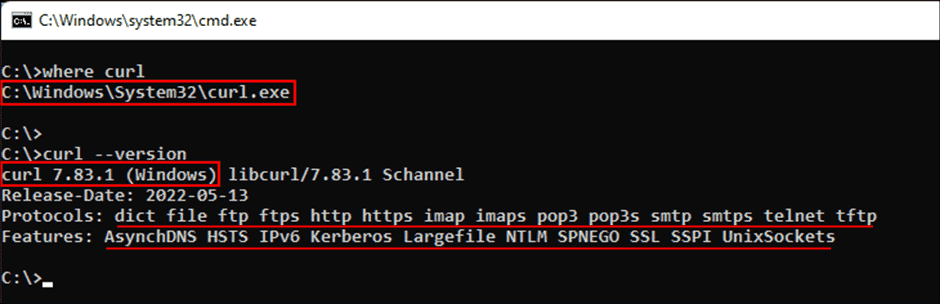
Определение местоположения и версии curl в Windows
Команда curl —version также выводит список протоколов и функций, поддерживаемых текущей версией curl. Как видно из показанного выше скриншота, к использованию встроенной утилиты curl всё готово. Если вместо этого отображается сообщение об ошибке, curl может быть недоступен потому, что вы используете более раннюю версию Windows (например, Windows 8.1 или Server 2016). В таком случае вам потребуется установить curl в Windows вручную.
▍ Синтаксис curl
Команда curl использует следующий синтаксис:
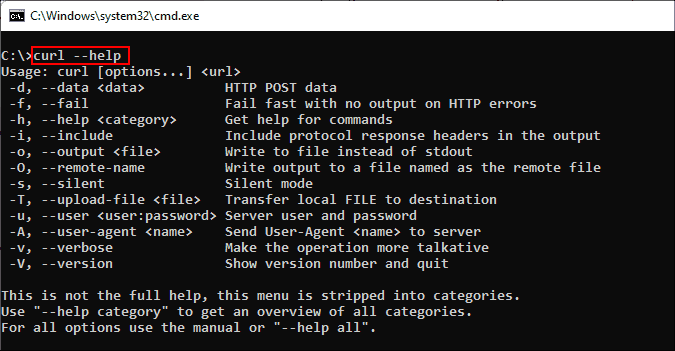
curl [options...] [url]Инструмент поддерживает различные опции, которые мы рассмотрим ниже. Как и в любом инструменте командной строки, вы можете использовать для получения справки команду curl —help.
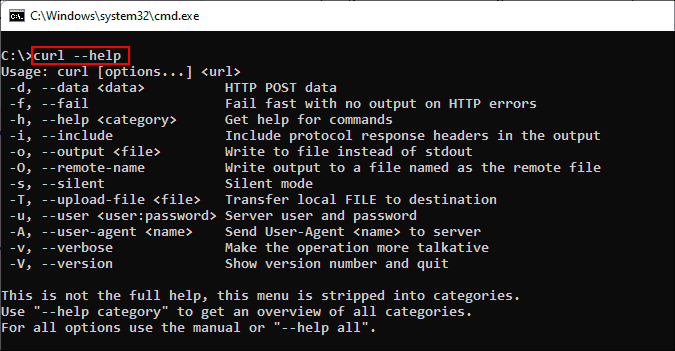
Получение справки при помощи команды curl
Для получения подробной справки можно использовать команду curl —help all. Справка разделена на категории, поэтому при помощи curl —help category можно просмотреть все темы.
Ознакомившись с синтаксисом curl, давайте рассмотрим различные способы применения этого инструмента на примерах.
▍ HTTP-запрос GET
При использовании curl с URL и без указания опций запрос по умолчанию использует метод GET протокола HTTP. Попробуйте выполнить такую команду:
curl https://4sysops.comПриведённая выше команда по сути эквивалентна curl —request GET 4sysops.com, отправляющей запрос GET к 4sysops.com по протоколу HTTPS. Чтобы указать версию протокола HTTP (например, http/2), используйте опцию —http2:
curl --http2 https://4sysops.comВ случае URL, начинающихся с HTTPS, curl сначала пытается установить соединение http/2 и автоматически откатывается к http/1.1, если это не удаётся. Также он поддерживает другие методы, например, HEAD, POST, PUT и DELETE. Для использования этих методов вместе с командой curl нужно указать опцию —request (или -X), за которой следует указание метода. Стоит заметить, что список доступных методов зависит от используемого протокола.
▍ Получение информации об удалённом файле
Если вы администратор, то иногда вам могут быть интересны только заголовки HTTP. Их можно получить при помощи опции —head (или -I). Иногда URL может перенаправлять пользователя в другую точку. В таком случае опция —location (или -L) позволяет curl выполнять перенаправления. Также можно использовать —insecure (или -k), чтобы разрешить незащищённые подключения и избежать ошибок с сертификатом TLS в случае, если целевой URL использует самоподписанный сертификат. Пользуйтесь этой опцией только при абсолютной необходимости. Все эти три опции можно скомбинировать в одну краткую запись, как показано в следующей команде:
curl -kIL 4sysops.com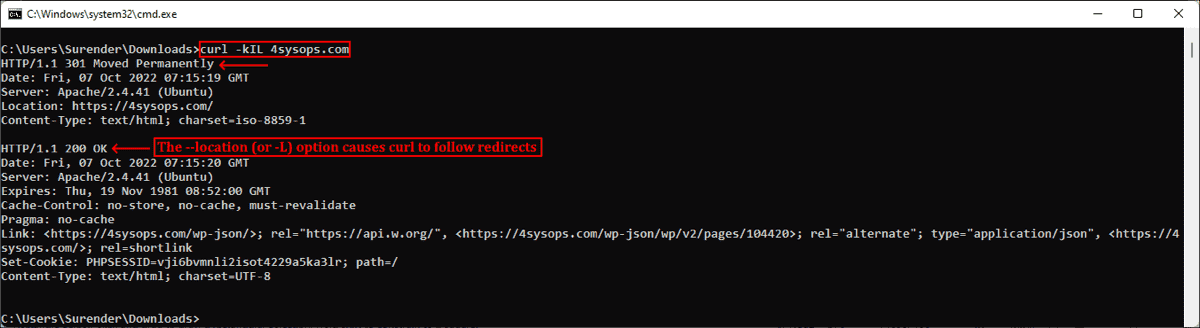
Опции просмотра заголовков запросов, включения незащищённого соединения и использования перенаправлений
Как можно заметить, такая краткая запись особенно полезна для комбинирования нескольких опций. Приведённая выше команда по сути эквивалентна команде curl —insecure —head —location 4sysops.com.
Опция —head (или -I) также даёт основную информацию об удалённом файле без его скачивания. Как показано на скриншоте ниже, при использовании curl с URL удалённого файла он отображает различные заголовки, дающие информацию об удалённом файле.
curl -IL https://curl.se/windows/dl-7.85.0_5/curl-7.85.0_5-win64-mingw.zip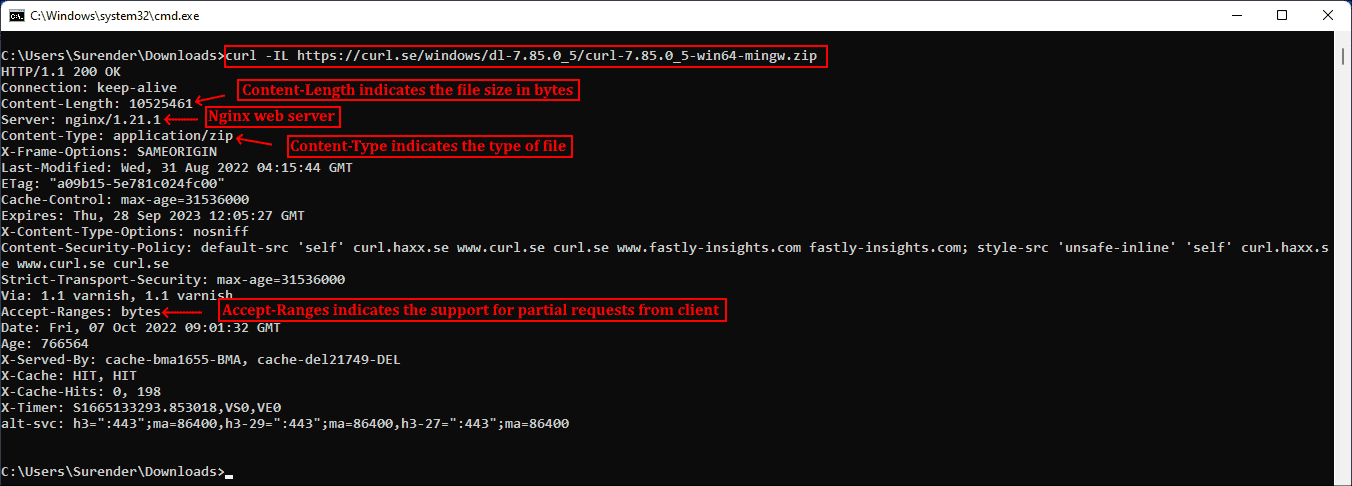
Использование curl для просмотра основной информации удалённых файлов
Заголовок Content-Length обозначает размер файла (в байтах), Content-Type сообщает о типе медиафайла (например, image/png, text/html), Server обозначает тип серверного приложения (Apache, Gunicorn и так далее), Last-Modified показывает дату последнего изменения файла на сервере, а заголовок Accept-Ranges обозначает поддержку частичных запросов для скачивания от клиента, что по сути определяет возможность продолжения прерванной загрузки.
▍ Скачивание файла
Для скачивания файла и сохранения с тем же именем, что и на сервере, можно использовать curl с опцией —remote-name (или -O). Показанная ниже команда скачивает последнюю версию curl для Windows с официального сайта:
curl -OL https://curl.se/windows/latest.cgi?p=win64-mingw.zip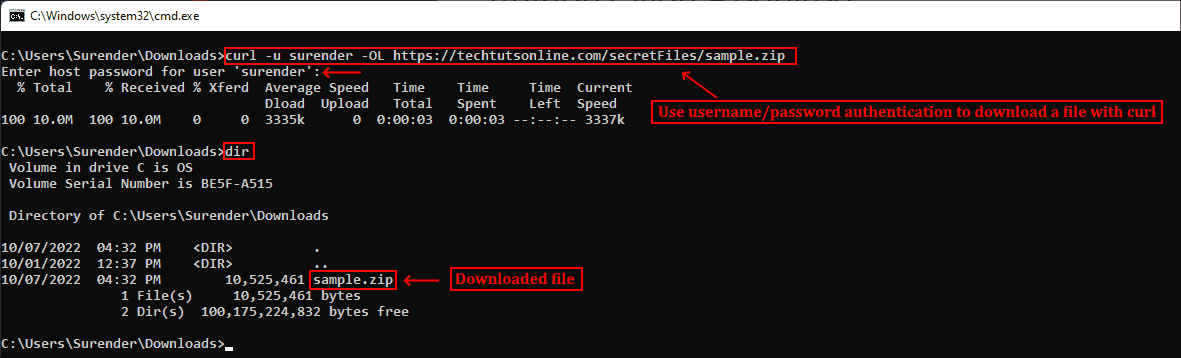
Скачивание файла с именем по умолчанию и индикатором прогресса
При необходимости для нахождения ресурса добавляется опция -L, разрешающая перенаправления. Если нужно сохранить файл с новым именем, используйте опцию —output (или -o). Кроме того, при использовании команды curl в скрипте может понадобиться отключить индикатор прогресса, что можно сделать при помощи опции —silent (или -s). Эти две опции можно скомбинировать:
curl -sLo curl.zip https://curl.se/windows/latest.cgi?p=win64-mingw.zip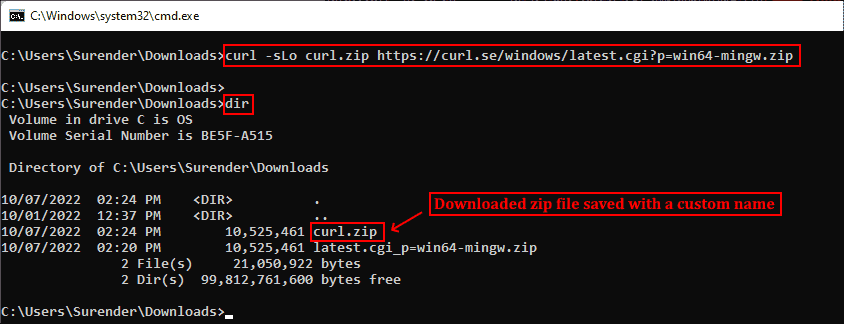
Скачивание файла без индикатора и сохранение под произвольным именем
▍ Продолжение прерванного скачивания
Наличие Accept-Ranges: bytes в заголовке ответа в буквальном смысле обозначает, что сервер поддерживает скачивания с возможностью продолжения. Чтобы продолжить прерванное скачивание, можно использовать опцию —continue-at (или -C), получающую смещение (в байтах). Обычно указывать смещение непросто, поэтому curl предоставляет простой способ продолжения прерванной загрузки:
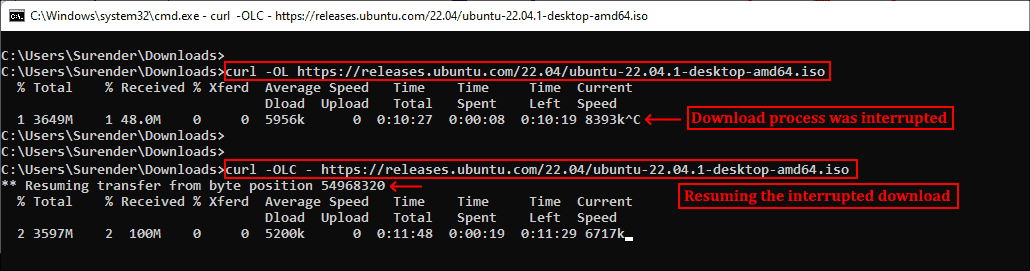
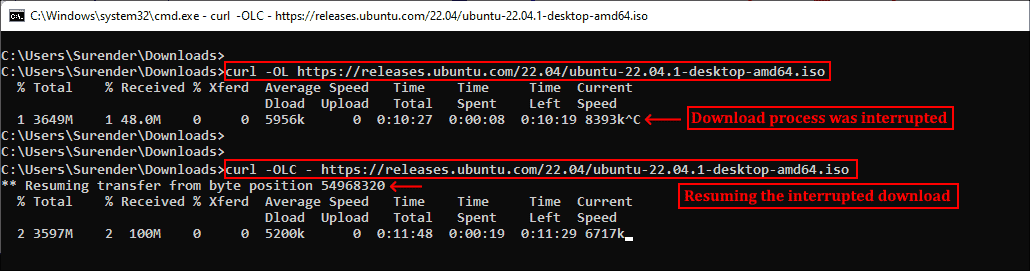
curl -OLC - https://releases.ubuntu.com/22.04/ubuntu-22.04.1-desktop-amd64.iso
Продолжение прерванного скачивания
Как видно из скриншота, я скачивал iso-файл Ubuntu, но скачивание было прервано. Затем я снова запустил команду curl с опцией -C, и передача продолжилась с того диапазона байтов, на котором была прервана. Знак минус (—) рядом с -C позволяет curl автоматически определить, как и где продолжить прерванное скачивание.
▍ Аутентификация с Curl
Также Curl поддерживает аутентификацию, что позволяет скачать защищённый файл, предоставив учётные данные при помощи опции —user (or -u), принимающей имя пользователя и пароль в формате username:password. Если не вводить пароль, curl попросит ввести его в режиме no-echo.
curl -u surender -OL https://techtutsonline.com/secretFiles/sample.zip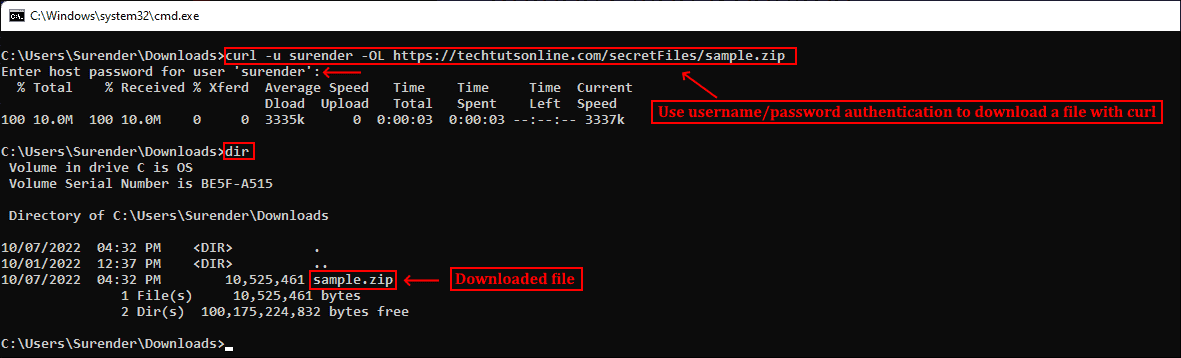
Скачивание файла с аутентификацией по имени пользователя и паролю
Если вы используете Basic authentication, то необходимо передать имя пользователя и пароль, а значит, воспользоваться защищённым протоколом наподобие HTTPS (вместо HTTP) или FTPS (вместо FTP). Если по каким-то причинам приходится использовать протокол без шифрования, то убедитесь, что вы используете способ аутентификации, не передающий учётные данные в виде простого текста (например, аутентификацию Digest, NTLM или Negotiate).
Также curl поддерживает использование файлов конфигурации .curlrc, _curlrc и .netrc, позволяющих задавать различные опции curl в файле, а затем добавлять файл в команду при помощи опции curl —config (или curl -K), что особенно полезно при написании скриптов.
▍ Выгрузка файла
Опция —upload-file (или -T) позволяет выгружать локальный файл на удалённый сервер. Показанная ниже команда выгружает файл из локальной системы на удалённый веб-сервер по протоколу FTPS:
curl -kT C:UsersSurenderDownloadssample1.zip -u testlabsurender ftps://192.168.0.80/awesomewebsite.com/files/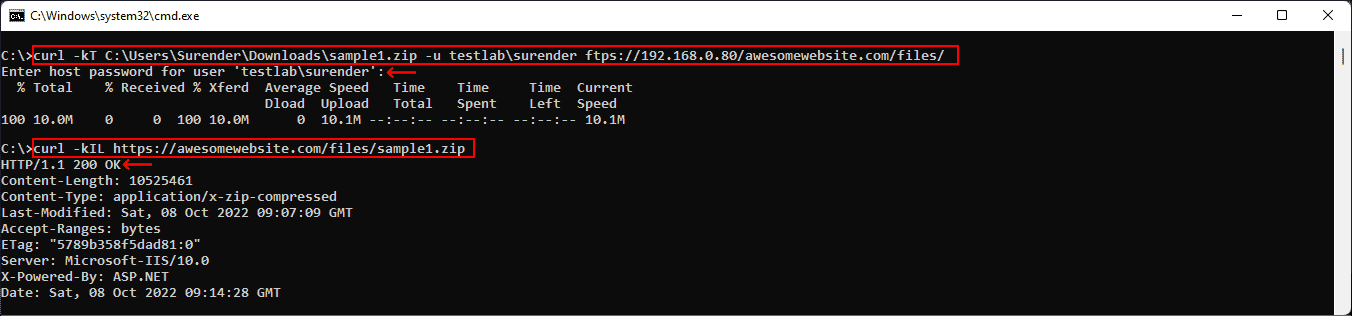
Выгрузка файла на удалённый сервер
Опция -k добавляется для устранения проблем с сертификатами на случай, если веб-сервер использует самоподписанный сертификат. Наклонная черта в конце URL сообщает curl, что конечная точка является папкой. Можно указать несколько имён файлов, например «{sample1.zip,sample2.zip}». Ниже показано, как с помощью одной команды curl можно выгрузить на сервер несколько файлов:
curl -kT sample[1-5].zip -u testlabsurender ftps://192.168.0.80/awesomewebsite.com/files/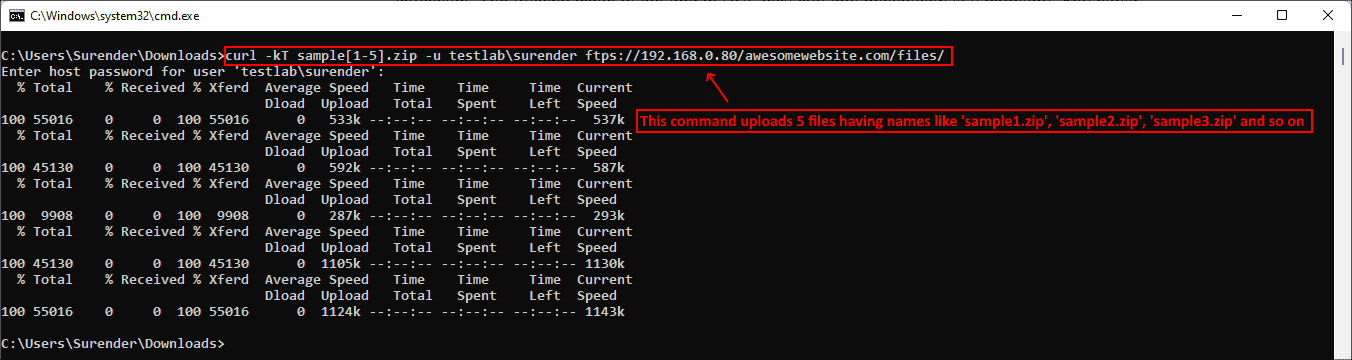
Выгрузка нескольких файлов на сервер
▍ Последовательность команд
Как говорилось ранее, curl поддерживает различные методы в зависимости от используемого протокола. Дополнительные команды можно отправлять при помощи —quote (или -Q) для выполнения операции до или после обычной операции curl. Например, можно скачать файл с удалённого сервера по протоколу FTPS и удалить файл с сервера после успешного скачивания. Для этого нужно выполнить следующую команду:
curl -u testlabsurender -kO "ftps://192.168.0.80/awesomewebsite.com/files/sample1.zip" -Q "-DELE sample1.zip"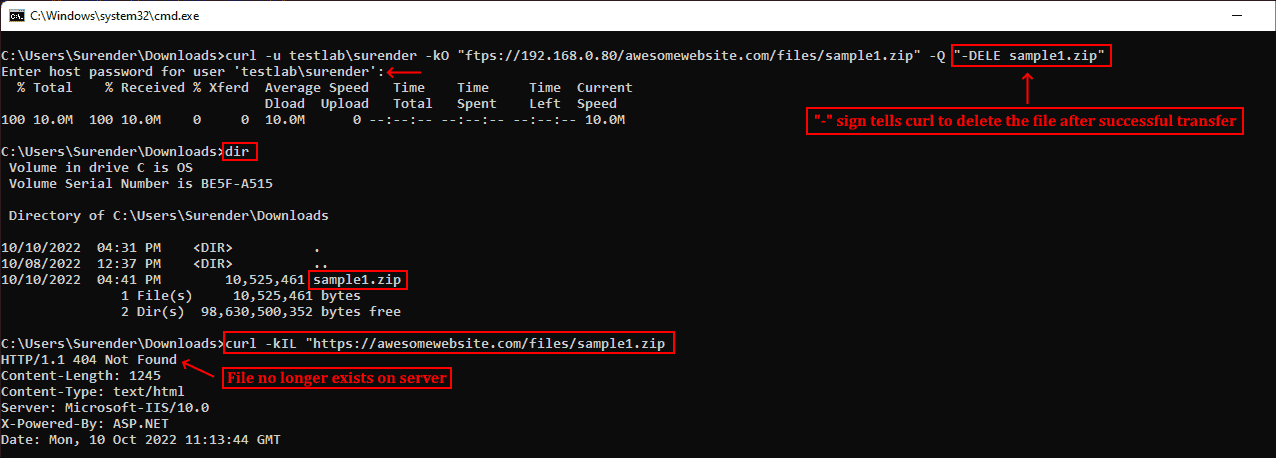
Удаление файла после успешного скачивания
В показанном выше примере я скачал файл sample1.zip с FTPS-сервера при помощи опции -O. После опции -Q я добавил минус (-) перед командой DELE, что заставляет curl отправить команду DELE sample1.zip сразу после успешного скачивания файла. Аналогично, если вы хотите отправить команду на сервер до выполнения операции curl, используйте плюс (+) вместо минуса.
▍ Изменение user-agent
Информация user-agent сообщает серверу тип клиента, отправляющего запрос. При отправке запроса curl на сервер по умолчанию используется user-agent curl/<version>. Если сервер настроен так, чтобы блокировать запросы curl, можно задать собственный user-agent при помощи опции —user-agent (или -A). Показанная ниже команда отправляет стандартный user-agent Google Chrome:
curl -kIA "Mozilla/5.0 (Windows NT 10.0; Win64; x64) AppleWebKit/537.36 (KHTML, like Gecko) Chrome/106.0.0.0" https://awesomewebsite.com/files/secretFile.zip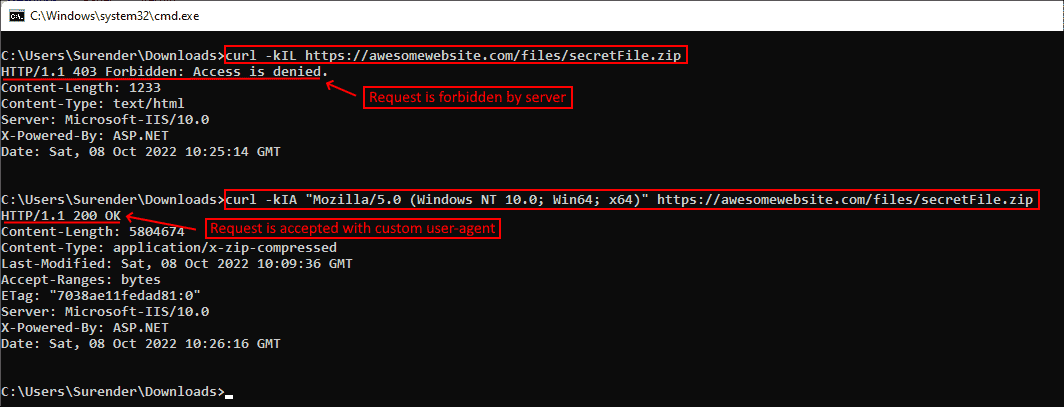
Использование собственного user-agent с командой curl, чтобы избежать блокировки сервером
На показанном выше скриншоте видно, что обычный запрос curl был отклонён веб-сервером (с ответом 403 Forbidden), но при передаче другого user-agent запрос выполняется успешно, возвращая ответ 200 OK.
▍ Отправка куки
По умолчанию запрос curl не отправляет и не сохраняет куки. Для записи куки можно использовать опцию —cookie-jar (или -c), а отправить куки можно опцией —cookie (or -b):
curl -c /path/cookie_file https://awesomewebsite.com/
curl -b /path/cookie_file https://awesomewebsite.com/
Первая команда записывает файл куки, а вторая отправляет куки с запросом curl. Также можно отправить куки в формате ‘name = value’:
curl -b 'session=abcxyz' -b 'loggedin=true' http://echo.hoppscotch.io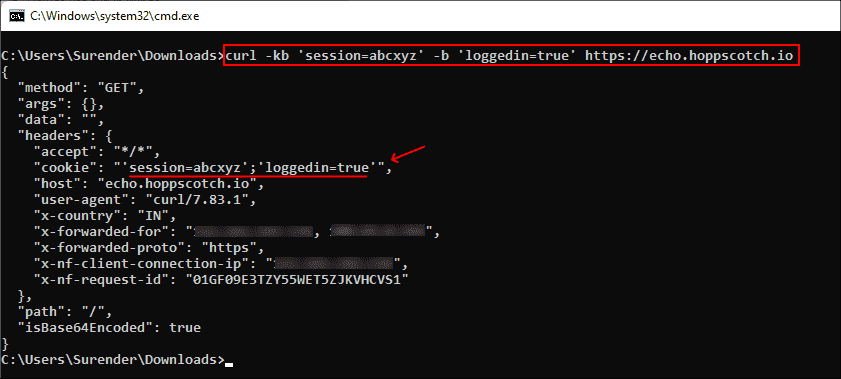
Отправка нескольких куки командой curl
Я воспользовался веб-сайтом echo.hoppscotch.io для демонстрации заголовков HTTP-запросов, которые обычно невидимы клиентам, отправляющим запрос. Если вы не хотите пользоваться этим веб-сайтом, то можете применить опцию –verbose (или -v) для отображения запроса в сыром виде (который отображает и заголовки запросов).
▍ Использование прокси-сервера
Если вы пользуетесь прокси-сервером для подключения к интернету, в curl можно указать прокси опцией —proxy (или -x). Если прокси-сервер требует аутентификации, то добавьте —proxy-user (или -U):
curl -x 192.168.0.250:8088 -U username:password https://awesomewebsite.com/Прокси-сервер указывается в формате server:port, а пользователь прокси — в формате username:password. Можно не вводить пароль пользователя прокси, тогда curl попросит ввести его в режиме no-echo.

Использование прокси-сервера и аутентификации
▍ Дополнительные заголовки запросов
Иногда вместе с запросом к серверу необходимо отправить дополнительную информацию. В curl это можно сделать при помощи —header (или -H), как показано в следующей команде:
curl -vkIH "x-client-os: Windows 11 Enterprise (x64)" https://awesomewebsite.com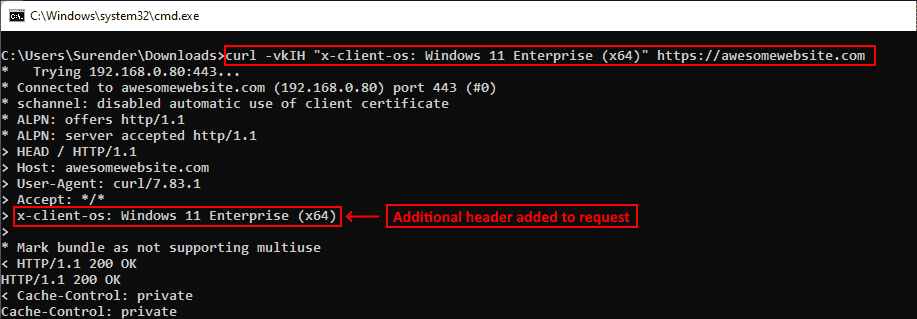
Указание дополнительных заголовков для запроса curl
Можно отправлять любую информацию, недоступную через стандартные заголовки HTTP-запросов. В этом примере я отправил название своей операционной системы. Также я добавил опцию -v для включения verbose-вывода, отображающего дополнительный заголовок, отправляемый вместе с каждым моим запросом curl.
▍ Отправка электронного письма
Так как curl поддерживает протокол SMTP, его можно использовать для отправки электронного письма. Показанная ниже команда позволяет отправить электронное письмо при помощи curl:
curl --insecure --ssl-reqd smtps://mail.yourdomain.com –-mail-from sender@yourdomain.com –-mail-rcpt receiver@company.com --user sender@yourdomain.com --upload-file email_msg.txt
Отправка электронного письма командой curl
Давайте вкратце перечислим использованные здесь опции:
- Опция —insecure (или -k) используется, чтобы избежать ошибки сертификата SSL. Мы уже применяли её ранее.
- Опция —ssl-reql используется для апгрейда соединения передачи простого текста до зашифрованного соединения, если оно поддерживается SMTP-сервером. Если вы уверены, что ваш SMTP-сервер поддерживает SSL, то можно использовать непосредственно имя сервера smtps (например, smtps://smtp.yourdomain.com), как показано на скриншоте.
- Опция —mail-from используется для указания адреса электронной почты отправителя.
- Опция mail-rcpt указывает адрес электронной почты получателя.
- Опция —user (или -u) отправляет имя пользователя для аутентификации, оно должно совпадать с адресом mail-from, потому что в противном случае письмо может быть отклонено или помечено как спам.
- Опция —upload-file (или -T) используется для указания файла, в котором находится отправляемое письмо.
На скриншоте ниже показано письмо, полученное мной во входящие:
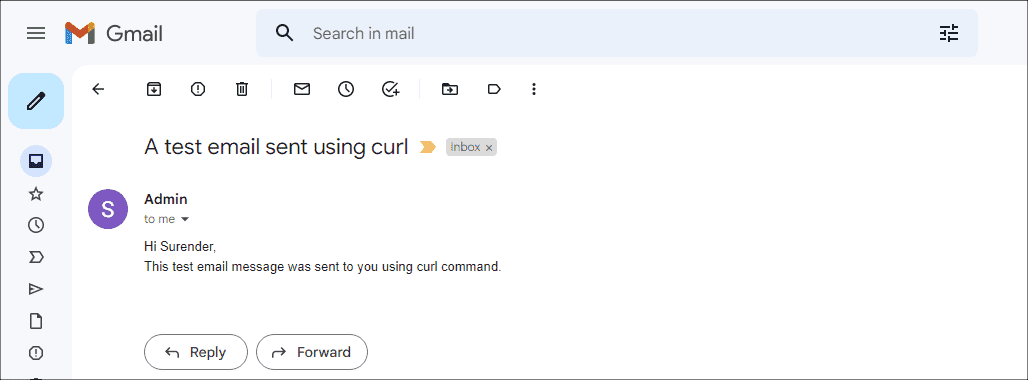
Просмотр письма, отправленного с помощью curl
Это всего лишь несколько примеров использования curl — на самом деле их гораздо больше. Я настоятельно рекомендую проверить справку по curl и поэкспериментировать с ней.
А вы используете curl? И если да, то для чего?
Telegram-канал с полезностями и уютный чат

curl tutorial
Simple Usage
Get the main page from a web-server:
curl https://www.example.com/
Get a README file from an FTP server:
curl ftp://ftp.funet.fi/README
Get a web page from a server using port 8000:
curl http://www.weirdserver.com:8000/
Get a directory listing of an FTP site:
Get the definition of curl from a dictionary:
curl dict://dict.org/m:curl
Fetch two documents at once:
curl ftp://ftp.funet.fi/ http://www.weirdserver.com:8000/
Get a file off an FTPS server:
curl ftps://files.are.secure.com/secrets.txt
or use the more appropriate FTPS way to get the same file:
curl --ftp-ssl ftp://files.are.secure.com/secrets.txt
Get a file from an SSH server using SFTP:
curl -u username sftp://example.com/etc/issue
Get a file from an SSH server using SCP using a private key (not
password-protected) to authenticate:
curl -u username: --key ~/.ssh/id_rsa scp://example.com/~/file.txt
Get a file from an SSH server using SCP using a private key
(password-protected) to authenticate:
curl -u username: --key ~/.ssh/id_rsa --pass private_key_password
scp://example.com/~/file.txt
Get the main page from an IPv6 web server:
curl "http://[2001:1890:1112:1::20]/"
Get a file from an SMB server:
curl -u "domainusername:passwd" smb://server.example.com/share/file.txt
Download to a File
Get a web page and store in a local file with a specific name:
curl -o thatpage.html http://www.example.com/
Get a web page and store in a local file, make the local file get the name of
the remote document (if no file name part is specified in the URL, this will
fail):
curl -O http://www.example.com/index.html
Fetch two files and store them with their remote names:
curl -O www.haxx.se/index.html -O curl.se/download.html
Using Passwords
FTP
To ftp files using name and password, include them in the URL like:
curl ftp://name:passwd@machine.domain:port/full/path/to/file
or specify them with the -u flag like
curl -u name:passwd ftp://machine.domain:port/full/path/to/file
FTPS
It is just like for FTP, but you may also want to specify and use SSL-specific
options for certificates etc.
Note that using FTPS:// as prefix is the implicit way as described in the
standards while the recommended explicit way is done by using FTP:// and
the --ssl-reqd option.
SFTP / SCP
This is similar to FTP, but you can use the --key option to specify a
private key to use instead of a password. Note that the private key may itself
be protected by a password that is unrelated to the login password of the
remote system; this password is specified using the --pass option.
Typically, curl will automatically extract the public key from the private key
file, but in cases where curl does not have the proper library support, a
matching public key file must be specified using the --pubkey option.
HTTP
Curl also supports user and password in HTTP URLs, thus you can pick a file
like:
curl http://name:passwd@machine.domain/full/path/to/file
or specify user and password separately like in
curl -u name:passwd http://machine.domain/full/path/to/file
HTTP offers many different methods of authentication and curl supports
several: Basic, Digest, NTLM and Negotiate (SPNEGO). Without telling which
method to use, curl defaults to Basic. You can also ask curl to pick the most
secure ones out of the ones that the server accepts for the given URL, by
using --anyauth.
Note! According to the URL specification, HTTP URLs can not contain a user
and password, so that style will not work when using curl via a proxy, even
though curl allows it at other times. When using a proxy, you must use the
-u style for user and password.
HTTPS
Probably most commonly used with private certificates, as explained below.
Proxy
curl supports both HTTP and SOCKS proxy servers, with optional authentication.
It does not have special support for FTP proxy servers since there are no
standards for those, but it can still be made to work with many of them. You
can also use both HTTP and SOCKS proxies to transfer files to and from FTP
servers.
Get an ftp file using an HTTP proxy named my-proxy that uses port 888:
curl -x my-proxy:888 ftp://ftp.leachsite.com/README
Get a file from an HTTP server that requires user and password, using the
same proxy as above:
curl -u user:passwd -x my-proxy:888 http://www.get.this/
Some proxies require special authentication. Specify by using -U as above:
curl -U user:passwd -x my-proxy:888 http://www.get.this/
A comma-separated list of hosts and domains which do not use the proxy can be
specified as:
curl --noproxy localhost,get.this -x my-proxy:888 http://www.get.this/
If the proxy is specified with --proxy1.0 instead of --proxy or -x, then
curl will use HTTP/1.0 instead of HTTP/1.1 for any CONNECT attempts.
curl also supports SOCKS4 and SOCKS5 proxies with --socks4 and --socks5.
See also the environment variables Curl supports that offer further proxy
control.
Most FTP proxy servers are set up to appear as a normal FTP server from the
client’s perspective, with special commands to select the remote FTP server.
curl supports the -u, -Q and --ftp-account options that can be used to
set up transfers through many FTP proxies. For example, a file can be uploaded
to a remote FTP server using a Blue Coat FTP proxy with the options:
curl -u "username@ftp.server Proxy-Username:Remote-Pass"
  --ftp-account Proxy-Password --upload-file local-file
  ftp://my-ftp.proxy.server:21/remote/upload/path/
See the manual for your FTP proxy to determine the form it expects to set up
transfers, and curl’s -v option to see exactly what curl is sending.
Piping
Get a key file and add it with apt-key (when on a system that uses apt for
package management):
curl -L https://apt.llvm.org/llvm-snapshot.gpg.key | sudo apt-key add -
The ‘|’ pipes the output to STDIN. - tells apt-key that the key file
should be read from STDIN.
Ranges
HTTP 1.1 introduced byte-ranges. Using this, a client can request to get only
one or more sub-parts of a specified document. Curl supports this with the
-r flag.
Get the first 100 bytes of a document:
curl -r 0-99 http://www.get.this/
Get the last 500 bytes of a document:
curl -r -500 http://www.get.this/
Curl also supports simple ranges for FTP files as well. Then you can only
specify start and stop position.
Get the first 100 bytes of a document using FTP:
curl -r 0-99 ftp://www.get.this/README
Uploading
FTP / FTPS / SFTP / SCP
Upload all data on stdin to a specified server:
curl -T - ftp://ftp.upload.com/myfile
Upload data from a specified file, login with user and password:
curl -T uploadfile -u user:passwd ftp://ftp.upload.com/myfile
Upload a local file to the remote site, and use the local file name at the
remote site too:
curl -T uploadfile -u user:passwd ftp://ftp.upload.com/
Upload a local file to get appended to the remote file:
curl -T localfile -a ftp://ftp.upload.com/remotefile
Curl also supports ftp upload through a proxy, but only if the proxy is
configured to allow that kind of tunneling. If it does, you can run curl in a
fashion similar to:
curl --proxytunnel -x proxy:port -T localfile ftp.upload.com
SMB / SMBS
curl -T file.txt -u "domainusername:passwd"
  smb://server.example.com/share/
HTTP
Upload all data on stdin to a specified HTTP site:
curl -T - http://www.upload.com/myfile
Note that the HTTP server must have been configured to accept PUT before this
can be done successfully.
For other ways to do HTTP data upload, see the POST section below.
Verbose / Debug
If curl fails where it is not supposed to, if the servers do not let you in, if
you cannot understand the responses: use the -v flag to get verbose
fetching. Curl will output lots of info and what it sends and receives in
order to let the user see all client-server interaction (but it will not show you
the actual data).
curl -v ftp://ftp.upload.com/
To get even more details and information on what curl does, try using the
--trace or --trace-ascii options with a given file name to log to, like
this:
curl --trace trace.txt www.haxx.se
Detailed Information
Different protocols provide different ways of getting detailed information
about specific files/documents. To get curl to show detailed information about
a single file, you should use -I/--head option. It displays all available
info on a single file for HTTP and FTP. The HTTP information is a lot more
extensive.
For HTTP, you can get the header information (the same as -I would show)
shown before the data by using -i/--include. Curl understands the
-D/--dump-header option when getting files from both FTP and HTTP, and it
will then store the headers in the specified file.
Store the HTTP headers in a separate file (headers.txt in the example):
curl --dump-header headers.txt curl.se
Note that headers stored in a separate file can be useful at a later time if
you want curl to use cookies sent by the server. More about that in the
cookies section.
POST (HTTP)
It is easy to post data using curl. This is done using the -d <data> option.
The post data must be urlencoded.
Post a simple name and phone guestbook.
curl -d "name=Rafael%20Sagula&phone=3320780" http://www.where.com/guest.cgi
How to post a form with curl, lesson #1:
Dig out all the <input> tags in the form that you want to fill in.
If there is a normal post, you use -d to post. -d takes a full post
string, which is in the format
<variable1>=<data1>&<variable2>=<data2>&...
The variable names are the names set with "name=" in the <input> tags, and
the data is the contents you want to fill in for the inputs. The data must
be properly URL encoded. That means you replace space with + and that you
replace weird letters with %XX where XX is the hexadecimal representation
of the letter’s ASCII code.
Example:
(page located at http://www.formpost.com/getthis/)
<form action="post.cgi" method="post">
<input name=user size=10>
<input name=pass type=password size=10>
<input name=id type=hidden value="blablabla">
<input name=ding value="submit">
</form>
We want to enter user foobar with password 12345.
To post to this, you enter a curl command line like:
curl -d "user=foobar&pass=12345&id=blablabla&ding=submit"
  http://www.formpost.com/getthis/post.cgi
While -d uses the application/x-www-form-urlencoded mime-type, generally
understood by CGI’s and similar, curl also supports the more capable
multipart/form-data type. This latter type supports things like file upload.
-F accepts parameters like -F "name=contents". If you want the contents to
be read from a file, use @filename as contents. When specifying a file, you
can also specify the file content type by appending ;type=<mime type> to the
file name. You can also post the contents of several files in one field. For
example, the field name coolfiles is used to send three files, with
different content types using the following syntax:
curl -F "coolfiles=@fil1.gif;type=image/gif,fil2.txt,fil3.html"
  http://www.post.com/postit.cgi
If the content-type is not specified, curl will try to guess from the file
extension (it only knows a few), or use the previously specified type (from an
earlier file if several files are specified in a list) or else it will use the
default type application/octet-stream.
Emulate a fill-in form with -F. Let’s say you fill in three fields in a
form. One field is a file name which to post, one field is your name and one
field is a file description. We want to post the file we have written named
cooltext.txt. To let curl do the posting of this data instead of your
favorite browser, you have to read the HTML source of the form page and find
the names of the input fields. In our example, the input field names are
file, yourname and filedescription.
curl -F "file=@cooltext.txt" -F "yourname=Daniel"
  -F "filedescription=Cool text file with cool text inside"
  http://www.post.com/postit.cgi
To send two files in one post you can do it in two ways:
Send multiple files in a single field with a single field name:
curl -F "pictures=@dog.gif,cat.gif" $URL
Send two fields with two field names
curl -F "docpicture=@dog.gif" -F "catpicture=@cat.gif" $URL
To send a field value literally without interpreting a leading @ or <, or
an embedded ;type=, use --form-string instead of -F. This is recommended
when the value is obtained from a user or some other unpredictable
source. Under these circumstances, using -F instead of --form-string could
allow a user to trick curl into uploading a file.
Referrer
An HTTP request has the option to include information about which address
referred it to the actual page. curl allows you to specify the referrer to be
used on the command line. It is especially useful to fool or trick stupid
servers or CGI scripts that rely on that information being available or
contain certain data.
curl -e www.coolsite.com http://www.showme.com/
User Agent
An HTTP request has the option to include information about the browser that
generated the request. Curl allows it to be specified on the command line. It
is especially useful to fool or trick stupid servers or CGI scripts that only
accept certain browsers.
Example:
curl -A 'Mozilla/3.0 (Win95; I)' http://www.nationsbank.com/
Other common strings:
Mozilla/3.0 (Win95; I)— Netscape Version 3 for Windows 95Mozilla/3.04 (Win95; U)— Netscape Version 3 for Windows 95Mozilla/2.02 (OS/2; U)— Netscape Version 2 for OS/2Mozilla/4.04 [en] (X11; U; AIX 4.2; Nav)— Netscape for AIXMozilla/4.05 [en] (X11; U; Linux 2.0.32 i586)— Netscape for Linux
Note that Internet Explorer tries hard to be compatible in every way:
Mozilla/4.0 (compatible; MSIE 4.01; Windows 95)— MSIE for W95
Mozilla is not the only possible User-Agent name:
Konqueror/1.0— KDE File Manager desktop clientLynx/2.7.1 libwww-FM/2.14— Lynx command line browser
Cookies
Cookies are generally used by web servers to keep state information at the
client’s side. The server sets cookies by sending a response line in the
headers that looks like Set-Cookie: <data> where the data part then
typically contains a set of NAME=VALUE pairs (separated by semicolons ;
like NAME1=VALUE1; NAME2=VALUE2;). The server can also specify for what path
the cookie should be used for (by specifying path=value), when the cookie
should expire (expire=DATE), for what domain to use it (domain=NAME) and
if it should be used on secure connections only (secure).
If you have received a page from a server that contains a header like:
Set-Cookie: sessionid=boo123; path="/foo";
it means the server wants that first pair passed on when we get anything in a
path beginning with /foo.
Example, get a page that wants my name passed in a cookie:
curl -b "name=Daniel" www.sillypage.com
Curl also has the ability to use previously received cookies in following
sessions. If you get cookies from a server and store them in a file in a
manner similar to:
curl --dump-header headers www.example.com
… you can then in a second connect to that (or another) site, use the
cookies from the headers.txt file like:
curl -b headers.txt www.example.com
While saving headers to a file is a working way to store cookies, it is
however error-prone and not the preferred way to do this. Instead, make curl
save the incoming cookies using the well-known Netscape cookie format like
this:
curl -c cookies.txt www.example.com
Note that by specifying -b you enable the cookie engine and with -L you
can make curl follow a location: (which often is used in combination with
cookies). If a site sends cookies and a location field, you can use a
non-existing file to trigger the cookie awareness like:
curl -L -b empty.txt www.example.com
The file to read cookies from must be formatted using plain HTTP headers OR as
Netscape’s cookie file. Curl will determine what kind it is based on the file
contents. In the above command, curl will parse the header and store the
cookies received from www.example.com. curl will send to the server the stored
cookies which match the request as it follows the location. The file
empty.txt may be a nonexistent file.
To read and write cookies from a Netscape cookie file, you can set both -b
and -c to use the same file:
curl -b cookies.txt -c cookies.txt www.example.com
Progress Meter
The progress meter exists to show a user that something actually is
happening. The different fields in the output have the following meaning:
% Total    % Received % Xferd  Average Speed          Time             Curr.
                               Dload  Upload Total    Current  Left    Speed
0  151M    0 38608    0     0   9406      0  4:41:43  0:00:04  4:41:39  9287
From left-to-right:
%— percentage completed of the whole transferTotal— total size of the whole expected transfer%— percentage completed of the downloadReceived— currently downloaded amount of bytes%— percentage completed of the uploadXferd— currently uploaded amount of bytesAverage Speed Dload— the average transfer speed of the downloadAverage Speed Upload— the average transfer speed of the uploadTime Total— expected time to complete the operationTime Current— time passed since the invokeTime Left— expected time left to completionCurr.Speed— the average transfer speed the last 5 seconds (the first
5 seconds of a transfer is based on less time of course.)
The -# option will display a totally different progress bar that does not
need much explanation!
Speed Limit
Curl allows the user to set the transfer speed conditions that must be met to
let the transfer keep going. By using the switch -y and -Y you can make
curl abort transfers if the transfer speed is below the specified lowest limit
for a specified time.
To have curl abort the download if the speed is slower than 3000 bytes per
second for 1 minute, run:
curl -Y 3000 -y 60 www.far-away-site.com
This can be used in combination with the overall time limit, so that the above
operation must be completed in whole within 30 minutes:
curl -m 1800 -Y 3000 -y 60 www.far-away-site.com
Forcing curl not to transfer data faster than a given rate is also possible,
which might be useful if you are using a limited bandwidth connection and you
do not want your transfer to use all of it (sometimes referred to as
bandwidth throttle).
Make curl transfer data no faster than 10 kilobytes per second:
curl --limit-rate 10K www.far-away-site.com
or
curl --limit-rate 10240 www.far-away-site.com
Or prevent curl from uploading data faster than 1 megabyte per second:
curl -T upload --limit-rate 1M ftp://uploadshereplease.com
When using the --limit-rate option, the transfer rate is regulated on a
per-second basis, which will cause the total transfer speed to become lower
than the given number. Sometimes of course substantially lower, if your
transfer stalls during periods.
Config File
Curl automatically tries to read the .curlrc file (or _curlrc file on
Microsoft Windows systems) from the user’s home dir on startup.
The config file could be made up with normal command line switches, but you
can also specify the long options without the dashes to make it more
readable. You can separate the options and the parameter with spaces, or with
= or :. Comments can be used within the file. If the first letter on a
line is a #-symbol the rest of the line is treated as a comment.
If you want the parameter to contain spaces, you must enclose the entire
parameter within double quotes ("). Within those quotes, you specify a quote
as ".
NOTE: You must specify options and their arguments on the same line.
Example, set default time out and proxy in a config file:
# We want a 30 minute timeout:
-m 1800
# ... and we use a proxy for all accesses:
proxy = proxy.our.domain.com:8080
Whitespaces ARE significant at the end of lines, but all whitespace leading
up to the first characters of each line are ignored.
Prevent curl from reading the default file by using -q as the first command
line parameter, like:
Force curl to get and display a local help page in case it is invoked without
URL by making a config file similar to:
# default url to get
url = "http://help.with.curl.com/curlhelp.html"
You can specify another config file to be read by using the -K/--config
flag. If you set config file name to - it will read the config from stdin,
which can be handy if you want to hide options from being visible in process
tables etc:
echo "user = user:passwd" | curl -K - http://that.secret.site.com
Extra Headers
When using curl in your own programs, you may end up needing to pass on your
own custom headers when getting a web page. You can do this by using the -H
flag.
Example, send the header X-you-and-me: yes to the server when getting a
page:
curl -H "X-you-and-me: yes" www.love.com
This can also be useful in case you want curl to send a different text in a
header than it normally does. The -H header you specify then replaces the
header curl would normally send. If you replace an internal header with an
empty one, you prevent that header from being sent. To prevent the Host:
header from being used:
curl -H "Host:" www.server.com
FTP and Path Names
Do note that when getting files with a ftp:// URL, the given path is
relative to the directory you enter. To get the file README from your home
directory at your ftp site, do:
curl ftp://user:passwd@my.site.com/README
If you want the README file from the root directory of that same site, you
need to specify the absolute file name:
curl ftp://user:passwd@my.site.com//README
(I.e with an extra slash in front of the file name.)
SFTP and SCP and Path Names
With sftp: and scp: URLs, the path name given is the absolute name on the
server. To access a file relative to the remote user’s home directory, prefix
the file with /~/ , such as:
curl -u $USER sftp://home.example.com/~/.bashrc
FTP and Firewalls
The FTP protocol requires one of the involved parties to open a second
connection as soon as data is about to get transferred. There are two ways to
do this.
The default way for curl is to issue the PASV command which causes the server
to open another port and await another connection performed by the
client. This is good if the client is behind a firewall that does not allow
incoming connections.
If the server, for example, is behind a firewall that does not allow
connections on ports other than 21 (or if it just does not support the PASV
command), the other way to do it is to use the PORT command and instruct the
server to connect to the client on the given IP number and port (as parameters
to the PORT command).
The -P flag to curl supports a few different options. Your machine may have
several IP-addresses and/or network interfaces and curl allows you to select
which of them to use. Default address can also be used:
curl -P - ftp.download.com
Download with PORT but use the IP address of our le0 interface (this does
not work on Windows):
curl -P le0 ftp.download.com
Download with PORT but use 192.168.0.10 as our IP address to use:
curl -P 192.168.0.10 ftp.download.com
Network Interface
Get a web page from a server using a specified port for the interface:
curl --interface eth0:1 http://www.example.com/
or
curl --interface 192.168.1.10 http://www.example.com/
HTTPS
Secure HTTP requires a TLS library to be installed and used when curl is
built. If that is done, curl is capable of retrieving and posting documents
using the HTTPS protocol.
Example:
curl https://www.secure-site.com
curl is also capable of using client certificates to get/post files from sites
that require valid certificates. The only drawback is that the certificate
needs to be in PEM-format. PEM is a standard and open format to store
certificates with, but it is not used by the most commonly used browsers. If
you want curl to use the certificates you use with your favorite browser, you
may need to download/compile a converter that can convert your browser’s
formatted certificates to PEM formatted ones.
Example on how to automatically retrieve a document using a certificate with a
personal password:
curl -E /path/to/cert.pem:password https://secure.site.com/
If you neglect to specify the password on the command line, you will be
prompted for the correct password before any data can be received.
Many older HTTPS servers have problems with specific SSL or TLS versions,
which newer versions of OpenSSL etc use, therefore it is sometimes useful to
specify what TLS version curl should use.:
curl --tlv1.0 https://secure.site.com/
Otherwise, curl will attempt to use a sensible TLS default version.
Resuming File Transfers
To continue a file transfer where it was previously aborted, curl supports
resume on HTTP(S) downloads as well as FTP uploads and downloads.
Continue downloading a document:
curl -C - -o file ftp://ftp.server.com/path/file
Continue uploading a document:
curl -C - -T file ftp://ftp.server.com/path/file
Continue downloading a document from a web server
curl -C - -o file http://www.server.com/
Time Conditions
HTTP allows a client to specify a time condition for the document it requests.
It is If-Modified-Since or If-Unmodified-Since. curl allows you to specify
them with the -z/--time-cond flag.
For example, you can easily make a download that only gets performed if the
remote file is newer than a local copy. It would be made like:
curl -z local.html http://remote.server.com/remote.html
Or you can download a file only if the local file is newer than the remote
one. Do this by prepending the date string with a -, as in:
curl -z -local.html http://remote.server.com/remote.html
You can specify a plain text date as condition. Tell curl to only download the
file if it was updated since January 12, 2012:
curl -z "Jan 12 2012" http://remote.server.com/remote.html
curl accepts a wide range of date formats. You always make the date check the
other way around by prepending it with a dash (-).
DICT
For fun try
curl dict://dict.org/m:curl
curl dict://dict.org/d:heisenbug:jargon
curl dict://dict.org/d:daniel:gcide
Aliases for m are match and find, and aliases for d are define and
lookup. For example,
curl dict://dict.org/find:curl
Commands that break the URL description of the RFC (but not the DICT
protocol) are
curl dict://dict.org/show:db
curl dict://dict.org/show:strat
Authentication support is still missing
LDAP
If you have installed the OpenLDAP library, curl can take advantage of it and
offer ldap:// support. On Windows, curl will use WinLDAP from Platform SDK
by default.
Default protocol version used by curl is LDAP version 3. Version 2 will be
used as a fallback mechanism in case version 3 fails to connect.
LDAP is a complex thing and writing an LDAP query is not an easy task. I do
advise you to dig up the syntax description for that elsewhere. One such place
might be: RFC 2255, The LDAP URL Format
To show you an example, this is how I can get all people from my local LDAP
server that has a certain sub-domain in their email address:
curl -B "ldap://ldap.frontec.se/o=frontec??sub?mail=*sth.frontec.se"
If I want the same info in HTML format, I can get it by not using the -B
(enforce ASCII) flag.
You also can use authentication when accessing LDAP catalog:
curl -u user:passwd "ldap://ldap.frontec.se/o=frontec??sub?mail=*"
curl "ldap://user:passwd@ldap.frontec.se/o=frontec??sub?mail=*"
By default, if user and password are provided, OpenLDAP/WinLDAP will use basic
authentication. On Windows you can control this behavior by providing one of
--basic, --ntlm or --digest option in curl command line
curl --ntlm "ldap://user:passwd@ldap.frontec.se/o=frontec??sub?mail=*"
On Windows, if no user/password specified, auto-negotiation mechanism will be
used with current logon credentials (SSPI/SPNEGO).
Environment Variables
Curl reads and understands the following environment variables:
http_proxy, HTTPS_PROXY, FTP_PROXY
They should be set for protocol-specific proxies. General proxy should be set
with
A comma-separated list of host names that should not go through any proxy is
set in (only an asterisk, * matches all hosts)
If the host name matches one of these strings, or the host is within the
domain of one of these strings, transactions with that node will not be done
over proxy. When a domain is used, it needs to start with a period. A user can
specify that both www.example.com and foo.example.com should not use a proxy
by setting NO_PROXY to .example.com. By including the full name you can
exclude specific host names, so to make www.example.com not use a proxy but
still have foo.example.com do it, set NO_PROXY to www.example.com.
The usage of the -x/--proxy flag overrides the environment variables.
Netrc
Unix introduced the .netrc concept a long time ago. It is a way for a user
to specify name and password for commonly visited FTP sites in a file so that
you do not have to type them in each time you visit those sites. You realize
this is a big security risk if someone else gets hold of your passwords,
therefore most Unix programs will not read this file unless it is only readable
by yourself (curl does not care though).
Curl supports .netrc files if told to (using the -n/--netrc and
--netrc-optional options). This is not restricted to just FTP, so curl can
use it for all protocols where authentication is used.
A simple .netrc file could look something like:
machine curl.se login iamdaniel password mysecret
Custom Output
To better allow script programmers to get to know about the progress of curl,
the -w/--write-out option was introduced. Using this, you can specify what
information from the previous transfer you want to extract.
To display the amount of bytes downloaded together with some text and an
ending newline:
curl -w 'We downloaded %{size_download} bytesn' www.download.com
Kerberos FTP Transfer
Curl supports kerberos4 and kerberos5/GSSAPI for FTP transfers. You need the
kerberos package installed and used at curl build time for it to be available.
First, get the krb-ticket the normal way, like with the kinit/kauth tool.
Then use curl in way similar to:
curl --krb private ftp://krb4site.com -u username:fakepwd
There is no use for a password on the -u switch, but a blank one will make
curl ask for one and you already entered the real password to kinit/kauth.
TELNET
The curl telnet support is basic and easy to use. Curl passes all data passed
to it on stdin to the remote server. Connect to a remote telnet server using a
command line similar to:
curl telnet://remote.server.com
And enter the data to pass to the server on stdin. The result will be sent to
stdout or to the file you specify with -o.
You might want the -N/--no-buffer option to switch off the buffered output
for slow connections or similar.
Pass options to the telnet protocol negotiation, by using the -t option. To
tell the server we use a vt100 terminal, try something like:
curl -tTTYPE=vt100 telnet://remote.server.com
Other interesting options for it -t include:
XDISPLOC=<X display>Sets the X display location.NEW_ENV=<var,val>Sets an environment variable.
NOTE: The telnet protocol does not specify any way to login with a specified
user and password so curl cannot do that automatically. To do that, you need to
track when the login prompt is received and send the username and password
accordingly.
Persistent Connections
Specifying multiple files on a single command line will make curl transfer all
of them, one after the other in the specified order.
libcurl will attempt to use persistent connections for the transfers so that
the second transfer to the same host can use the same connection that was
already initiated and was left open in the previous transfer. This greatly
decreases connection time for all but the first transfer and it makes a far
better use of the network.
Note that curl cannot use persistent connections for transfers that are used
in subsequent curl invokes. Try to stuff as many URLs as possible on the same
command line if they are using the same host, as that will make the transfers
faster. If you use an HTTP proxy for file transfers, practically all transfers
will be persistent.
Multiple Transfers With A Single Command Line
As is mentioned above, you can download multiple files with one command line
by simply adding more URLs. If you want those to get saved to a local file
instead of just printed to stdout, you need to add one save option for each
URL you specify. Note that this also goes for the -O option (but not
--remote-name-all).
For example: get two files and use -O for the first and a custom file
name for the second:
curl -O http://url.com/file.txt ftp://ftp.com/moo.exe -o moo.jpg
You can also upload multiple files in a similar fashion:
curl -T local1 ftp://ftp.com/moo.exe -T local2 ftp://ftp.com/moo2.txt
IPv6
curl will connect to a server with IPv6 when a host lookup returns an IPv6
address and fall back to IPv4 if the connection fails. The --ipv4 and
--ipv6 options can specify which address to use when both are
available. IPv6 addresses can also be specified directly in URLs using the
syntax:
http://[2001:1890:1112:1::20]/overview.html
When this style is used, the -g option must be given to stop curl from
interpreting the square brackets as special globbing characters. Link local
and site local addresses including a scope identifier, such as fe80::1234%1,
may also be used, but the scope portion must be numeric or match an existing
network interface on Linux and the percent character must be URL escaped. The
previous example in an SFTP URL might look like:
IPv6 addresses provided other than in URLs (e.g. to the --proxy,
--interface or --ftp-port options) should not be URL encoded.
Mailing Lists
For your convenience, we have several open mailing lists to discuss curl, its
development and things relevant to this. Get all info at
https://curl.se/mail/.
Please direct curl questions, feature requests and trouble reports to one of
these mailing lists instead of mailing any individual.
Available lists include:
curl-users
Users of the command line tool. How to use it, what does not work, new
features, related tools, questions, news, installations, compilations,
running, porting etc.
curl-library
Developers using or developing libcurl. Bugs, extensions, improvements.
curl-announce
Low-traffic. Only receives announcements of new public versions. At worst,
that makes something like one or two mails per month, but usually only one
mail every second month.
curl-and-php
Using the curl functions in PHP. Everything curl with a PHP angle. Or PHP with
a curl angle.
curl-and-python
Python hackers using curl with or without the python binding pycurl.
CURL — утилита командной строки для Linux или Windows, поддерживает работу с протоколами: FTP, FTPS, HTTP, HTTPS, TFTP, SCP, SFTP, Telnet, DICT, LDAP, POP3, IMAP и SMTP. Она отлично подходит для имитации действий пользователя на страницах сайтов и других операций с URL адресами. Поддержка CURL добавлена в множество различных языков программирования и платформ.
Для начала скачаем саму утилиту, для этого переходим на официальный сайт утилиты, в раздел Download. После скачивания архива для своей платформы (у меня это Windows 64 bit), распаковываем архив. Чтобы иметь возможность работать с HTTPS и FTPS, устанавливаем сертификат безопасности url-ca-bundle.crt, который находится в папке curl/bin.

Запускаем командную строку, переходим в директорию curl/bin и пытаемся скачать главную страницу Google:
> cd C:/curl/bin
> curl google.com
<HTML><HEAD><meta http-equiv="content-type" content="text/html;charset=utf-8">
<TITLE>301 Moved</TITLE></HEAD><BODY>
<H1>301 Moved</H1>
The document has moved
<A HREF="http://www.google.com/">here</A>.
</BODY></HTML>
Опция -X позволяет задать тип HTTP-запроса вместо используемого по умолчанию GET. Дополнительные запросы могут быть POST, PUT и DELETE или связанные с WebDAV — PROPFIND, COPY, MOVE и т.п.
Следовать за редиректами
Сервер Google сообщил нам, что страница google.com перемещена (301 Moved Permanently), и теперь надо запрашивать страницу www.google.com. С помощью опции -L укажем CURL следовать редиректам:
> curl -L google.com
<!doctype html>
<html itemscope="" itemtype="http://schema.org/WebPage" lang="ru">
<head>
<meta content="Поиск информации в интернете: веб страницы, картинки, видео и многое другое." name="description">
<meta content="noodp" name="robots">
<meta content="/images/branding/googleg/1x/googleg_standard_color_128dp.png" itemprop="image">
<meta content="origin" name="referrer">
<title>Google</title>
..........
Сохранить вывод в файл
Чтобы сохранить вывод в файл, надо использовать опции -o или -O:
-o(oнижнего регистра) — результат будет сохранён в файле, заданном в командной строке;-O(Oверхнего регистра) — имя файла будет взято из URL и будет использовано для сохранения полученных данных.
Сохраняем страницу Google в файл google.html:
> curl -L -o google.html google.com
  % Total    % Received % Xferd  Average Speed   Time    Time     Time  Current
                                 Dload  Upload   Total   Spent    Left  Speed
100   219  100   219    0     0   2329      0 --:--:-- --:--:-- --:--:--  2329
100 14206    0 14206    0     0  69980      0 --:--:-- --:--:-- --:--:-- 69980
Сохраняем документ gettext.html в файл gettext.html:
> curl -O http://www.gnu.org/software/gettext/manual/gettext.html
  % Total    % Received % Xferd  Average Speed   Time    Time     Time  Current
                                 Dload  Upload   Total   Spent    Left  Speed
100 1375k  100 1375k    0     0   800k      0  0:00:01  0:00:01 --:--:--  800k
Загрузить файл, только если он изменён
Опция -z позволяет получить файлы, только если они были изменены после определённого времени. Это будет работать и для FTP и для HTTP. Например, файл archive.zip будет получен, если он изменялся после 20 августа 2018 года:
> curl -z 20-Aug-18 http://www.example.com/archive.zip
Команда ниже загрузит файл archive.zip, если он изменялся до 20 августа 2018 года:
> curl -z -20-Aug-18 http://www.example.com/archive.zip
Прохождение аутентификации HTTP
Опция -u позволяет указать данные пользователя (имя и пароль) для прохождения базовой аутентификаци (Basic HTTP Authentication):
> curl -u evgeniy:qwerty -O http://www.example.com/archive.zip
Получение и отправка cookie
Cookie используются сайтами для хранения некой информации на стороне пользователя. Сервер сохраняет cookie на стороне клиента (т.е. в браузере), отправляя заголовки:
Set-Cookie: PHPSESSID=svn7eb593i8d2gv471rs94og58; path=/
Set-Cookie: visitor=fa867bd917ad0d715830a6a88c816033; expires=Mon, 16-Sep-2019 08:20:53 GMT; Max-Age=31536000; path=/
Set-Cookie: lastvisit=1537086053; path=/
А браузер, в свою очередь, отправляет полученные cookie обратно на сервер при каждом запросе. Разумеется, тоже в заголовках:
Cookie: PHPSESSID=svn7eb593i8d2gv471rs94og58; visitor=fa867bd917ad0d715830a6a88c816033; lastvisit=1537086053
Передать cookie на сервер, как будто они были ранее получены от сервера:
> curl -b lastvisit=1537086053 http://www.example.com/
Чтобы сохранить полученные сookie в файл:
> curl -c cookie.txt http://www.example.com/
Затем можно отправить сохраненные в файле cookie обратно:
> curl -b cookie.txt http://www.example.com/catalog/
Файл cookie.txt имеет вид:
# Netscape HTTP Cookie File
# https://curl.haxx.se/docs/http-cookies.html
# This file was generated by libcurl! Edit at your own risk.

www.example.com    FALSE    /    FALSE    0             lastvisit        1537085301
www.example.com    FALSE    /    FALSE    1568621304    visitor          60f7c17ba4b5d77975dfd020f06ac8ca
www.example.com    FALSE    /    FALSE    0             PHPSESSID        p23cr2d14rlgj5kls58kd7l6a6
Получение и отправка заголовков
По умолчанию, заголовки ответа сервера не показываются. Но это можно исправить:
> curl -i google.com
HTTP/1.1 301 Moved Permanently
Location: http://www.google.com/
Content-Type: text/html; charset=UTF-8
Date: Sun, 16 Sep 2018 08:28:18 GMT
Expires: Tue, 16 Oct 2018 08:28:18 GMT
Cache-Control: public, max-age=2592000
Server: gws
Content-Length: 219
X-XSS-Protection: 1; mode=block
X-Frame-Options: SAMEORIGIN

<HTML><HEAD><meta http-equiv="content-type" content="text/html;charset=utf-8">
<TITLE>301 Moved</TITLE></HEAD><BODY>
<H1>301 Moved</H1>
The document has moved
<A HREF="http://www.google.com/">here</A>.
</BODY></HTML>
Если содержимое страницы не нужно, а интересны только заголовки (будет отправлен HEAD запрос):
> curl -I http://www.example.com/
HTTP/1.1 200 OK
Date: Sun, 16 Sep 2018 08:20:52 GMT
Server: Apache/2.4.34 (Win64) mod_fcgid/2.3.9
X-Powered-By: PHP/7.1.10
Expires: Thu, 19 Nov 1981 08:52:00 GMT
Cache-Control: no-store, no-cache, must-revalidate
Pragma: no-cache
Set-Cookie: PHPSESSID=svn7eb593i8d2gv471rs94og58; path=/
Set-Cookie: visitor=fa867bd917ad0d715830a6a88c816033; expires=Mon, 16-Sep-2019 08:20:53 GMT; Max-Age=31536000; path=/
Set-Cookie: lastvisit=1537086053; path=/
Content-Length: 132217
Content-Type: text/html; charset=utf-8
Посмотреть, какие заголовки отправляет CURL при запросе, можно с помощью опции -v, которая выводит более подробную информацию:
> curl -v google.com
- Строка, начинающаяся с
>означает заголовок, отправленный серверу - Строка, начинающаяся с
<означает заголовок, полученный от сервера - Строка, начинающаяся с
*означает дополнительные данные от CURL
* Rebuilt URL to: http://google.com/
*   Trying 173.194.32.206...
* TCP_NODELAY set
* Connected to google.com (173.194.32.206) port 80 (#0)
> GET / HTTP/1.1
> Host: google.com
> User-Agent: curl/7.61.1
> Accept: */*
>
< HTTP/1.1 301 Moved Permanently
< Location: http://www.google.com/
< Content-Type: text/html; charset=UTF-8
< Date: Mon, 17 Sep 2018 15:11:49 GMT
< Expires: Wed, 17 Oct 2018 15:11:49 GMT
< Cache-Control: public, max-age=2592000
< Server: gws
< Content-Length: 219
< X-XSS-Protection: 1; mode=block
< X-Frame-Options: SAMEORIGIN
<
<HTML><HEAD><meta http-equiv="content-type" content="text/html;charset=utf-8">
<TITLE>301 Moved</TITLE></HEAD><BODY>
<H1>301 Moved</H1>
The document has moved
<A HREF="http://www.google.com/">here</A>.
</BODY></HTML>
* Connection #0 to host google.com left intact
Если этой информации недостаточно, можно использовать опции --trace или --trace-ascii.
А вот так можно отправить свой заголовок:
> curl -H "User-Agent: Mozilla/5.0" http://www.example.com/
Отправка данных методом POST
Команда ниже отправляет POST запрос на сервер аналогично тому, как пользователь, заполнив HTML форму, нажал бы кнопку «Отправить». Данные будут отправлены в формате application/x-www-form-urlencoded.
> curl -d "key1=value1&key2=value2" http://www.example.com
> curl --data "key1=value1&key2=value2" http://www.example.com
Параметр --data аналогичен --data-ascii, для отправки двоичных данных необходимо использовать параметр --data-binary. Для URL-кодирования полей формы нужно использовать --data-urlencode.
> curl --data-urlencode "name=Василий" --data-urlencode "surname=Пупкин" http://www.example.com
Если значение опции --data начинается с @, то после него должно быть имя файла с данными (или дефис — тогда будут использованы данные из стандартного ввода). Пример получения данных из файла для отправки POST-запроса:
> curl --data @data.txt http://www.example.com
Содержимое файла data.txt:
key1=value1&key2=value2
Массив $_POST, который будет содержать данные этого запроса:
Array
(
    [key1] => value1
    [key2] => value2
)
Пример URL-кодирования данных из файла перед отправкой POST-запроса:
> curl --data-urlencode name@username.txt http://www.example.com
Содержимое файла username.txt:
Иванов Иван Иванович
Массив $_POST, который будет содержать данные этого запроса:
Array
(
    [name] = Иванов Иван Иванович
)
Загрузка файлов методом POST
Для HTTP запроса типа POST существует два варианта передачи полей из HTML форм, а именно, используя алгоритм application/x-www-form-urlencoded и multipart/form-data. Алгоритм первого типа создавался давным-давно, когда в языке HTML еще не предусматривали возможность передачи файлов через HTML формы.
Со временем возникла необходимость через формы отсылать еще и файлы. Тогда консорциум W3C взялся за доработку формата POST запроса, в результате чего появился документ RFC 1867. Форма, которая позволяет пользователю загрузить файл, используя алгоритм multipart/form-data, выглядит примерно так:
<form action="/upload.php" method="POST" enctype="multipart/form-data">
    <input type="file" name="upload">
    <input type="submit" name="submit" value="OK">
</form>
Чтобы отправить на сервер данные такой формы:
> curl -F upload=@image.jpg -F submit=OK http://www.example.com/upload.php
Скрипт upload.php, который принимает данные формы:
<?php
print_r($_POST);
print_r($_FILES);
move_uploaded_file($_FILES['upload']['tmp_name'], 'image.jpg');
Ответ сервера:
Array
(
    [submit] => OK
)
Array
(
    [upload] => Array
        (
            [name] => image.jpg
            [type] => image/jpeg
            [tmp_name] => D:worktempphpB02F.tmp
            [error] => 0
            [size] => 2897
        )
)
Работа по протоколу FTP
Скачать файл с FTP-сервера:
> curl -u username:password -O ftp://example.com/file.zip
Если заданный FTP путь является директорией, то по умолчанию будет выведен список файлов в ней:
> curl -u username:password -O ftp://example.com/public_html/
Выгрузить файл на FTP-сервер
> curl -u username:password -T file.zip ftp://example.com/
Получить вывод из стандартного ввода и сохранить содержимое на сервере под именем data.txt:
> curl -u username:password -T - ftp://example.com/data.txt
Дополнительно:
- Утилита curl. Обмен данными с сервером
- Пользуемся curl для отладки HTTP
Поиск:
CLI • CURL • Cookie • FTP • GET • HTTP • Linux • POST • URL • Web-разработка • Windows • Форма
Каталог оборудования
Lorem ipsum dolor sit amet, consectetur adipiscing elit, sed do eiusmod tempor incididunt ut labore et dolore magna aliqua.
Производители
Lorem ipsum dolor sit amet, consectetur adipiscing elit, sed do eiusmod tempor incididunt ut labore et dolore magna aliqua.
Функциональные группы
Lorem ipsum dolor sit amet, consectetur adipiscing elit, sed do eiusmod tempor incididunt ut labore et dolore magna aliqua.
Curl (client URL) — это инструмент командной строки на основе библиотеки libcurl для передачи данных с сервера и на сервер при помощи различных протоколов, в том числе HTTP, HTTPS, FTP, FTPS, IMAP, IMAPS, POP3, POP3S, SMTP и SMTPS. Он очень популярен в сфере автоматизации и скриптов благодаря широкому диапазону функций и поддерживаемых протоколов. В этой статье мы расскажем, как использовать curl в Windows на различных примерах.
▍ Установка в Windows
Во всех современных версиях Windows, начиная с Windows 10 (версия 1803) и Server 2019, исполняемый файл curl поставляется в комплекте, поэтому ручная установка не требуется. Чтобы определить местоположение curl и его версию в системе, можно использовать следующие команды:
where curl
curl --version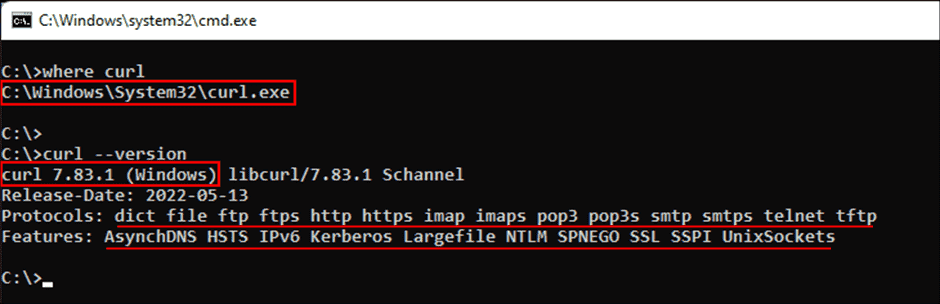
Определение местоположения и версии curl в Windows
Команда curl —version также выводит список протоколов и функций, поддерживаемых текущей версией curl. Как видно из показанного выше скриншота, к использованию встроенной утилиты curl всё готово. Если вместо этого отображается сообщение об ошибке, curl может быть недоступен потому, что вы используете более раннюю версию Windows (например, Windows 8.1 или Server 2016). В таком случае вам потребуется установить curl в Windows вручную.
▍ Синтаксис curl
Команда curl использует следующий синтаксис:
curl [options...] [url]Инструмент поддерживает различные опции, которые мы рассмотрим ниже. Как и в любом инструменте командной строки, вы можете использовать для получения справки команду curl —help.
Получение справки при помощи команды curl
Для получения подробной справки можно использовать команду curl —help all. Справка разделёна на категории, поэтому при помощи curl —help category можно просмотреть все темы.
Ознакомившись с синтаксисом curl, давайте рассмотрим различные способы применения этого инструмента на примерах.
▍ HTTP-запрос GET
При использовании curl с URL и без указания опций запрос по умолчанию использует метод GET протокола HTTP. Попробуйте выполнить такую команду:
curl https://4sysops.comПриведённая выше команда по сути эквивалентна curl —request GET 4sysops.com, отправляющей запрос GET к 4sysops.com по протоколу HTTPS. Чтобы указать версию протокола HTTP (например, http/2), используйте опцию —http2:
curl --http2 https://4sysops.comВ случае URL, начинающихся с HTTPS, curl сначала пытается установить соединение http/2 и автоматически откатывается к http/1.1, если это не удаётся. Также он поддерживает другие методы, например, HEAD, POST, PUT и DELETE. Для использования этих методов вместе с командой curl нужно указать опцию —request (или -X), за которой следует указание метода. Стоит заметить, что список доступных методов зависит от используемого протокола.
▍ Получение информации об удалённом файле
Если вы администратор, то иногда вам могут быть интересны только заголовки HTTP. Их можно получить при помощи опции —head (или -I). Иногда URL может перенаправлять пользователя в другую точку. В таком случае опция —location (или -L) позволяет curl выполнять перенаправления. Также можно использовать —insecure (или -k), чтобы разрешить незащищённые подключения и избежать ошибок с сертификатом TLS в случае, если целевой URL использует самоподписанный сертификат. Пользуйтесь этой опцией только при абсолютной необходимости. Все эти три опции можно скомбинировать в одну краткую запись, как показано в следующей команде:
curl -kIL 4sysops.com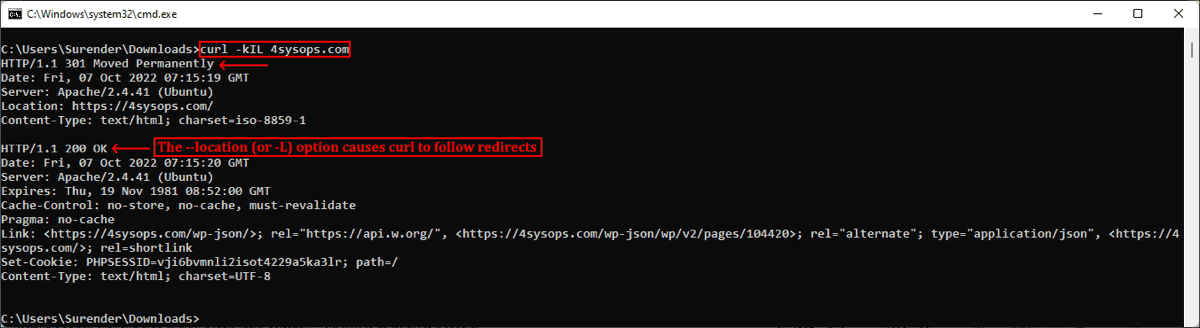
Опции просмотра заголовков запросов, включения незащищённого соединения и использования перенаправлений
Как можно заметить, такая краткая запись особенно полезна для комбинирования нескольких опций. Приведённая выше команда по сути эквивалентна команде curl —insecure —head —location 4sysops.com.
Опция —head (или -I) также даёт основную информацию об удалённом файле без его скачивания. Как показано на скриншоте ниже, при использовании curl с URL удалённого файла он отображает различные заголовки, дающие информацию об удалённом файле.
curl -IL https://curl.se/windows/dl-7.85.0_5/curl-7.85.0_5-win64-mingw.zip
Использование curl для просмотра основной информации удалённых файлов
Заголовок Content-Length обозначает размер файла (в байтах), Content-Type сообщает о типе медиафайла (например, image/png, text/html), Server обозначает тип серверного приложения (Apache, Gunicorn и так далее), Last-Modified показывает дату последнего изменения файла на сервере, а заголовок Accept-Ranges обозначает поддержку частичных запросов для скачивания от клиента, что по сути определяет возможность продолжения прерванной загрузки.
▍ Скачивание файла
Для скачивания файла и сохранения с тем же именем, что и на сервере, можно использовать curl с опцией —remote-name (или -O). Показанная ниже команда скачивает последнюю версию curl для Windows с официального сайта:
curl -OL https://curl.se/windows/latest.cgi?p=win64-mingw.zip
Скачивание файла с именем по умолчанию и индикатором прогресса
При необходимости для нахождения ресурса добавляется опция -L, разрешающая перенаправления. Если нужно сохранить файл с новым именем, используйте опцию —output (или -o). Кроме того, при использовании команды curl в скрипте может понадобиться отключить индикатор прогресса, что можно сделать при помощи опции —silent (или -s). Эти две опции можно скомбинировать:
curl -sLo curl.zip https://curl.se/windows/latest.cgi?p=win64-mingw.zip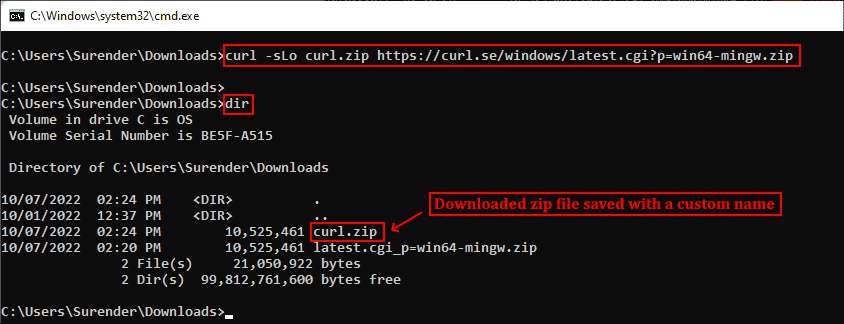
Скачивание файла без индикатора и сохранение под произвольным именем
▍ Продолжение прерванного скачивания
Наличие Accept-Ranges: bytes в заголовке ответа в буквальном смысле обозначает, что сервер поддерживает скачивания с возможностью продолжения. Чтобы продолжить прерванное скачивание, можно использовать опцию —continue-at (или -C), получающую смещение (в байтах). Обычно указывать смещение непросто, поэтому curl предоставляет простой способ продолжения прерванной загрузки:
curl -OLC - https://releases.ubuntu.com/22.04/ubuntu-22.04.1-desktop-amd64.iso
Продолжение прерванного скачивания
Как видно из скриншота, я скачивал iso-файл Ubuntu, но скачивание было прервано. Затем я снова запустил команду curl с опцией -C, и передача продолжилась с того диапазона байтов, на котором была прервана. Знак минус (—) рядом с -C позволяет curl автоматически определить, как и где продолжить прерванное скачивание.
▍ Аутентификация с Curl
Также Curl поддерживает аутентификацию, что позволяет скачать защищённый файл, предоставив учётные данные при помощи опции —user (or -u), принимающей имя пользователя и пароль в формате username:password. Если не вводить пароль, curl попросит ввести его в режиме no-echo.
curl -u surender -OL https://techtutsonline.com/secretFiles/sample.zip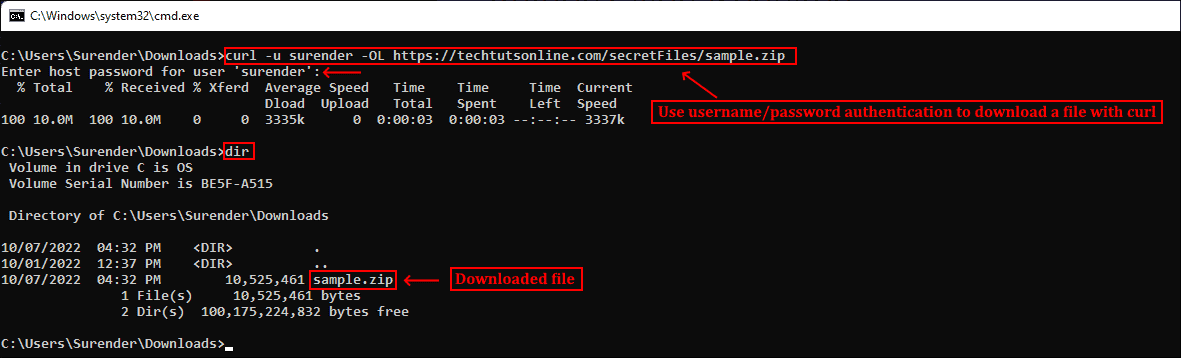
Скачивание файла с аутентификацией по имени пользователя и паролю
Если вы используете Basic authentication, то необходимо передать имя пользователя и пароль, а значит, воспользоваться защищённым протоколом наподобие HTTPS (вместо HTTP) или FTPS (вместо FTP). Если по каким-то причинам приходится использовать протокол без шифрования, то убедитесь, что вы используете способ аутентификации, не передающий учётные данные в виде простого текста (например, аутентификацию Digest, NTLM или Negotiate).
Также curl поддерживает использование файлов конфигурации .curlrc, _curlrc и .netrc, позволяющих задавать различные опции curl в файле, а затем добавлять файл в команду при помощи опции curl —config (или curl -K), что особенно полезно при написании скриптов.
▍ Выгрузка файла
Опция —upload-file (или -T) позволяет выгружать локальный файл на удалённый сервер. Показанная ниже команда выгружает файл из локальной системы на удалённый веб-сервер по протоколу FTPS:
curl -kT C:UsersSurenderDownloadssample1.zip -u testlabsurender ftps://192.168.0.80/awesomewebsite.com/files/
Выгрузка файла на удалённый сервер
Опция -k добавляется для устранения проблем с сертификатами на случай, если веб-сервер использует самоподписанный сертификат. Наклонная черта в конце URL сообщает curl, что конечная точка является папкой. Можно указать несколько имён файлов, например «{sample1.zip,sample2.zip}». Ниже показано, как с помощью одной команды curl можно выгрузить на сервер несколько файлов:
curl -kT sample[1-5].zip -u testlabsurender ftps://192.168.0.80/awesomewebsite.com/files/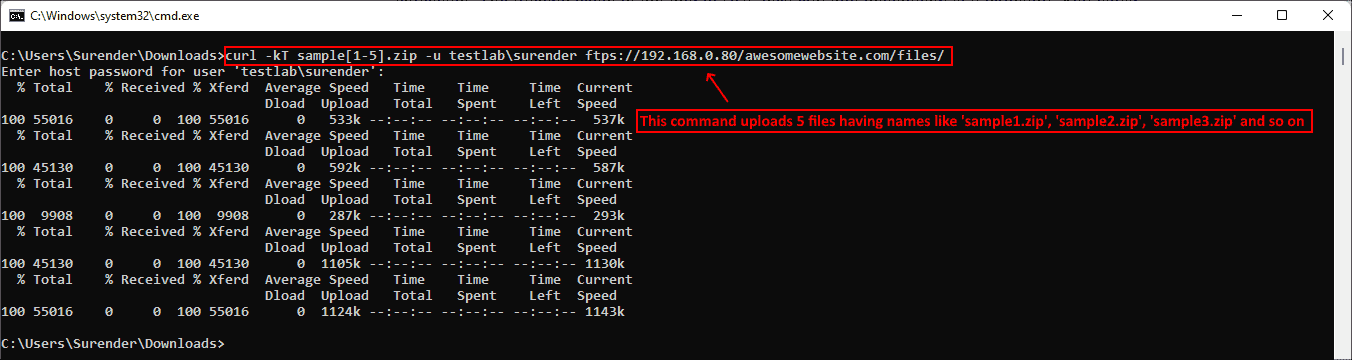
Выгрузка нескольких файлов на сервер
▍ Последовательность команд
Как говорилось ранее, curl поддерживает различные методы в зависимости от используемого протокола. Дополнительные команды можно отправлять при помощи —quote (или -Q) для выполнения операции до или после обычной операции curl. Например, можно скачать файл с удалённого сервера по протоколу FTPS и удалить файл с сервера после успешного скачивания. Для этого нужно выполнить следующую команду:
curl -u testlabsurender -kO "ftps://192.168.0.80/awesomewebsite.com/files/sample1.zip" -Q "-DELE sample1.zip"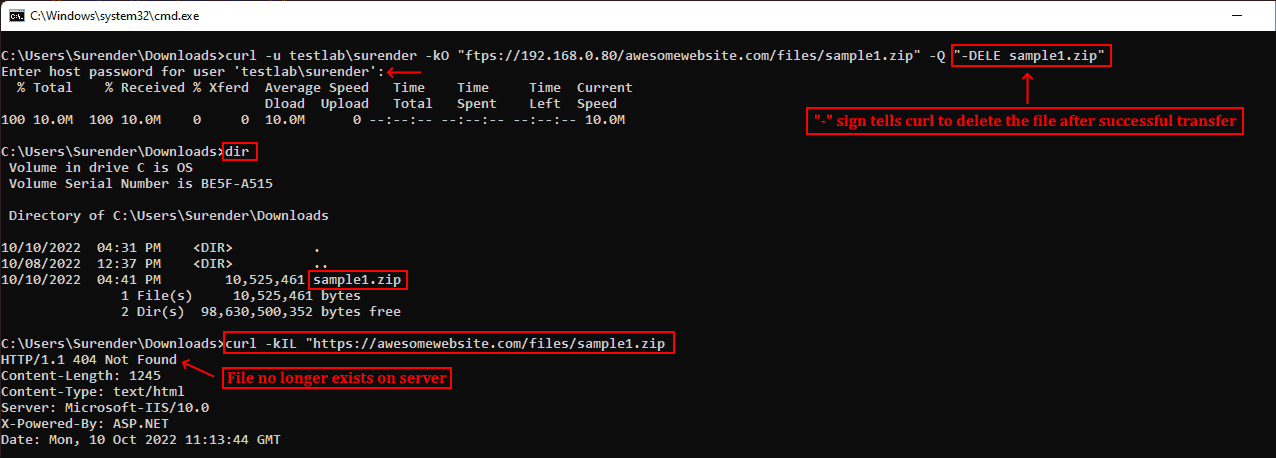
Удаление файла после успешного скачивания
В показанном выше примере я скачал файл sample1.zip с FTPS-сервера при помощи опции -O. После опции -Q я добавил минус (-) перед командой DELE, что заставляет curl отправить команду DELE sample1.zip сразу после успешного скачивания файла. Аналогично, если вы хотите отправить команду на сервер до выполнения операции curl, используйте плюс (+) вместо минуса.
▍ Изменение user-agent
Информация user-agent сообщает серверу тип клиента, отправляющего запрос. При отправке запроса curl на сервер по умолчанию используется user-agent curl/<version>. Если сервер настроен так, чтобы блокировать запросы curl, можно задать собственный user-agent при помощи опции —user-agent (или -A). Показанная ниже команда отправляет стандартный user-agent Google Chrome:
curl -kIA "Mozilla/5.0 (Windows NT 10.0; Win64; x64) AppleWebKit/537.36 (KHTML, like Gecko) Chrome/106.0.0.0" https://awesomewebsite.com/files/secretFile.zip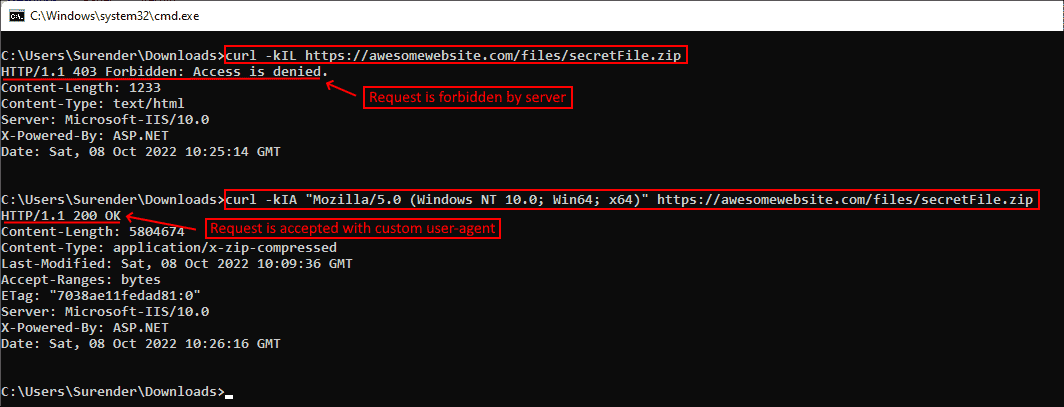
Использование собственного user-agent с командой curl, чтобы избежать блокировки сервером
На показанном выше скриншоте видно, что обычный запрос curl был отклонён веб-сервером (с ответом 403 Forbidden), но при передаче другого user-agent запрос выполняется успешно, возвращая ответ 200 OK.
▍ Отправка куки
По умолчанию запрос curl не отправляет и не сохраняет куки. Для записи куки можно использовать опцию —cookie-jar (или -c), а отправить куки можно опцией —cookie (or -b):
curl -c /path/cookie_file https://awesomewebsite.com/
curl -b /path/cookie_file https://awesomewebsite.com/
Первая команда записывает файл куки, а вторая отправляет куки с запросом curl. Также можно отправить куки в формате ‘name = value’:
curl -b 'session=abcxyz' -b 'loggedin=true' http://echo.hoppscotch.io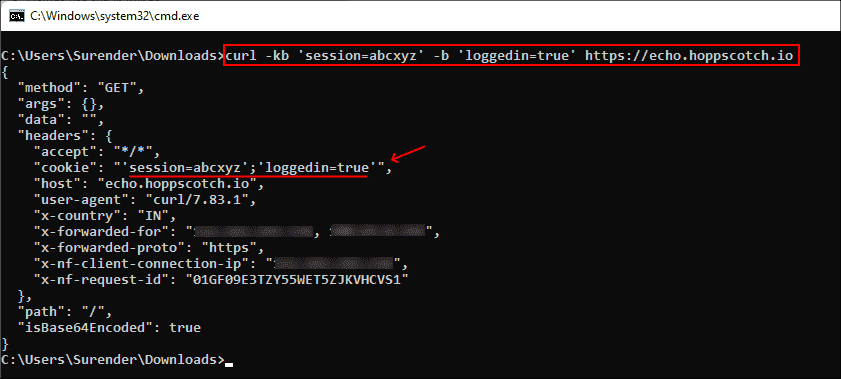
Отправка нескольких куки командой curl
Я воспользовался веб-сайтом echo.hoppscotch.io для демонстрации заголовков HTTP-запросов, которые обычно невидимы клиентам, отправляющим запрос. Если вы не хотите пользоваться этим веб-сайтом, то можете применить опцию –verbose (или -v) для отображения запроса в сыром виде (который отображает и заголовки запросов).
▍ Использование прокси-сервера
Если вы пользуетесь прокси-сервером для подключения к интернету, в curl можно указать прокси опцией —proxy (или -x). Если прокси-сервер требует аутентификации, то добавьте —proxy-user (или -U):
curl -x 192.168.0.250:8088 -U username:password https://awesomewebsite.com/Прокси-сервер указывается в формате server:port, а пользователь прокси — в формате username:password. Можно не вводить пароль пользователя прокси, тогда curl попросит ввести его в режиме no-echo.

Использование прокси-сервера и аутентификации
▍ Дополнительные заголовки запросов
Иногда вместе с запросом к серверу необходимо отправить дополнительную информацию. В curl это можно сделать при помощи —header (или -H), как показано в следующей команде:
curl -vkIH "x-client-os: Windows 11 Enterprise (x64)" https://awesomewebsite.com
Указание дополнительных заголовков для запроса curl
Можно отправлять любую информацию, недоступную через стандартные заголовки HTTP-запросов. В этом примере я отправил название своей операционной системы. Также я добавил опцию -v для включения verbose-вывода, отображающего дополнительный заголовок, отправляемый вместе с каждым моим запросом curl.
▍ Отправка электронного письма
Так как curl поддерживает протокол SMTP, его можно использовать для отправки электронного письма. Показанная ниже команда позволяет отправить электронное письмо при помощи curl:
curl --insecure --ssl-reqd smtps://mail.yourdomain.com –-mail-from sender@yourdomain.com –-mail-rcpt receiver@company.com --user sender@yourdomain.com --upload-file email_msg.txt
Отправка электронного письма командой curl
Давайте вкратце перечислим использованные здесь опции:
- Опция —insecure (или -k) используется, чтобы избежать ошибки сертификата SSL. Мы уже применяли её ранее.
- Опция —ssl-reql используется для апгрейда соединения передачи простого текста до зашифрованного соединения, если оно поддерживается SMTP-сервером. Если вы уверены, что ваш SMTP-сервер поддерживает SSL, то можно использовать непосредственно имя сервера smtps (например, smtps://smtp.yourdomain.com), как показано на скриншоте.
- Опция —mail-from используется для указания адреса электронной почты отправителя.
- Опция mail-rcpt указывает адрес электронной почты получателя.
- Опция —user (или -u) отправляет имя пользователя для аутентификации, оно должно совпадать с адресом mail-from, потому что в противном случае письмо может быть отклонено или помечено как спам.
- Опция —upload-file (или -T) используется для указания файла, в котором находится отправляемое письмо.
На скриншоте ниже показано письмо, полученное мной во входящие:
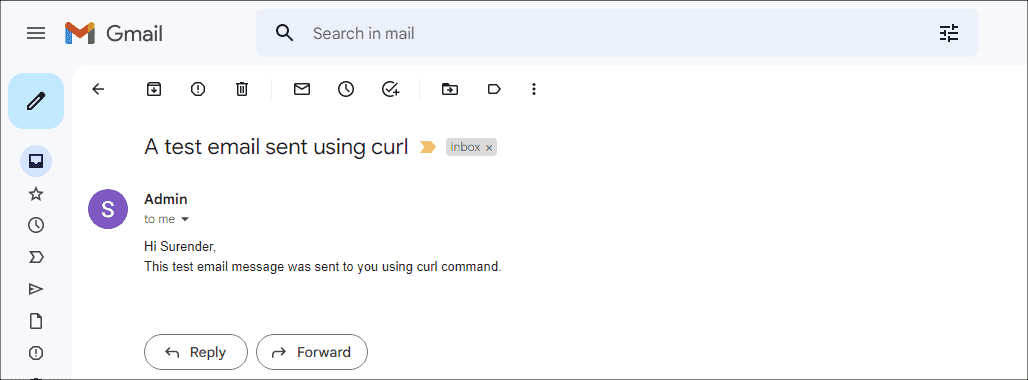
Просмотр письма, отправленного с помощью curl
Это всего лишь несколько примеров использования curl — на самом деле их гораздо больше. Я настоятельно рекомендую проверить справку по curl и поэкспериментировать с ней.
А вы используете curl? И если да, то для чего?
Telegram-канал с полезностями и уютный чат

Команда Mail.ru Cloud Solutions перевела статью, автор которой составил краткий справочник часто используемых команд curl для протоколов HTTP/HTTPS. Это не замена официального руководства по cURL, скорее, краткий конспект.
cURL (расшифровывается как Client URL) — программное обеспечение, которое предоставляет библиотеку libcurl и инструмент командной строки curl. Возможности cURL огромны, во многих опциях легко потеряться.
curl — инструмент для передачи данных с сервера или на него, при этом используется один из поддерживаемых протоколов: DICT, FILE, FTP, FTPS, GOPHER, HTTP, HTTPS, IMAP, IMAPS, LDAP, LDAPS, POP3, POP3S, RTMP, RTSP, SCP, SFTP, SMB, SMBS, SMTP, SMTPS, TELNET и TFTP. Команда предназначена для работы без взаимодействия с пользователем.
Команда curl запускается из командной строки и предустановлена в большинстве дистрибутивов Linux.
Варианты применения:
- доступ без браузера;
- внутри shell-скриптов;
- для тестирования API.
В основном я использовал curl для тестирования API, иногда просто вставляя команды, которые нашел в интернете. Но я хочу разобраться в curl и лучше понять его особенности. Так что поделюсь некоторыми командами, с которыми столкнулся во время работы.
Запрос страницы
Если никакие аргументы не указаны, то команда curl выполняет HTTP-запрос get и отображает статическое содержимое страницы. Оно аналогично тому, что мы видим при просмотре исходного кода в браузере.
curl www.google.com
Скачивание файла
Есть два варианта этой команды.
- Скачать файл и сохранить под оригинальным именем (testfile.tar.gz).
curl -O https://testdomain.com/testfile.tar.gz
- Скачать файл и сохранить под другим именем.
curl -o custom_file.tar.gz https://testdomain.com/testfile.tar.gz
Еще можно скачать несколько файлов одной командой, хотя в мануале так делать не рекомендуют.
curl -O https://testdomain.com/testfile.tar.gz -O https://testdomain.com/testfile2.tar.gz
Получение заголовков HTTP
Если вы хотите посмотреть, какие заголовки отдает сервер, то можно использовать опции -I или -head. Они позволяют получить заголовок без тела документа.
curl -I https://www.google.com
HTTP/1.1 200 OK
Content-Type: text/html; charset=ISO-8859-1
P3P: CP=»This is not a P3P policy! See g.co/p3phelp for more info.»
Date: Thu, 04 Jun 2020 15:07:42 GMT
Server: gws
X-XSS-Protection: 0
X-Frame-Options: SAMEORIGIN
Transfer-Encoding: chunked
Expires: Thu, 04 Jun 2020 15:07:42 GMT
Cache-Control: private
Set-Cookie: 1P_JAR=2020-06-04-15; expires=Sat, 04-Jul-2020 15:07:42 GMT; path=/; domain=.google.com; Secure
Set-Cookie: <cookie_info>
Игнорирование ошибки неправильных или самоподписанных сертификатов
Когда вы тестируете веб-приложение или API, то в вашем тестовом окружении могут быть самоподписанные или неправильные SSL-сертификаты. По умолчанию curl верифицирует все сертификаты. Чтобы он не выдавал ошибку о неверных сертификатах и устанавливал соединение для тестирования, используйте опцию -k или -insecure.
curl -k https://localhost/my_test_endpoint
Отправка POST-запроса
Иногда для тестирования API нужно отправить какие-либо данные, обычно это делают через POST-запрос. Если вы делаете POST-запрос при помощи curl, то можете отправить данные либо в виде списка имя=значение, либо в виде JSON.
- Запрос в виде списка имя=значение.
curl —data «param1=test1¶m2=test2» http://test.com
- Запрос в виде JSON.
curl -H ‘Content-Type: application/json’ —data ‘{«param1″:»test1″,»param2″:»test2»}’ http://www.test.com
Параметр —data эквивалентен -d, оба указывают curl выполнить HTTP POST-запрос.
Указание типа запроса
Если curl не передаются никакие данные, то по умолчанию он выполняет HTTP GET запрос. Но если вам, например, нужно обновить данные, а не пересоздать их заново, то curl поддерживает опции, указывающие тип запроса. Параметры -x или —request позволяют указать тип HTTP-запроса, который используется для сообщения с сервером.
# updating the value of param2 to be test 3 on the record id
curl -X ‘PUT’ -d ‘{«param1″:»test1″,»param2″:»test3»}’ http://test.com/1
Использование авторизации
API защищено авторизацией по логину-паролю — вы можете передать пару логин-пароль, используя параметр -u или —user. Если просто передать логин, то curl запросит пароль в командной строке. Используете параметр несколько раз — для авторизации на сервер будет передано только последнее значение.
curl -u <user:password> https://my-test-api.com/endpoint1
Управление резольвом имен
Вы хотите протестировать API перед развертыванием и перенаправить запрос на тестовую машину — это можно сделать, указав альтернативный резольв имени эндпоинта для данного запроса. Все работает эквивалентно пропиcыванию хоста в /etc/hosts.
curl —resolve www.test.com:80:localhost http://www.test.com/
Загрузка файла
О возможности загрузки файла через curl я узнал недавно. Не был уверен, что это возможно, но, по всей видимости, это так: curl с опцией -F эмулирует отправку заполненной формы, когда пользователь нажимает кнопку отправки. Опция указывает curl передавать данные в виде POST-запроса, используя multipart / form-data Content-Type.
Вы можете загрузить несколько файлов, повторяя параметр -F.
Измерение продолжительности соединения
Вы можете использовать опцию -w для отображения информации в stdout после завершения передачи. Она поддерживает отображение набора переменных. Например, можно узнать общее время, которое потребовалось для успешного выполнения запроса. Это удобно, если вам нужно определить время загрузки или скачивания с помощью curl.
curl -w «%{time_total}n» -o /dev/null -s www.test.com
Это некоторые из опций, которые можно использовать с curl. Надеюсь, информация была вам полезна и статья понравилась.
Удачи!
Что еще почитать:
- Иллюстрированное руководство по полезным инструментам командной строки.
- Что происходит, когда вы обновляете свой DNS.
- Наш Телеграм-канал о цифровой трансформации.
Осваиваем быстрый, маленький и простой инструмент тестирования API
- Настройка
- Базовые опции
- GET-метод
- POST-метод
- Отправка простого текста
- Параметры строки запроса
- Отправка JSON-объекта
- Эмуляция отправки значений формы
- Отправка файла
- Другие методы
- Аутентификация
- Платный тариф
“Когда я начал изучать HTTP-протокол и надо было работать с URL-ами и передаваемыми в них данными, в каждом найденном инструменте не хватало хорошей документации, или она была, но в виде избыточно сложных инструкций для простых вещей, типа отправки простого HTTP-запроса. Однажды обратил внимание на curl, которым раньше скачивал файлы, и это оказался лучший инструмент для изучения веб-API.
Этот материал требует базового знакомства с HTTP-протоколом, понимания что такое веб-API, а также умения работать с командной строкой в Windows, надеемся ты это умеешь.
Итак, поехали.
Настройка
Как всякий серьезный софт, curl требует установки в операционной системе. Хорошая новость: скорее всего, он уже установлен! Точнее, встроен в операционку. Уважающий себя тестировщик, разумеется, работает в Linux, а почти каждый дистрибутив Linux уже идет с curl. Более того, даже Windows 10 (начиная с версии 1803) поставляется с curl.
Проверим, есть ли в системе curl.
В Linux набираем в терминале:
curl --version
Если все-таки работаешь в Windows, то запускаешь cmd или, лучше, PowerShell:
curl.exe --version
Команда покажет версию curl, прикрепленные библиотеки, дату релиза, поддерживаемые протоколы и поддерживаемые функции. В Linux увидим следующее:
curl 7.68.0 (x86_64-pc-linux-gnu) libcurl/7.68.0 OpenSSL/1.1.1f zlib/1.2.11 brotli/1.0.7 libidn2/2.2.0 libpsl/0.21.0 (+libidn2/2.2.0) libssh/0.9.3/openssl/zlib nghttp2/1.40.0 librtmp/2.3
Release-Date: 2020-01-08
Protocols: dict file ftp ftps gopher http https imap imaps ldap ldaps pop3 pop3s rtmp rtsp scp sftp smb smbs smtp smtps telnet tftp
Features: AsynchDNS brotli GSS-API HTTP2 HTTPS-proxy IDN IPv6 Kerberos Largefile libz NTLM NTLM_WB PSL SPNEGO SSL TLS-SRP UnixSockets
Если введенная команда выдала ошибку, то curl не установлен, значит его надо скачать и поставить. Еще одна хорошая новость: он бесплатный (но есть нюансы, о которых в конце). Есть версии для практически всех операционных систем, размер ехе-шника не превышает 5 Мб.
Если понадобилось ознакомиться с curl, а опыта с API нет, ситуацию облегчит тестовый httpbin-сервис, примеры с которым приведены далее в этом посте.
Примечание. С этого момента, будут приводиться исключительно «линуксовые» bash-команды, для ясности и читабельности. Если ты сидишь в Windows и примеры почему-то не работают, попробуй добавлять «.exe» после команды curl, или удалять (возможные) лишние пробелы в строках (line breaks).
Базовые опции
Несмотря на то, что Curl очень простой инструмент, он имеет множество различных функций. Начнем с ними знакомиться:
--requestили-X: Указывает нужный http-метод (здесь подробнее — желательно хорошо разобраться). Если опции нет, запрос по умолчанию обрабатывается как GET. Например:curl -X POST ...
--headerили-H: В HTTP-запрос добавляется дополнительный заголовок, их может быть сколько угодно. Например:curl -H "X-First-Name: John" -H "X-Last-Name: Doe" ...
--dataили-d: В запрос включаются какие-то данные. Они могут добавляться в той же строке, или указывать на текстовый файл, откуда считываются. Пример:curl -d "тут текстовые данные" ...
- —
-formили-F: curl эмулирует заполненную форму, с нажатием кнопки отправки. Допускается отправка бинарных файлов. Пример:curl -F name=John -F shoesize=11 ...
--user <user:password>или-u <user:password>: Логин и пароль для аутентификации на сервере.
curl показывает логи HTTP-транзакций в терминале. Если нужно еще больше подробностей, то curl сохраняет все в файлы для проверки при необходимости. Для это есть функции:
--dump-headerили-D: Сохраняет в указанный дамп-файл полученные заголовки. Пример:curl -D result.header ...--outputили-O: Выводит в указанный дамп-файл, минуя stdout. Пример:curl -o result.json ...
GET-метод
Мы познакомились с основами, пора перейти к более серьезным вещам.
Во первых, меняем текущую папку в командной оболочке, на домашнюю папку или на рабочий стол (desktop), чтобы легче было найти выведенные из curl файлы.
Делаем первые запросы:
curl -X GET "https://httpbin.org/get"
-H "accept: application/json"
-D result.headers
-o result.json
В первой строке указываем curl выполнить HTTP-запрос GET-методом, по такому-то URL. Во второй строке добавляем заголовок, чтобы сервер знал, что нам отправить в ответе. В третьей строке прописываем вывод полученных заголовков в файл дампа, который мы назовем result.headers. В последней строчке даем указание вывести результат запроса в файл result.json.
Если все пошло как надо, после запуска команды в прописанной на первом этапе домашней папке появятся нужные файлы. В данном случае будет выглядеть так.
файл result.headers
HTTP/2 200
date: Thu, 02 Sep 2021 05:47:14 GMT
content-type: application/json
content-length: 169
В файле result.headers видим, что запрос успешно выполнен, с кодом ответа 200 (все ОК), от сервера получен таймкод ответа (timestamp), и все заголовки.
Файл result.json
{
  "args": {},
  "headers": {
    "Accept": "application/json",
    "Host": "httpbin.org",
    "User-Agent": "curl/7.68.0"
  },
  "url": "https://httpbin.org/get"
}
В этом файле result.json находится тело ответа. Это данные, возвращенные сервером, в красивом JSON-формате (об особенностях формата читаем здесь).
POST-метод
Отправка простого текста
Сейчас попробуем отправить обычный текст (plaintext) на сервер, с помощью метода POST.
curl -X POST "https://httpbin.org/post"
-H "accept: application/json"
-H "Content-Type: text/plain"
-H "Custom-Header: Testing"
-d "I love hashnode"
-D result.headers
-o result.json
Как видим, в запрос включен кастомный заголовок "Custom-Header: Testing". Он должен отображаться в теле ответа.
Смотрим теперь в файл result.headers
HTTP/2 200
date: Fri, 03 Sep 2021 03:16:20 GMT
content-type: application/json
content-length: 182
и файл result.json
{
  "data": "I love hashnode",
  "headers": {
    "Accept": "application/json",
    "Content-Length": "15",
    "Content-Type": "text/plain",
    "Custom-Header": "Testing"
  }
}
Видим, что сервер получил plaintext-сообщение с тестовым заголовком и вернул его обратно без изменений.
Параметры строки запроса
В curl поддерживается не только простой текст, но и достаточно сложные параметры типа:
curl -X POST "https://httpbin.org/post?name=Carlos&last=Jasso"
-H "accept: application/json"
-D result.headers
-o result.json
файл result.headers
HTTP/2 200
date: Fri, 03 Sep 2021 03:30:47 GMT
content-type: application/json
content-length: 120
файл result.json
{
  "args": {
    "lastname": "Jasso",
    "name": "Carlos"
  },
  "headers": {
    "Accept": "application/json"
  }
}
Сервер, как и предыдущем примере, правильно «зеркалит» параметры, которые curl отправил.
Отправка JSON-объекта
Поставим curl-у задачу посложнее, попытаемся отправить на сервер json-файл и посмотрим что получится:
curl -X POST "https://httpbin.org/post"
-H "Content-Type: application/json; charset=utf-8"
-d @data.json
-o result.json
Тут мы добавили специальный заголовок Content-Type, сообщающий серверу, что ему посылается json-файл. Путь к файлу с данными указывается флагом -d с собачкой @, и далее путь к файлу (в нашем случае это будет текущая папка).
Вот содержимое файла data.json, который надо создать:
{
    "name": "Jane",
    "last": "Doe"
}
И файл result.json:
{
  "data": "{    "name": "Jane",    "last": "Doe"}",
  "headers": {
    "Accept": "*/*",
    "Content-Length": "38",
    "Content-Type": "application/json; charset=utf-8"
  },
  "json": {
    "last": "Doe",
    "name": "Jane"
  }
}
И снова видим, как curl умеет корректно отправлять контент JSON-файлов на сервер.
Эмуляция отправки значений формы
Иногда может понадобиться имитировать отправку формы. Curl умеет и это:
curl -X POST "https://httpbin.org/post"
-H "Content-Type: multipart/form-data"
-F "FavoriteFood=Pizza"
-F "FavoriteBeverage=Beer"
-o result.json
Чтобы обозначить для сервера, что посылаются данные формы, добавляется заголовок с соответствующим MIME-типом (как показано выше), плюс параметр -F в каждом из полей и значений.
result.json:
{
  "form": {
    "FavoriteBeverage": "Beer",
    "FavoriteFood": "Pizza"
  },
  "headers": {
    "Accept": "*/*",
    "Content-Length": "261",
    "Content-Type": "multipart/form-data;"
  }
}
Видим, что сервер получил форму и правильно обработал все поля.
Отправка файла
Выше мы демонстрировали достаточно простые действия. А как насчет передачи файла? Файлы передаются таким же образом, как формы выше. Отправим изображение из текущей папки:
curl -X POST "https://httpbin.org/post"
-H "Content-Type: multipart/form-data"
-F "FileComment=This is a JPG file"
-F "image=@image.jpg"
-o result.json
result.json:
{
  "files": {
    "image": "data:image/jpeg;base64,/9j/4AAQSkZJ..."
  },
  "form": {
    "FileComment": "This is a JPG file"
  },
  "headers": {
    "Accept": "*/*",
    "Content-Length": "78592",
    "Content-Type": "multipart/form-data;"
  }
}
curl может потребоваться некоторое время чтобы отправить большой файл, а потом сервер вернет этот файл (причем закодированный в Base64). Curl должен правильно обработать такой запрос.
Другие методы
Можно попробовать «погонять» любые запросы, чтобы убедиться, как полезен бывает curl при тестировании API. В целом, обработка запросов зависит от типа API и имплементации метода.
Аутентификация
curl умеет проводить аутентификацию на сервере, когда по URL-адресу нужен ввод пользовательских имени-пароля. В этом случае httpbin получает ожидаемые имя и пароль в формате /basic-auth/{user}/{passwd} и сопоставляет значения с введенными. Если эти данные не введены, получается следующее:
curl -X GET "https://httpbin.org/basic-auth/carlos/secret"
-H "accept: application/json"
-D result.headers
result.headers:
HTTP/2 401
date: Fri, 03 Sep 2021 04:08:44 GMT
content-length: 0
То есть код 401 (не прошла авторизация).
Добавим в запрос логин и пароль:
curl -X GET "https://httpbin.org/basic-auth/carlos/secret"
-u carlos:secret
-H "accept: application/json"
-D result.headers
result.headers:
HTTP/2 200
date: Fri, 03 Sep 2021 04:14:19 GMT
content-type: application/json
content-length: 48
result.json:
{
  "authenticated": true,
  "user": "carlos"
}
Все хорошо, авторизация прошла успешно.
Curl позволяет авторизоваться и другими методами — например, с помощью токена. Токен просто отправляется в соответствующем заголовке.
Платный тариф
Уже должно быть понятно, что curl — полезная вещь для тестировщика. Чтобы в этом мнении укрепиться, рассмотрим еще некоторые нюансы.
Распространенные инструменты тестирования API — бесплатные, но в них чаще всего бывают платными функции командной работы. Или например, запросы к социальным сетям (Вконтакте и Facebook) блокированы в бесплатном тарифе, и это один из немногих минусов в столь приятном продукте.
В других похожих инструментах бывает слишком сложный интерфейс, но это не об curl. Для простоты, рекомендую работать в VSCode. Связка VSCode c curl — идеальная.

На скрине слева отрендеренный markdown-документ, справа полученные result.headers и result.json, и терминал внизу, куда тестировщику приходится глядеть чаще всего.
Вопреки убеждению, бытующему в определенных кругах, curl хорошо работает не только в REST-архитектуре, но и в SOAP.
Конечно, раскрыть все нюансы в одной статье невозможно, и чтобы продолжить знакомство с такой полезной вещью как curl, не обойтись без чтения официальной документации на их сайте. Там же и примеры использования.”
Edit me
Хотя Postman удобен, его трудно использовать для представления в документации, как совершать запросы с его помощью. Кроме того, разные пользователи, вероятно, используют разные клиенты с графическим интерфейсом или вообще не используют их (предпочитая командную строку)
Вместо того, чтобы описывать, как выполнять REST-запросы с использованием GUI-клиента, такого как Postman, наиболее традиционный метод документирования синтаксиса запроса — использовать curl.
curl — это утилита командной строки, которая позволяет выполнять HTTP-запросы с различными параметрами и методами. Вместо того, чтобы переходить к веб-ресурсам в адресной строке браузера, можно использовать командную строку, чтобы получить те же ресурсы, извлеченные в виде текста.
Установка curl
curl доступен на MacOS по умолчанию, для Windows требуется установка. Ниже представлены инструкции по установке curl.
Установка на MacOS
Проверить установлен ли curl на MacOS можно так:
- Открываем Терминал (нажимаем
Cmd+spacebarдля открытия Спотлайт и вводим Terminal). - В терминале пишем
curl -V. Ответ должен быть примерно таким:
curl 7.54.0 (x86_64-apple-darwin16.0) libcurl/7.54.0 SecureTransport zlib/1.2.8
Protocols: dict file ftp ftps gopher http https imap imaps ldap ldaps pop3 pop3s rtsp smb smbs smtp smtps telnet tftp Features: AsynchDNS IPv6 Largefile GSS-API Kerberos SPNEGO NTLM NTLM_WB SSL libz UnixSockets
Если такого ответа нет, то curl необходимо скачать и установить
Установка на Windows
Установка curl в Windows включает другие шаги. Сначала определяем версию windows: 32-разрядная или 64-разрядная версия Windows, щелкнув правой кнопкой мыши Компьютер и выбрав Свойства. Затем следуем инструкциям на этой странице. Нужно выбрать одну из бесплатных версий с правами Администратора.
После установки проверяем версию установленной curl;
- Открываем командную строку нажав кнопку
Пуски введяcmd - В строке пишем
curl -V
Ответ должен быть примерно таким:
curl 7.54.0 (x86_64-apple-darwin14.0) libcurl/7.37.1 SecureTransport zlib/1.2.5
Protocols: dict file ftp ftps gopher http https imap imaps ldap ldaps pop3 pop3s rtsp smtp smtps telnet tftp
Features: AsynchDNS GSS-Negotiate IPv6 Largefile NTLM NTLM_WB SSL libz
Создание тестового вызова API
После установки curl делаем тестовый вызов API
curl -X GET "https://api.openweathermap.org/data/2.5/weather?zip=95050&appid=fd4698c940c6d1da602a70ac34f0b147&units=imperial"
В ответ должен вернуться минимизированный JSON:
{"coord":{"lon":-121.96,"lat":37.35},"weather":[{"id":701,"main":"Mist","description":"mist","icon":"50d"}],"base":"stations","main":{"temp":66.92,"pressure":1017,"humidity":50,"temp_min":53.6,"temp_max":75.2},"visibility":16093,"wind":{"speed":10.29,"deg":300},"clouds":{"all":75},"dt":1522526400,"sys":{"type":1,"id":479,"message":0.0051,"country":"US","sunrise":1522504404,"sunset":1522549829},"id":420006397,"name":"Santa Clara","cod":200}
curl и Windows
Если вы используете Windows, обратите внимание на следующие требования к форматированию при использовании curl:
- Используйте двойные кавычки в командной строке Windows. (Windows не поддерживает одинарные кавычки.);
- Не используйте обратную косую черту
для разделения строк. (Это только для удобства чтения и не влияет на вызов на Mac.) - Добавив -k в команду curl, вы можете обойти сертификат безопасности curl, который может быть необходимым.
🔙
Go next ➡
It looks like you’re using cmd.exe. Command Prompt’s character escaping rules are both archaic and awful. I recommend using Powershell instead; it uses rules much more similar to those of bash on other *nix shells (though not identical, notably because it uses ` (backtick) as the escape character instead of backslash).
Here’s the command in Powershell on my system:
& 'C:Program FilesGitmingw64bincurl' -i -X POST -H "Content-Type:application/json" -d '{ "firstName" : "Frodo", "lastName" : "Baggins" }' http://localhost:8080/people
The leading & is required because the path to the program is a quoted string. I had to specify the path because I don’t have a curl.exe in my Windows PATH. However, I could just escape the space in «Program Files»:
C:Program` FilesGitmingw64bincurl -i -X POST -H "Content-Type:application/json" -d '{ "firstName" : "Frodo", "lastName" : "Baggins" }' http://localhost:8080/people
Single and double quotes otherwise work as you’re using them, with the ' delimiting the start of a string and the " appearing just as literal characters inside it.
Note that you do have to provide the path to a curl executable, or at least specify curl.exe; curl by itself is a Powershell alias for the Invoke-WebRequest cmdlet, which can do most of what the cURL program can do but has very different argument syntax.
Also, while you can invoke Powershell from cmd using powershell -c <command>, that wouldn’t really help here because you’d have to escape the string using cmd‘s silly syntax anyhow.
Another option is just to use the Windows Subsystem for Linux (WSL), which lets you run Linux programs (including the default Ubuntu versions of bash and curl) directly on Windows, no VM or rebooting needed. Full details about this can be found at https://msdn.microsoft.com/en-us/commandline/wsl/about, but the short version is try running bash (or bash.exe) from any Command Prompt or Powershell window, and it will install the Linux subsystem or at least tell you how.