
|
45 / 44 / 7 Регистрация: 15.10.2008 Сообщений: 320 |
|
|
1 |
|
Открытие папки (проводника)21.04.2010, 12:02. Показов 38774. Ответов 13
Привет. столкнулся с проблемой. как программоно открыть папку при нажатии на кнопку?
__________________
0 |

|
dimasamchenko 336 / 269 / 21 Регистрация: 30.03.2009 Сообщений: 500 |
||||
|
21.04.2010, 12:23 |
2 |
|||
|
что значит «как программно открыть папку»
далее работаем с файлами…
0 |
|
MAcK Комбайнёр 1606 / 704 / 77 Регистрация: 27.05.2008 Сообщений: 2,535 |
||||
|
21.04.2010, 12:54 |
3 |
|||
|
Решение
6 |
 Сообщение было отмечено как решение
|
45 / 44 / 7 Регистрация: 15.10.2008 Сообщений: 320 |
|
|
21.04.2010, 13:04 [ТС] |
4 |
|
что значит «как программно открыть папку» т.е. мне надо по нажатию на кнопку, открыть в эксплорере папку, лежащую в корне диска, но имя диска мы тоже не знаем …
0 |


|
Комбайнёр 1606 / 704 / 77 Регистрация: 27.05.2008 Сообщений: 2,535 |
|
|
21.04.2010, 13:27 |
5 |
|
Я как понял ,тебе нужно копать в сторону апи функций для перехвата автозагрузки и брать букву диска
0 |
|
336 / 269 / 21 Регистрация: 30.03.2009 Сообщений: 500 |
|
|
21.04.2010, 13:28 |
6 |
|
т.е. мне надо по нажатию на кнопку, открыть в эксплорере папку, лежащую в корне диска, но имя диска мы тоже не знаем … открой то-не знаю что…
0 |
|
45 / 44 / 7 Регистрация: 15.10.2008 Сообщений: 320 |
|
|
21.04.2010, 13:42 [ТС] |
7 |
|
в общем эта прога будет служить автораном. а мы же не можем предусмотреть какую имеет буковку cd-rom на разных компах
0 |
|
336 / 269 / 21 Регистрация: 30.03.2009 Сообщений: 500 |
|
|
21.04.2010, 13:52 |
8 |
|
тогда вообще непонятен твой вопрос!!! Добавлено через 7 минут
в общем эта прога будет служить автораном. а мы же не можем предусмотреть какую имеет буковку cd-rom на разных компах авторан ну и ладно а что ты хочешь писать, значит должен знать куда писать а на это я тебе ответил
0 |
|
45 / 44 / 7 Регистрация: 15.10.2008 Сообщений: 320 |
|
|
21.04.2010, 13:56 [ТС] |
9 |
|
задача передо мной такая. при запуске диска должен отработать файл autorun.inf, который запустит это приложение, на этой форме есть две кнопки, видео и фото. так вот. при нажатии на эти кнопки должны открыться соответствующие папки. что касаеться кода, там еще нет ничего особенного, только обработчики нажатия кнопки (собственно в которых и должно отрабатывать то, то я спрашивал).
0 |
|
336 / 269 / 21 Регистрация: 30.03.2009 Сообщений: 500 |
|
|
21.04.2010, 14:00 |
10 |
|
где открытся папки!!!????!!!! какие файлы???!!!
0 |
|
45 / 44 / 7 Регистрация: 15.10.2008 Сообщений: 320 |
|
|
21.04.2010, 14:03 [ТС] |
11 |
|
папка с содержимым(фото или видео) должна открыться в эксплорере.
0 |
|
dimasamchenko 336 / 269 / 21 Регистрация: 30.03.2009 Сообщений: 500 |
||||
|
21.04.2010, 14:09 |
12 |
|||
|
папка с содержимым(фото или видео) должна открыться в эксплорере. эксплорер — это интернетэксплорер?? тогда понятно.
0 |
|
45 / 44 / 7 Регистрация: 15.10.2008 Сообщений: 320 |
|
|
21.04.2010, 14:12 [ТС] |
13 |
|
эксплореро — это проводник windows (служба explorer.exe)
0 |
|
dimasamchenko 336 / 269 / 21 Регистрация: 30.03.2009 Сообщений: 500 |
||||
|
21.04.2010, 14:16 |
14 |
|||
|
смотри выше!!!
1 |
Последнее обновление: 31.10.2015
Окна открытия и сохранения файла представлены классами OpenFileDialog и SaveFileDialog.
Они имеют во многом схожую функциональность, поэтому рассмотрим их вместе.
OpenFileDialog и SaveFileDialog имеют ряд общих свойств, среди которых можно выделить следующие:
-
DefaultExt: устанавливает расширение файла, которое добавляется по умолчанию, если пользователь ввел имя файла без расширения -
AddExtension: при значенииtrueдобавляет к имени файла расширение при его отсуствии. Расширение берется из
свойстваDefaultExtилиFilter -
CheckFileExists: если имеет значениеtrue, то проверяет существование файла с указанным именем -
CheckPathExists: если имеет значениеtrue, то проверяет существование пути к файлу с указанным именем -
FileName: возвращает полное имя файла, выбранного в диалоговом окне -
Filter: задает фильтр файлов, благодаря чему в диалоговом окне можно отфильтровать файлы по расширению. Фильтр задается в следующем формате
Название_файлов|*.расширение. Например,Текстовые файлы(*.txt)|*.txt. Можно задать сразу несколько фильтров, для этого они разделяются
вертикальной линией |. Например,Bitmap files (*.bmp)|*.bmp|Image files (*.jpg)|*.jpg -
InitialDirectory: устанавливает каталог, который отображается при первом вызове окна -
Title: заголовок диалогового окна
Отдельно у класса SaveFileDialog можно еще выделить пару свойств:
-
CreatePrompt: при значенииtrueв случае, если указан не существующий файл, то будет отображаться сообщение о его создании -
OverwritePrompt: при значенииtrueв случае, если указан существующий файл, то будет отображаться сообщение о том, что файл будет перезаписан
Чтобы отобразить диалоговое окно, надо вызвать метод ShowDialog().
Рассмотрим оба диалоговых окна на примере. Добавим на форму текстовое поле textBox1 и две кнопки button1 и button2. Также перетащим с панели инструментов
компоненты OpenFileDialog и SaveFileDialog. После добавления они отобразятся внизу дизайнера формы. В итоге форма будет выглядеть примерно так:
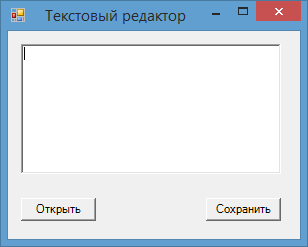
Теперь изменим код формы:
public partial class Form1 : Form
{
    public Form1()
    {
        InitializeComponent();

        button1.Click += button1_Click;
        button2.Click += button2_Click;
        openFileDialog1.Filter = "Text files(*.txt)|*.txt|All files(*.*)|*.*";
        saveFileDialog1.Filter = "Text files(*.txt)|*.txt|All files(*.*)|*.*";
    }
    // сохранение файла
    void button2_Click(object sender, EventArgs e)
    {
        if (saveFileDialog1.ShowDialog() == DialogResult.Cancel)
            return;
        // получаем выбранный файл
        string filename = saveFileDialog1.FileName;
        // сохраняем текст в файл
        System.IO.File.WriteAllText(filename, textBox1.Text);
        MessageBox.Show("Файл сохранен");
    }
    // открытие файла
    void button1_Click(object sender, EventArgs e)
    {
        if (openFileDialog1.ShowDialog() == DialogResult.Cancel)
            return;
        // получаем выбранный файл
        string filename = openFileDialog1.FileName;
        // читаем файл в строку
        string fileText = System.IO.File.ReadAllText(filename);
        textBox1.Text = fileText;
        MessageBox.Show("Файл открыт");
    }
}
По нажатию на первую кнопку будет открываться окно открытия файла. После выбора файла он будет считываться, а его текст будет отображаться в
текстовом поле. Клик на вторую кнопку отобразит окно для сохранения файла, в котором надо установить его название. И после этого произойдет сохранение
текста из текстового поля в файл.
I want to select a file on the local hard disk when I click a «Browse» button.
I don’t have any idea how to use the OpenFileDialog control. Can anyone help me?

Mark Byers
795k188 gold badges1562 silver badges1443 bronze badges
asked Feb 15, 2011 at 3:55

0
These links explain it with examples
http://dotnetperls.com/openfiledialog
http://www.geekpedia.com/tutorial67_Using-OpenFileDialog-to-open-files.html
private void button1_Click(object sender, EventArgs e)
{
    int size = -1;
    OpenFileDialog openFileDialog1 = new OpenFileDialog();
    DialogResult result = openFileDialog1.ShowDialog(); // Show the dialog.
    if (result == DialogResult.OK) // Test result.
    {
       string file = openFileDialog1.FileName;
       try
       {
          string text = File.ReadAllText(file);
          size = text.Length;
       }
       catch (IOException)
       {
       }
    }
    Console.WriteLine(size); // <-- Shows file size in debugging mode.
    Console.WriteLine(result); // <-- For debugging use.
}

answered Feb 15, 2011 at 4:00

DiviDivi
7,56113 gold badges47 silver badges63 bronze badges
0
var FD = new System.Windows.Forms.OpenFileDialog();
if (FD.ShowDialog() == System.Windows.Forms.DialogResult.OK) {
    string fileToOpen = FD.FileName;

    System.IO.FileInfo File = new System.IO.FileInfo(FD.FileName);

    //OR

    System.IO.StreamReader reader = new System.IO.StreamReader(fileToOpen);
    //etc
}

Cody Gray♦
236k50 gold badges486 silver badges567 bronze badges
answered Feb 15, 2011 at 3:59

Adam RackisAdam Rackis
81.9k55 gold badges266 silver badges392 bronze badges
0
OpenFileDialog fdlg = new OpenFileDialog();
fdlg.Title = "C# Corner Open File Dialog" ;
fdlg.InitialDirectory = @"c:" ;
fdlg.Filter = "All files (*.*)|*.*|All files (*.*)|*.*" ;
fdlg.FilterIndex = 2 ;
fdlg.RestoreDirectory = true ;
if(fdlg.ShowDialog() == DialogResult.OK)
{
textBox1.Text = fdlg.FileName ;
}
In this code you can put your address in a text box.

Josh R
1051 silver badge6 bronze badges
answered Jul 25, 2014 at 7:57

alireza0000alireza0000
3413 silver badges3 bronze badges
        int size = -1;
        OpenFileDialog openFileDialog1 = new OpenFileDialog();
        openFileDialog1.InitialDirectory = @"YOUR FILE PATH";
        DialogResult result = openFileDialog1.ShowDialog();
        // Show the dialog.
        openFileDialog1.RestoreDirectory = true;
        openFileDialog1.Title = "BROWSE TEXT BLT";
        openFileDialog1.FilterIndex = 2;
        openFileDialog1.CheckFileExists = true;
        openFileDialog1.CheckPathExists = true;
        if (result == DialogResult.OK) // Test result.
        {
            string file = openFileDialog1.FileName;
            try
            {
                string text = System.IO.File.ReadAllText(file);
                size = text.Length;
            }
            catch (System.IO.IOException ex)
            {
                throw ex;
            }
            TXT_FOLDER_PATH.Text = file;
         }
answered Sep 24, 2022 at 11:09

- Remove From My Forums
-
Question
-
Hi,
Short story: how do I embed a Windows Explorer or FileOpenDialog onto a winform?
Background: I am writing a task management application using Windows Forms in C#. I want to have a «import task photos» form, on the
right is a
view into the local file system, on the left is a ListView which displays photos of a task. After a technicians finishes a task and takes some photos, he connects his phone/camera to the PC, then he can see those photos through the
right view, and select and drag photos from the right view to the left ListView.Instead of spending two weeks writing my own powerful explorer control for the right view, thought I should be able to just somehow embed the Windows Explorer
or something similar such as OpenFileDialog onto the form.How do I do that?
-
Moved by
Saturday, November 26, 2011 4:57 PM
Winforms related (From:Visual C# General)
-
Moved by
Answers
-
> how do I embed a Windows Explorer or FileOpenDialog onto a winform?
you can do it with SetParent function. but this is not good idea and i think it’s even not legal.
so below is an example only for educational purposes!using System; using System.Diagnostics; using System.Linq; using System.Runtime.InteropServices; using System.Text; using System.Windows.Forms; using System.Drawing; namespace WindowsFormsApplication4 { public partial class Form1 : Form { public Form1() { this.Size = new System.Drawing.Size(800, 600); this.TopMost = true; this.FormBorderStyle = FormBorderStyle.FixedToolWindow; Func<bool> run = () => Window.Find(hwnd => { var cn = Window.GetClassName(hwnd); var res = (cn == "CabinetWClass"); if (res) { this.Controls.Clear(); Window.SetParent(hwnd, this.Handle); Window.SetWindowPos(hwnd, new IntPtr(0), -8, -30, this.Width + 10, this.Height + 37, 0x0040); } return res; }); new Button { Parent = this, Text = "Start" } .Click += (s, e) => { if (run() == false) MessageBox.Show("Open Explorer"); }; } } public static class Window { public static bool Find(Func<IntPtr, bool> fn) { return EnumWindows((hwnd, lp) => !fn(hwnd), 0) == 0; } public static string GetClassName(IntPtr hwnd) { var sb = new StringBuilder(1024); GetClassName(hwnd, sb, sb.Capacity); return sb.ToString(); } public static uint GetProcessId(IntPtr hwnd) // {0:X8} { uint pid; GetWindowThreadProcessId(hwnd, out pid); return pid; } public static string GetText(IntPtr hwnd) { var sb = new StringBuilder(1024); GetWindowText(hwnd, sb, sb.Capacity); return sb.ToString(); } delegate bool CallBackPtr(IntPtr hwnd, int lParam); [DllImport("user32.dll")] static extern int EnumWindows(CallBackPtr callPtr, int lPar); [DllImport("user32.dll")] static extern uint GetWindowThreadProcessId(IntPtr hWnd, out uint lpdwProcessId); [DllImport("user32.dll", CharSet = CharSet.Auto, SetLastError = true)] static extern int GetWindowText(IntPtr hWnd, StringBuilder lpString, int nMaxCount); [DllImport("user32.dll", SetLastError = true, CharSet = CharSet.Auto)] static extern int GetClassName(IntPtr hWnd, StringBuilder lpClassName, int nMaxCount); [DllImport("User32", CharSet = CharSet.Auto, ExactSpelling = true)] public static extern IntPtr SetParent(IntPtr hWndChild, IntPtr hWndParent); [DllImport("user32.dll", SetLastError = true)] public static extern bool SetWindowPos(IntPtr hWnd, IntPtr hWndInsertAfter, int X, int Y, int W, int H, uint uFlags); } }
-
Marked as answer by
Silan Liu
Sunday, November 27, 2011 10:50 PM
-
Marked as answer by
-
With all my respect — no. Why do people like me prefer to code using C# instead of C++ or C? Because C# has a powerful library of classes and controls, that enables you to do things in one line of code which you used to do in C++ in 200 lines.
With your logic one could say «Well C++ has all the for/while/if/else key words, with which you could write the whole world.»
If there is a very common need — like this file explorer control, which could be easily encapsulated generically, then it warrants a class/tool.
Cheers,
SillyDude
A customer tells you that he wants a Calculator application. What will you do? Will you expect .NET to give you a calculator control which you embed in a form and give it to customer? Or you will develop one with existing buttons and textboxes ?
FCL provides you all basic controls from which you can develop a composite control. Imagine if you had to create a button from scratch how much time/effort/code you had to invest. As of now FCL doesn’t have inbuilt file explorer control because they thought
that control can be built very easily using exisiting controls. May be in next version of .NET they may include a control like that (if at all it is necessary).
Please mark this post as answer if it solved your problem. Happy Programming!
-
Marked as answer by
Silan Liu
Sunday, November 27, 2011 10:51 PM
-
Marked as answer by
-
-
Edited by
Sheng Jiang 蒋晟
Saturday, November 26, 2011 5:36 PM -
Marked as answer by
Silan Liu
Sunday, November 27, 2011 10:50 PM
-
Edited by
C# OpenFileDialog
C# OpenFileDialog control allows us to browse and select files on a computer in an application. A typical Open File Dialog looks like Figure 1 where you can see Windows Explorer like features to navigate through folders and select a file.

Figure 1
Creating a OpenFileDialog
We can create an OpenFileDialog control using a Forms designer at design-time or using the OpenFileDialog class in code at run-time (also known as dynamically). Unlike other Windows Forms controls, an OpenFileDialog does not have and not need visual properties like others. The only purpose of OpenFileDialog to display available colors, create custom colors and select a color from these colors. Once a color is selected, we need that color in our code so we can apply it on other controls.
Again, you can create an OpenFileDialog at design-time but it is easier to create an OpenFileDialog at run-time.
Design-time
To create an OpenFileDialog control at design-time, you simply drag and drop an OpenFileDialog control from Toolbox to a Form in Visual Studio. After you drag and drop an OpenFileDialog on a Form, the OpenFileDialog looks like Figure 2.

Figure 2
Adding an OpenFileDialog to a Form adds following two lines of code.
- private System.Windows.Forms.OpenFileDialog openFileDialog1;
- this.openFileDialog1 = new System.Windows.Forms.OpenFileDialog();
Run-time
Creating a OpenFileDialog control at run-time is merely a work of creating an instance of OpenFileDialog class, set its properties and add OpenFileDialog class to the Form controls.
First step to create a dynamic OpenFileDialog is to create an instance of OpenFileDialog class. The following code snippet creates an OpenFileDialog control object.
- OpenFileDialog openFileDialog1 = new OpenFileDialog();
ShowDialog method displays the OpenFileDialog.
- openFileDialog1.ShowDialog();
Once the ShowDialog method is called, you can browse and select a file.
Setting OpenFileDialog Properties
After you place an OpenFileDialog control on a Form, the next step is to set properties.
The easiest way to set properties is from the Properties Window. You can open Properties window by pressing F4 or right click on a control and select Properties menu item. The Properties window looks like Figure 3.

Figure 3
Initial and Restore Directories
InitialDirectory property represents the directory to be displayed when the open file dialog appears first time.
- openFileDialog1.InitialDirectory = @«C:»;
If RestoreDirectory property set to true that means the open file dialogg box restores the current directory before closing.
- openFileDialog1.RestoreDirectory = true;
Title
Title property is used to set or get the title of the open file dialog.
- openFileDialog1.Title = «Browse Text Files»;
Default Extension
DefaultExtn property represents the default file name extension.
- openFileDialog1.DefaultExt = «txt»;
Filter and Filter Index
Filter property represents the filter on an open file dialog that is used to filter the type of files to be loaded during the browse option in an open file dialog. For example, if you need users to restrict to image files only, we can set Filter property to load image files only.
- openFileDialog1.Filter = «txt files (*.txt)|*.txt|All files (*.*)|*.*»;
FilterIndex property represents the index of the filter currently selected in the file dialog box.
- openFileDialog1.FilterIndex = 2;
Check File Exists and Check Path Exists
CheckFileExists property indicates whether the dialog box displays a warning if the user specifies a file name that does not exist. CheckPathExists property indicates whether the dialog box displays a warning if the user specifies a path that does not exist.
- openFileDialog1.CheckFileExists = true;
- openFileDialog1.CheckPathExists = true;
File Name and File Names
FileName property represents the file name selected in the open file dialog.
- textBox1.Text = openFileDialog1.FileName;
If MultiSelect property is set to true that means the open file dialog box allows multiple file selection. The FileNames property represents all the files selected in the selection.
- this.openFileDialog1.Multiselect = true;
- foreach (String file in openFileDialog1.FileNames)
- {
- MessageBox.Show(file);
- }
Read Only Checked and Show Read Only Files
ReadOnlyChecked property represents whether the read-only checkbox is selected and ShowReadOnly property represents whether the read-only checkbox is available or not.
- openFileDialog1.ReadOnlyChecked = true;
- openFileDialog1.ShowReadOnly = true;
Implementing OpenFileDialog in a C# and WinForms Applications
Now let’s create a WinForms application that will use an OpenFileDialog that has two Button controls, a TextBox, and a container control. The Form looks like Figure 4.

Figure 4
The Browse button click event handler will show an open file dialog and users will be able to select text files. The open file dialog looks like Figure 5.

Figure 5
The following code snippet is the code for Browse button click event handler. Once a text file is selected, the name of the text file is displayed in the TextBox.
- private void BrowseButton_Click(object sender, EventArgs e)
- {
- OpenFileDialog openFileDialog1 = new OpenFileDialog
- {
- InitialDirectory = @«D:»,
- Title = «Browse Text Files»,
- CheckFileExists = true,
- CheckPathExists = true,
- DefaultExt = «txt»,
- Filter = «txt files (*.txt)|*.txt»,
- FilterIndex = 2,
- RestoreDirectory = true,
- ReadOnlyChecked = true,
- ShowReadOnly = true
- };
- if (openFileDialog1.ShowDialog() == DialogResult.OK)
- {
- textBox1.Text = openFileDialog1.FileName;
- }
- }
The code for Browse Multiple Files button click event handler looks like following.
- private void BrowseMultipleButton_Click(object sender, EventArgs e)
- {
- this.openFileDialog1.Filter =
- «Images (*.BMP;*.JPG;*.GIF,*.PNG,*.TIFF)|*.BMP;*.JPG;*.GIF;*.PNG;*.TIFF|» +
- «All files (*.*)|*.*»;
- this.openFileDialog1.Multiselect = true;
- this.openFileDialog1.Title = «Select Photos»;
- DialogResult dr = this.openFileDialog1.ShowDialog();
- if (dr == System.Windows.Forms.DialogResult.OK)
- {
- foreach (String file in openFileDialog1.FileNames)
- {
- try
- {
- PictureBox imageControl = new PictureBox();
- imageControl.Height = 400;
- imageControl.Width = 400;
- Image.GetThumbnailImageAbort myCallback =
- new Image.GetThumbnailImageAbort(ThumbnailCallback);
- Bitmap myBitmap = new Bitmap(file);
- Image myThumbnail = myBitmap.GetThumbnailImage(300, 300,
- myCallback, IntPtr.Zero);
- imageControl.Image = myThumbnail;
- PhotoGallary.Controls.Add(imageControl);
- }
- catch (Exception ex)
- {
- MessageBox.Show(«Error: « + ex.Message);
- }
- }
- }
- }
- public bool ThumbnailCallback()
- {
- return false;
- }
The output looks like Figure 6.

Summary
An OpenFileDialog control allows users to launch Windows Open File Dialog and let them select files. In this article, we discussed how to use a Windows Open File Dialog and set its properties in a Windows Forms application.
Лабораторные работы си шарп. Элементы управления для работы с файловой системой
Приложения для Windows forms
Лабораторная работа 11
Выполнить: Разработайте приложение, которое выводит на экран выбранный графический файл.
Пример выполнения:
Форма "Работа с файлами"

[Название проекта: Lesson_10Lab11, название файла L10Lab11.cs]
✍ Выполнение:
Инструментарий:
| объект | свойство name |
|---|---|
| форма | |
| контейнер для изображения (PictureBox) | pct |
| кнопка (button) | btn |
| диалоговое окно (OpenFileDialog) | file1 |
- Создайте новый проект и расположите элементы управления PictureBox (pct) и Button (btn) на новой форме, как показано на рисунке. Добавьте также элемент управления OpenFileDialog. Это скрытый элемент, не отображается в дизайне формы. Для свойства name элемента задайте имя file1.
- Предположим, необходимо открывать только графические файлы формата jpg. В таком случае, необходимо задать фильтр для файлов. Сделать это следует при загрузке формы, т.е. нужно запрограммировать событие Load для формы (дважды щелкнув по форме в коне дизайна формы):
- Теперь осталось вывести изображение из графического файла в PictureBox (pct). Для этого запрограммируем событие click для кнопки:
- Протестируйте результат.
private void Form1_Load(object sender, EventArgs e)
        {
            file1.Filter = "(*.jpg)|*.jpg";
        }
До прямого слэша указывается, как будет отображаться фильтр в окне, а после – сама маска фильтра.
// создаем переменную fname строкового типа
string fname;
// открываем Проводник
file1.ShowDialog();
// используем переменную для хранения имени выбранного файла
fname = file1.FileName;
// загружаем файл в элемент PictureBox
pct.Image = Image.FromFile(fname);
Дополнительное задание. Добавьте на форму текстовое окно для вывода полного имени открываемого графического файла.
Самостоятельное задание: Добавьте на форму элемент управления SaveFileDialog – диалоговое окно для сохранения файла и кнопку Сохранить файл. Необходимо использовать метод ShowDialog, свойство file1.SafeFileName и pct.Image.Save=....
Вопросы для самоконтроля:
- Назовите основное назначение элемента управления OpenFileDialog.
- Какое свойство элемента управления OpenFileDialog используется для открытия файлов конкретного формата?
- Каково назначение элемента управления PictureBox?
- Когда генерируется событие Load для формы?
* При использовании материалов обязательна ссылка на источник: Майер С.Ф., «Языки программирования (C#) / Programming languages (C#)» — Учебно-методическое пособие : Южный федеральный университет. – Ростов-на-Дону, 2020. – 212 с.
ВНИМАНИЕ: длинный пост с большим количеством кода.
Когда вы перемещаете элемент управления веб-браузера в папку файловой системы, в элементе управления веб-браузера размещается окно представления оболочки, которое, в свою очередь, размещает представление списка проводника. Фактически, это то же самое, что и процесс Explorer, а также диалоговые окна с файлами и Internet Explorer. Это окно оболочки не является элементом управления, поэтому для него нет методов или событий, на которые можно подписаться, но оно может получать сообщения Windows и может быть разделено на подклассы.
Оказывается, часть вашего вопроса, связанная с автоматической настройкой представления «Подробности», на самом деле довольно проста. В событии Navigated элемента управления веб-браузера просто найдите дескриптор окна просмотра оболочки и отправьте ему сообщение WM_COMMAND с определенной константой оболочки (SHVIEW_REPORT). Это недокументированная команда, но она поддерживается на всех платформах Windows до Windows 2008 включительно и почти наверняка будет в Windows 7. Некоторый код, добавляемый в форму вашего веб-браузера, демонстрирует это:
    private delegate int EnumChildProc(IntPtr hwnd, IntPtr lParam);

    [DllImport("user32.dll", SetLastError = true)]
    private static extern IntPtr SendMessage(IntPtr hWnd, int Msg,
        IntPtr wParam, IntPtr lParam);

    [DllImport("user32.dll", SetLastError = true)]
    private static extern int EnumChildWindows(IntPtr hWndParent,
        EnumChildProc lpEnumFunc, IntPtr lParam);

    [DllImport("user32.dll", SetLastError = true, CharSet = CharSet.Unicode)]
    private static extern int GetClassName(IntPtr hWnd, StringBuilder lpClassName,
        int nMaxCount);

    private const int WM_COMMAND = 0x0111;
    private const int SHVIEW_REPORT = 0x702C;
    private const string SHELLVIEW_CLASS = "SHELLDLL_DefView";

    private IntPtr m_ShellView;

    void webBrowser1_Navigated(object sender, WebBrowserNavigatedEventArgs e)
    {
        m_ShellView = IntPtr.Zero;
        EnumChildWindows(webBrowser1.Handle, EnumChildren, IntPtr.Zero);
        if (m_ShellView != IntPtr.Zero)
        {
            SendMessage(m_ShellView, WM_COMMAND, (IntPtr)SHVIEW_REPORT, (IntPtr)0);
        }
    }

    private int EnumChildren(IntPtr hwnd, IntPtr lParam)
    {
        int retval = 1;

        StringBuilder sb = new StringBuilder(SHELLVIEW_CLASS.Length + 1);
        int numChars = GetClassName(hwnd, sb, sb.Capacity);
        if (numChars == SHELLVIEW_CLASS.Length)
        {
            if (sb.ToString(0, numChars) == SHELLVIEW_CLASS)
            {
                m_ShellView = hwnd;
                retval = 0;
            }
        }

        return retval;
    }
Каждый раз, когда веб-браузер переходит в новое окно (в том числе, когда папка открывается из представления проводника), создается новое окно представления оболочки, поэтому сообщение необходимо повторно отправлять в новое окно в каждом событии Navigated.
Что касается второй части вашего вопроса, вы хотели бы получать события из представления списка проводника. Это немного сложнее, чем первая часть. Для этого вам нужно будет подклассифицировать окно просмотра списка, а затем отслеживать сообщения Windows для тех, которые вас интересуют (например, WM_LBUTTONDBLCLK). Чтобы подклассифицировать окно, вам нужно будет создать свой собственный класс, производный от класса NativeWindow, и назначить ему дескриптор окна, которое вам нужно отслеживать. Затем вы можете переопределить его оконную процедуру и обрабатывать различные сообщения по своему усмотрению. Ниже приведен пример создания события двойного щелчка — это относительно просто, но для получения расширенного доступа к представлению списка проводника может потребоваться гораздо больше работы, чем вы готовы сделать.
Добавьте это в свою форму:
    private ExplorerListView m_Explorer;

    void OnExplorerItemExecuted(object sender, ExecuteEventArgs e)
    {
        string msg = string.Format("Item to be executed: {0}{0}{1}",
            Environment.NewLine, e.SelectedItem);
        e.Cancel = (MessageBox.Show(msg, "", MessageBoxButtons.OKCancel)
            == DialogResult.Cancel);
    }
и эти две строки в обработчик событий Navigated (сразу после SendMessage):
    m_Explorer = new ExplorerListView(m_ShellView);
    m_Explorer.ItemExecuted += OnExplorerItemExecuted;
Затем добавьте следующие классы:
class ExplorerListView : NativeWindow
{

    public event EventHandler<ExecuteEventArgs> ItemExecuted;

    [DllImport("user32.dll", SetLastError = true, CharSet = CharSet.Unicode)]
    private static extern IntPtr SendMessage(IntPtr hWnd, int Msg,
        IntPtr wParam, IntPtr lParam);

    [DllImport("user32.dll", SetLastError = true, CharSet = CharSet.Unicode)]
    private static extern IntPtr FindWindowEx(IntPtr hwndParent,
        IntPtr hwndChildAfter, string lpszClass, string lpszWindow);

    private const int WM_LBUTTONDBLCLK = 0x0203;

    private const int LVM_GETNEXTITEM = 0x100C;
    private const int LVM_GETITEMTEXT = 0x1073;

    private const int LVNI_SELECTED = 0x0002;

    private const string EXPLORER_LISTVIEW_CLASS = "SysListView32";

    public ExplorerListView(IntPtr shellViewHandle)
    {
        base.AssignHandle(FindWindowEx(shellViewHandle, IntPtr.Zero,
            EXPLORER_LISTVIEW_CLASS, null));
        if (base.Handle == IntPtr.Zero)
        {
            throw new ArgumentException("Window supplied does not encapsulate an explorer window.");
        }
    }


    protected override void WndProc(ref Message m)
    {
        switch (m.Msg)
        {
            case WM_LBUTTONDBLCLK:
                if (OnItemExecution() != 0) return;
                break;
            default:
                break;
        }
        base.WndProc(ref m);
    }

    private int OnItemExecution()
    {
        int cancel = 0;
        ExecuteEventArgs args = new ExecuteEventArgs(GetSelectedItem());
        EventHandler<ExecuteEventArgs> temp = ItemExecuted;
        if (temp != null)
        {
            temp(this, args);
            if (args.Cancel) cancel = 1;
        }
        return cancel;
    }

    private string GetSelectedItem()
    {
        string item = null;

        IntPtr pStringBuffer = Marshal.AllocHGlobal(2048);
        IntPtr pItemBuffer = Marshal.AllocHGlobal(Marshal.SizeOf(typeof(LVITEM)));

        int selectedItemIndex = SendMessage(base.Handle, LVM_GETNEXTITEM, (IntPtr)(-1), (IntPtr)LVNI_SELECTED).ToInt32();
        if (selectedItemIndex > -1)
        {
            LVITEM lvi = new LVITEM();
            lvi.cchTextMax = 1024;
            lvi.pszText = pStringBuffer;
            Marshal.StructureToPtr(lvi, pItemBuffer, false);
            int numChars = SendMessage(base.Handle, LVM_GETITEMTEXT, (IntPtr)selectedItemIndex, pItemBuffer).ToInt32();
            if (numChars > 0)
            {
                item = Marshal.PtrToStringUni(lvi.pszText, numChars);
            }
        }

        Marshal.FreeHGlobal(pStringBuffer);
        Marshal.FreeHGlobal(pItemBuffer);

        return item;
    }

    struct LVITEM
    {
        public int mask;
        public int iItem;
        public int iSubItem;
        public int state;
        public int stateMask;
        public IntPtr pszText;
        public int cchTextMax;
        public int iImage;
        public IntPtr lParam;
        public int iIndent;
        public int iGroupId;
        int cColumns; // tile view columns
        public IntPtr puColumns;
        public IntPtr piColFmt;
        public int iGroup;

    }
}

public class ExecuteEventArgs : EventArgs
{
    public string SelectedItem { get; private set; }
    public bool Cancel { get; set; }

    internal ExecuteEventArgs(string selectedItem)
    {
        SelectedItem = selectedItem;
    }
}
Это должно дать вам представление о том, что вам нужно делать. Если вам нужно больше, чем довольно простые события, вы можете поискать альтернативный элемент управления, хотя из того, что я видел в бесплатных и недорогих областях, есть несколько довольно приличных элементов управления, но все они имеют некоторые причуды и не дадут бесшовного проводника. опыт.
Помните, что этот код был составлен довольно быстро, без обработки ошибок или комментариев и игнорирования нескольких проблем, таких как несколько выбранных элементов, поэтому используйте его в качестве руководства и на свой страх и риск.