
First published on TechNet on Oct 26, 2015
Hello.
Jim
here again to take you through the migration steps for moving your two tier PKI hierarchy from SHA1 to SHA256. I will not be explaining the differences between the two or the supportability / security implementations of either. That information is readily available, easily discoverable and is referenced in the links provided below. Please note the following:
Server Authentication certificates: CAs must begin issuing new certificates using only the SHA-2 algorithm after January 1, 2016. Windows will no longer trust certificates signed with SHA-1 after January 1, 2017.
If your organization uses its own PKI hierarchy (you do not purchase certificates from a third-party), you will not be affected by the SHA1 deprecation. Microsoft’s SHA1 deprecation plan ONLY APPLIES to certificates issued by members of the
Microsoft Trusted Root Certificate program
. Your internal PKI hierarchy may continue to use SHA1; however, it is a security risk and diligence should be taken to move to SHA256 as soon as possible.
In this post, I will be following the steps documented here with some modifications: Migrating a Certification Authority Key from a Cryptographic Service Provider (CSP) to a Key Storage Provider (KSP) —
https://technet.microsoft.com/en-us/library/dn771627.aspx
The steps that follow in this blog will match the steps in the TechNet article above with the addition of screenshots and additional information that the TechNet article lacks.
Additional recommended reading:
The following blog written by Robert Greene will also be referenced and should be reviewed —
http://blogs.technet.com/b/askds/archive/2015/04/01/migrating-your-certification-authority-has…
This Wiki article written by Roger Grimes should also be reviewed as well —
http://social.technet.microsoft.com/wiki/contents/articles/31296.implementing-sha-2-in-active-…
Microsoft Trusted Root Certificate: Program Requirements —
https://technet.microsoft.com/en-us/library/cc751157.aspx
The scenario for this exercise is as follows:
A two tier PKI hierarchy consisting of an Offline ROOT and an Online subordinate enterprise issuing CA.
Operating Systems:
Offline ROOT and Online subordinate are both Windows 2008 R2 SP1
OFFLINE ROOT
CANAME — CONTOSOROOT-CA

ONLINE SUBORDINATE ISSUING CA
CANAME – ContosoSUB-CA

First, you should verify whether your CA is using a Cryptographic Service Provider (CSP) or Key Storage Provider (KSP). This will determine whether you have to go through all the steps or just skip to changing the CA hash algorithm to SHA2. The command for this is in step 3. The line to take note of in the output of this command is “Provider =”. If the
Provider = line
is any of the top five service providers highlighted below, the CA is using a CSP and you must do the conversion steps. The RSA#Microsoft Software
K
ey
S
torage
P
rovider and everything below it are KSP’s.

Here is sample output of the command — Certutil –store my <Your CA common name>
As you can see, the provider is a CSP.

If you are using a Hardware Storage Module (HSM) you should contact your HSM vendor for special guidance on migrating from a CSP to a KSP. The steps for changing the Hashing algorithm to a SHA2 algorithm would still be the same for HSM based CA’s.
There are some customers that use their HSM for the CA private / public key, but use Microsoft CSP’s for the Encryption CSP (used for the CA Exchange certificate).
We will begin at the OFFLINE ROOT.
BACKUP! BACKUP! BACKUP the CA and Private KEY of both the OFFLINE ROOT and Online issuing CA. If you have more than one CA Certificate (you have renewed multiple times), all of them will need to be backed up.
Use the MMC to backup the private key or use the CERTSRV.msc and right click the CA name to backup as follows on both the online subordinate issuing and the OFFLINE ROOT CA’s –
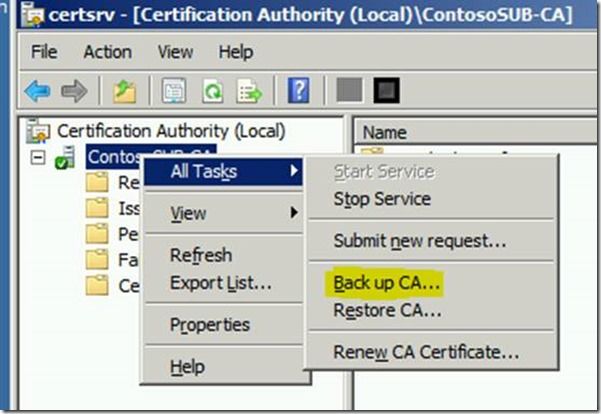

Provide a password for the private key file.
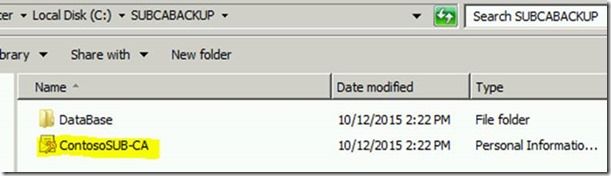
You may also backup the registry location as indicated in step 1C.
Step 2
– Stop the CA Service
Step 3
— This command was discussed earlier to determine the provider.
-
Certutil –store my
<Your CA common name>
Step 4 and Step 6 from the above referenced
TechNet article
should be done via the UI.
a. Open the MMC — load the Certificates snapin for the LOCAL COMPUTER
b. Right click each CA certificate (If you have more than 1) — export
c. Yes, export the private key
d. Check — Include all certificates in the certification path if possible
e. Check — Delete the private key if the export is successful

f. Click next and continue with the export.
Step 5
Copy the resultant .pfx file to a Windows 8 or Windows Server 2012 computer
Conversion requires a Windows Server 2012 certutil.exe, as Windows Server 2008 (and prior) do not support the necessary KSP conversion commands. If you want to convert a CA certificate on an ADCS version prior to Windows Server 2012, you must export the CA certificate off of the CA, import onto Windows Server 2012 or later using certutil.exe with the -KSP option, then export the newly signed certificate as a PFX file, and re-import on the original server.
Run the command in Step 5 on the Windows 8 or Windows Server 2012 computer.
-
Certutil –csp
<KSP name>
-importpfx
<Your CA cert/key PFX file>

Step 6
a. To be done on the Windows 8 or Windows Server 2012 computer as previously indicated using the MMC.
b. Open the MMC — load the Certificates snapin for the LOCAL COMPUTER
c. Right click the CA certificate you just imported – All Tasks – export
*I have seen an issue where the “Yes, export the private key” is dimmed after running the conversion command and trying to export via the MMC. If you encounter this behavior, simply reimport the .PFX file manually and check the box
Mark this key as exportable
during the import
.
This will not affect the previous conversion.
d. Yes, export the private key.
e. Check — Include all certificates in the certification path if possible
f. Check — Delete the private key if the export is successful
g. Click next and continue with the export.
h. Copy the resultant .pfx file back to the destination 2008 R2 ROOTCA
Step 7
You can again use the UI (MMC) to import the .pfx back to the computer store on the ROOTCA
*Don’t forget during the import to Mark this key as exportable.

***IMPORTANT***
If you have renewed you CA multiple times with the same key, after exporting the first CA certificate as indicated above in step 4 and step 6, you are breaking the private key association with the previously renewed CA certificates. This is because you are deleting the private key upon successful export. After doing the conversion and importing the resultant .pfx file on the CA (remembering to mark the private key as exportable), you must run the following command from an elevated command prompt for each of the additional CA certificates that were renewed previously:
certutil –repairstore MY serialnumber
The Serial number is found on the details tab of the CA certificate. This will repair the association of the public certificate to the private key.
Step 8
–
Your CSP.reg file must contain the information highlighted at the top –

Step 8c

Step 8d
– Run CSP.reg
Step 9
Your EncryptionCSP.reg file must contain the information highlighted at the top –

Step 9c
– verification — certutil -v -getreg caencryptioncspEncryptionAlgorithm
Step 9d
– Run EncryptionCsp.reg
Step 10
Change the CA hash algorithm to SHA256
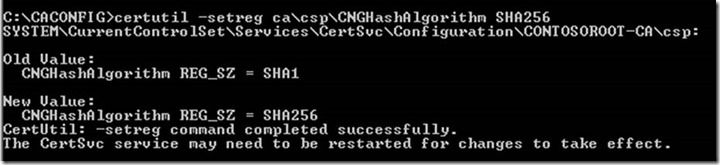
Start the CA Service
Step 11
For a root CA: You will not see the migration take effect for the CA certificate itself until you complete the migration of the root CA, and then renew the certificate for the root CA.
Before we renew the OFFLINE ROOT certificate this is how it looks:

Renewing the CA’s own certificate with a new or existing (same) key would depend on the remaining validity of the certificate. If the certificate is at or nearing 50% of its lifetime, it would be a good idea to renew with a new key. See the following for additional information on CA certificate renewal –
https://technet.microsoft.com/en-us/library/cc730605.aspx
After we renew the OFFLINE ROOT certificate with a new key or the same key, its own Certificate will be signed with the SHA256 signature as indicated in the screenshot below:

Your OFFLINE ROOT CA is now completely configured for SHA256.
Running CERTUTIL –CRL will generate a new CRL file also signed using SHA256
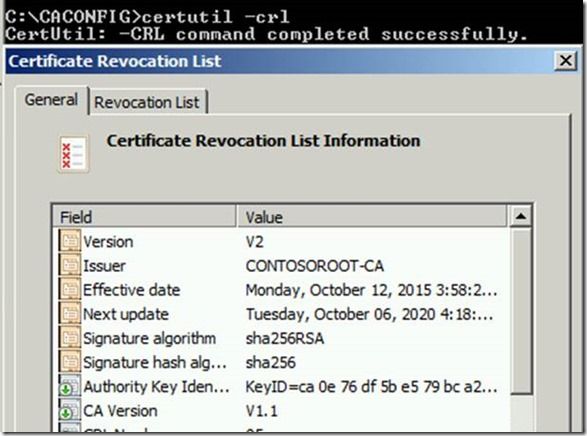
By default, CRT, CRL and delta CRL files are published on the CA in the following location —
%SystemRoot%System32CertSrvCertEnroll
. The format of the CRL file name is the «sanitized name» of the CA plus, in parentheses, the «key id» of the CA (if the CA certificate has been renewed with a new key) and a .CRL extension. See the following for more information on CRL distribution points and the CRL file name —
https://technet.microsoft.com/en-us/library/cc782162%28v=ws.10%29.aspx
Copy this new .CRL file to a domain joined computer and publish it to Active Directory while logged on as an Enterprise Administrator from an elevated command prompt.
Do the same for the new SHA256 ROOT CA certificate.
-
certutil -f -dspublish
<.CRT file>
RootCA -
certutil –f -dspublish
<.CRL file>
Now continue with the migration of the Online Issuing Subordinate CA.
Step 1
– Backup the CA database and Private Key.
Backup the CA registry settings
Step 2
– Stop the CA Service.
Step 3
— Get the details of your CA certificates
Certutil –store my
“Your SubCA name”

I have never renewed the Subordinate CA certificate so there is only one.
Step 4 – 6
As you know from what was previously accomplished with the OFFLINE ROOT, steps 4-6 are done via the MMC and we must do the conversion on a Windows 8 or Windows 2012 or later computer for reasons explained earlier.
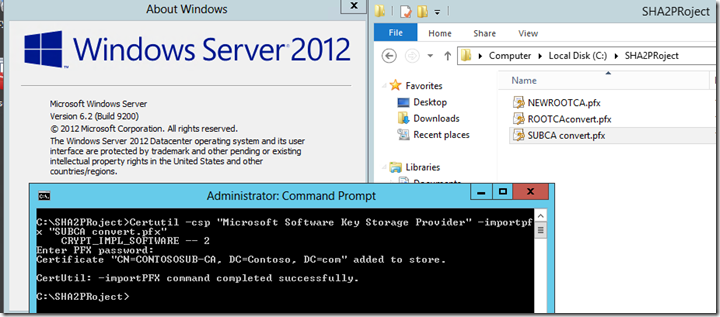
*When you import the converted SUBCA .pfx file via the MMC, you must remember to again Mark this key as exportable.
Step 8 – Step 9
Creating and importing the registry files for CSP and CSP Encryption (see above)
Step 10
— Change the CA hash algorithm to SHA-2

Now in the screenshot below you can see the Hash Algorithm is SHA256.

The Subordinate CA’s own certificate is still SHA1. In order to change this to SHA256 you must renew the Subordinate CA’s certificate. When you renew the Subordinate CA’s certificate it will be signed with SHA256. This is because we previously changed the hash algorithm on the OFFLINE ROOT to SHA256.
Renew the Subordinate CA’s certificate following the proper steps for creating the request and submitting it to the OFFLINE ROOT. Information on whether to renew with a new key or the same key was provided earlier. Then you will copy the resultant .CER file back to the Subordinate CA and install it via the Certification Authority management interface.
If you receive the following error when installing the new CA certificate –
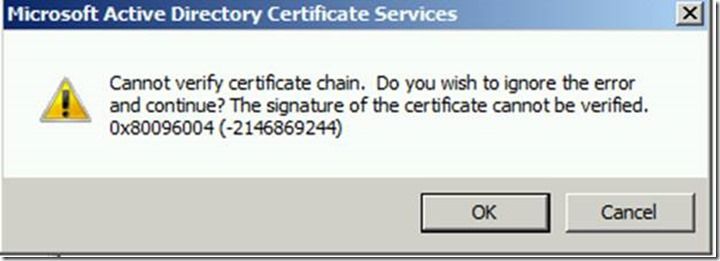
Check the newly procured Subordinate CA certificate via the MMC. On the certification path tab, it will indicate under certificate status that – “The signature of the certificate cannot be verified”
This error could have several causes. You did not –dspublish the new OFFLINE ROOT .CRT file and .CRL file to Active Directory as previously instructed.

Or you did publish the Root CA certificate but the Subordinate CA has not done Autoenrollment (AE) yet and therefore has not downloaded the “NEW” Root CA certificate via AE methods, or AE may be disabled on the CA all together.
After the files are published to AD and after verification of AE and group policy updates on the Subordinate CA, the install and subsequent starting of Certificate Services will succeed.
Now in addition to the Hash Algorithm being SHA256 on the Subordinate CA, the Signature on its own certificate will also be SHA256.
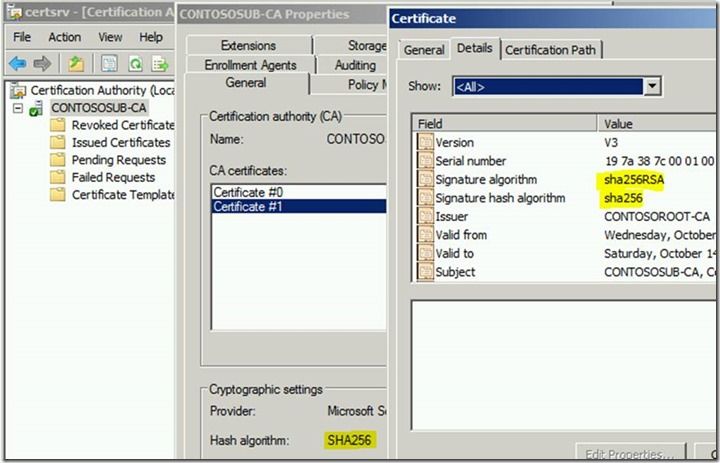
The Subordinate CA’s .CRL files are also now signed with SHA256 –

Your migration to SHA256 on the Subordinate CA is now completed.
I hope you found this information helpful and informative. I hope it will make your SHA256 migration project planning and implementation less daunting.
Jim Tierney
- Remove From My Forums
-
Question
-
Hi
We have an internal CA hierarchy, which consists of a Windows 2012 (not R2) server (Root CA) configured. Our current hasing algorithm is still SHA1 with Microsoft Strong Cryptographic Provider, which I need to upgrade to SHA2 (SHA256) if possible. We
have been using the internal certificates for Windows Client and Mail access (mail.abc.com).Also Clarify me, what happens to the already issued client certificate after the CA certificate is upgraded
to SHA2? I have read some article in this blog/forums said that the impact will not be there if you are not upgrade the Root certificate to SHA2. Will it possible If I want to renew the existing root certificates with the same SHA1 algorithm
in future? or renew the root certificate with the same or new key to SHA2, it won’t give any issue for my infrastructure.Can anyone clarify what my options are to upgrade our CA infrastructure to support SHA256, and switch (if necessary) to a better provider?
Thanks in Advance..
Kuppusamy
Answers
-
Hi,
》》Also Clarify me, what happens to the already issued client certificate after the CA certificate is upgraded
to SHA2?Upgrade SHA1 to SHA256 will not affect previous issued certificate.Acctually,when you renew the Root CA certificate,you have 2 certficiates
in CA.The exist certificates use old root ca cert to validate,and new certificate use new root ca cert to validate.>>an
anyone clarify what my options are to upgrade our CA infrastructure to support SHA256, and switch (if necessary) to a better provider?When you finished upgrading,please remember to re-generate and re-publish the CRL.You could follow this link,although it is replied to 2-tier hierarchy,but
the procedure is same:SHA1 Key Migration to SHA256 for a two tier PKI hierarchy
https://blogs.technet.microsoft.com/askds/2015/10/26/sha1-key-migration-to-sha256-for-a-two-tier-pki-hierarchy/
Best Regards
Cartman
Please remember to mark the replies as an answers if they help. If you have feedback for TechNet Subscriber Support, contact tnmff@microsoft.com-
Edited by
Monday, April 24, 2017 8:55 AM
-
Marked as answer by
Samy K
Monday, April 24, 2017 9:59 AM
-
Edited by
In this post, I will be covering how to Migrate 2-Tier Windows PKI SHA-1 Algorithm Infrastructure to SHA-256(Simply called as SHA-2) Algorithm.
Why do we need this migration:
Server Authentication certificates: CA must begin issuing new certificates using only the SHA-2 algorithm after January 1, 2016. Windows will no longer trust certificates signed with SHA-1 after January 1, 2017.
What is cover in this Article,
1. How to convert ROOT CA(Offline CA) from SHA-1 to SHA-256
2. How to convert Subordinate CA from SHA-1 to SHA-256.
3. How to Request and install SHA-256 Certificates in the CA Servers.
what is not Covered..
1. To Learn how to How to install ROOT CA. Please refer the Article for the new installation.
2. To Learn how to How to install ROOT CA with SHA-256 Algorithm. Please refer the Article if you want to install with SHA-256.
3. To Learn How to install Subordinate CA. Please refer the Article if you want to install with SHA-256.
Prerequisites:
1. Before begin to do anything, Please take backup of CA, Certificates of CA with Private Keys,and Templates.
2. Keep the backups in the Safe place and ensure the passwords of the private keys are kept in the secured place.
3. Ensure there is no Oracle,Unix and Java Applications running with older versions which is not supporting for SHA-256 and it has only support for the SHA-1. If you have you may need to check how to make them supportable for SHA-256 or you have to skip the Migration if there is very high dependency is there for the SHA-1
Test every application within your environment to make sure that they will be able to do certificate chaining and revocation checking against certificates and CRLs that have been signed using one of the SHA2 algorithms. There are some hotfix’s so that Windows XP SP3 and Windows Server 2003 SP2 can properly chain a certificate that contains certification authorities that were signed using SHA2 algorithms.
http://support.microsoft.com/kb/968730/EN-US
Applications that use the Cryptography API cannot validate an X.509 certificate in Windows Server 2003
http://support.microsoft.com/kb/938397/EN-US
Windows Server 2003 and Windows XP clients cannot obtain certificates from a Windows Server 2008-based certification authority (CA) if the CA is configured to use SHA2 256 or higher encryption.
Once all the Backups are verified and confirmed that applications support. we can begin by check the current CA support of Algorithm.
As I mentioned, We are migrating the 2-Tier PKI Infrastructure, Hence we need to check both ROOT CA and Subordinate CA.
In ROOT-CA, Below is the command to get the SHA Algorithm support in the CA,
Certutil –v –getreg cacspHashAlgorithm

Also, you can check it from Certificate Authority Console,


Even you can verify in the Registry from the path,[HKEY_LOCAL_MACHINESYSTEMCurrentControlSetServicesCertSvcConfiguration<Your CA Common Name>CSP]

So above results shows that Root CA supporting currently only for SHA-1 Hash Algorithm and the Certificate of the ROOT-CA also has the certificate in SHA-1. Same verified the in Subordinate CA using the above commands
Okay..Let’s begin Migration,
Step 1: Migrating ROOT-CA Hash Algorithm of to SHA-256.
Run the below command and restart the Certificate service,
certutil -setreg cacspCNGHashAlgorithm SHA256

Now we have successfully migrated to SHA-256. restart the Certificate Service by running the below Powershell command.
Restart-service Certsvc
Once restarted, you can see now that ROOT-CA Hash Algorithm is SHA-256.Wherein ROOT-CA Certificate still has with SHA1.

Step 2: Renew the ROOTCA Certificate with SHA-256.
Since it is certificate algorithm change, You need to get the new certificate with SHA-256.
Right click on ROOTCA–>All Tasks –> Click on Renew CA Certificate

Click on Yes

Select Yes and Click on OK

Now, You can see the ROOT-CA Certificate also shows with Hash Algorithm as SHA-256. So far we have successfully migrated ROOT-CA to SHA-256.

Step 3: Migrating Subordinate CA Hash Algorithm to SHA-256.
Run the below command and restart the Certificate service,
certutil -setreg cacspCNGHashAlgorithm SHA256

Now we have successfully migrated, restart the Certificate Service using the below command
Restart-service certsvc
Once restarted, you can see now that Subordinate CA HASH Algorithm is migrated to SHA-256.Herein Certificate of the Subordinate still has with SHA1.

Step 2: Renew the Subordinate CA Certificate with SHA-256.
Since it is Certificate Algorithm change, You need to get the new certificate with SHA-256.
Right click on Subordinate CA–>All Tasks –> Click on Renew CA Certificate

Select Yes and Click on YES

If you’re ROOT-CA is reachable and in network, you can directly request from the Subordinate CA, ROOT-CA is not in network and offline, You need to take the request file and manually get the certificate and copy the file to the Subordinate CA. In my case, ROOT-CA is reachable,Hence i have requested directly.

Now, the Subordinate CA Certificate also in the SHA-256 hash Algorithm.

So now ROOT-CA and Subordinate CA both are migrated and supports for SHA-256 Algorithm. hereafter the issuing Certificates from the infra will be in the SHA-256.

- Remove From My Forums
-
Question
-
Hi,
I had a 2003 offline root CA which I’ve migrated to 2008 R2. I exported the root certificate and private key, plus the registry settings and certificate DB. These have all been restored on the 2008 server and certificate services have been installed
(I’m using the same server name).I’ve then ran the command below to change the HASH algorithm on the rootCA to sha256:
certutil -setreg cacspCNGHashAlgorithm SHA256
I want to renew the issuingCA certificate so that the issuingCA can issue certificates and sign CRLs with sha256 encryption. I’m planning on the following:
1. Backup issuingCA
2. On the issuing CA —> «renew the CA certificate» —> generate a new certificate request
3. Copy the .req file to the rootCA and submit the request
4. Issue the certificate on the rootCA
5. Install the new sha256 issuing cert on the issuingCA
6. Restart certificate servicesNow that the issuingCA has a sha256 cert itself, I’m planning on setting the issuingCA to issue sha256 certs
certutil -setreg cacspCNGHashAlgorithm SHA256
I have a couple of questions:
1. I have a few hundred XP and 2003 computers which may not be sha256 compatible, if I run the process above will the existing .crt and .crl files in the CDPAIA be over written or signed with a sha256 hash and therefore be invalidated immediately?
I’m OK with the older clients failing revocationautoenrollment once their current certificateCRLs expire, but it would be a nightmare if all of those clients failed at the same time. Im thinking of changing the CDP/AIA location after this process, i.e.
from «cdp.contoso.com/certenroll/pki» (current AIACDP) to «cdp.contoso.com/certenroll/pki/cdp/sha256» so that the old .crt and .crl files are separate from the new ones — is this needed?2. Can I renew the issuing CA certificate with the same key? If so, should I?
Thanks in advance
Answers
-
You will be screwed with this method.
1) You need to move the root to SHA256 too, as the entire chain needs to be SHA256 to prevent the collision attack
2) After you migrate the issuing CA to SHA256, both the new CRL and the previous CRL are signed with a SHA256 signature that the XP/2003 clients you mention will not be able to validate (causing immediate failure of all of your old client certificates)
3) You should always renew with a new key pair. That being said, renewing with the same key pair will do nothing for you as the CRL will now be signed with a SHA256 signature no matter which way you proceed.
In your scenario, the only way to deploy SHA256 is to deploy a green field SHA256 CA hierarchy and keep the old SHA1 hierarchy running as is for your XP/2003 clients
Brian
-
Proposed as answer by
Tuesday, December 8, 2015 5:58 PM
-
Marked as answer by
Steven_Lee0510
Wednesday, December 9, 2015 12:09 AM
-
Proposed as answer by
- Remove From My Forums
-
Question
-
Hi,
I had a 2003 offline root CA which I’ve migrated to 2008 R2. I exported the root certificate and private key, plus the registry settings and certificate DB. These have all been restored on the 2008 server and certificate services have been installed
(I’m using the same server name).I’ve then ran the command below to change the HASH algorithm on the rootCA to sha256:
certutil -setreg cacspCNGHashAlgorithm SHA256
I want to renew the issuingCA certificate so that the issuingCA can issue certificates and sign CRLs with sha256 encryption. I’m planning on the following:
1. Backup issuingCA
2. On the issuing CA —> «renew the CA certificate» —> generate a new certificate request
3. Copy the .req file to the rootCA and submit the request
4. Issue the certificate on the rootCA
5. Install the new sha256 issuing cert on the issuingCA
6. Restart certificate servicesNow that the issuingCA has a sha256 cert itself, I’m planning on setting the issuingCA to issue sha256 certs
certutil -setreg cacspCNGHashAlgorithm SHA256
I have a couple of questions:
1. I have a few hundred XP and 2003 computers which may not be sha256 compatible, if I run the process above will the existing .crt and .crl files in the CDPAIA be over written or signed with a sha256 hash and therefore be invalidated immediately?
I’m OK with the older clients failing revocationautoenrollment once their current certificateCRLs expire, but it would be a nightmare if all of those clients failed at the same time. Im thinking of changing the CDP/AIA location after this process, i.e.
from «cdp.contoso.com/certenroll/pki» (current AIACDP) to «cdp.contoso.com/certenroll/pki/cdp/sha256» so that the old .crt and .crl files are separate from the new ones — is this needed?2. Can I renew the issuing CA certificate with the same key? If so, should I?
Thanks in advance
Answers
-
You will be screwed with this method.
1) You need to move the root to SHA256 too, as the entire chain needs to be SHA256 to prevent the collision attack
2) After you migrate the issuing CA to SHA256, both the new CRL and the previous CRL are signed with a SHA256 signature that the XP/2003 clients you mention will not be able to validate (causing immediate failure of all of your old client certificates)
3) You should always renew with a new key pair. That being said, renewing with the same key pair will do nothing for you as the CRL will now be signed with a SHA256 signature no matter which way you proceed.
In your scenario, the only way to deploy SHA256 is to deploy a green field SHA256 CA hierarchy and keep the old SHA1 hierarchy running as is for your XP/2003 clients
Brian
-
Proposed as answer by
Tuesday, December 8, 2015 5:58 PM
-
Marked as answer by
Steven_Lee0510
Wednesday, December 9, 2015 12:09 AM
-
Proposed as answer by
This blog post is about migrating your Microsoft certification authority hashing algorithm from SHA-1 to SHA-2, to mitigate the risk from using the broken SHA-1 hashing algorithm and to comply with Microsoft SHA-1 deprecation plan.
In this blog post, I will be covering the following topics:
- SHA-1 is broken, time to migrate to SHA-2:
- What a SHA-2 certification authority chain looks like?
- Certification authority migration options.
- Cryptographic providers:
- What are cryptographic providers?
- Cryptographic APIs.
- What this has to do with SHA-2?
- Which provider my certification authority is using?
- Is my certification authority capable of issuing SHA-2 certificates?
- Migrate your certification authority from CSP to KSP:
- Introduction.
- Backup is your big hero.
- How we are going to make your CA use KSP instead of CSP?
- Migration deep dive.
SHA-1 is broken, time to migrate to SHA-2
If you did not know yet, SHA-1 hash algorithm is a legacy cryptographic and is no longer secure. Attackers can use known weakness in SHA-1 to do man-in-middle attacks, compromise data integrity, or perform spoofing.
Microsoft, Google and others had announced their SHA-1 deprecation plans since 2011, to gradually shift from SHA-1 to SHA-2, a more secure alternative. Microsoft announced serious SHA-1 deprecation countdown that will start to take effect on May 9, 2017 according to their published whitepaper.
If you are not sure what SHA-1 deprecation means, how it might affect you, and whether you should do something about it, then kindly read my SHA-1 deprecation blog post and continue reading here to learn what is the next move.
What a SHA-2 certification authority chain looks like?
Before digging deep on how to migrate your certification authority hashing algorithm from SHA-1 to SHA-2, let us pause for a minute and try to picture where we want to be in terms of certification authority state. That is, how a PKI hierarchy would look like, that is not affected by the SHA-1 deprecation plans.
Microsoft SHA-1 deprecation plan affects the following enterprise PKI deployments:
- SSL and code signing entity certificates: These entity [end-user] certificates should be SHA-2 and the code signing certificates should be time-stamped.
- Intermediate certification authority certificate: The CA certificate for the CA server acting as the intermediate CA server (or issuing CA server).
Microsoft SHA-1 deprecation plan does not affect the following”
- Self-signed certificate of the Root certification authority server: This means that only the self-signed certificate for the Root CA can keep using SHA-1. Microsoft said “The SHA1 deprecation policy does not impact SHA1 privately deployed root certificates, because Windows relies on other means to validate root certificates besides the signature”
- All self-signed certificates: This is the case when you have a self-signed certificate that you are using internally or externally for some reason.

Let me give you an example. A 2-tier PKI hierarchy has an offline root CA and an online issuer CA [in a two-tier PKI hierarchy, the online issuer is also considered an intermediate CA server]. The online issuer CA issues end-entity certificates to users, computers and services.
In such two-tier PKI hierarchy, this is what it takes to be compliant with SHA-2 and avoid violation of the SHA-1 deprecation plan from Microsoft:
- For the privately deployed root CA server:
- The root CA self-signed certificate can either use SHA-1 or SHA-2, as it is not affected by SHA-1 deprecation plan.
- When the root CA server signs a CRL, or signs a certificate request, this signing operation should be performed by SHA-2.
- According to the previous point, the root CA server should be capable of performing SHA-2 operations even if its self-signed certificate is using SHA-1.
- To do signing operations using SHA-2, the root CA should be using cryptographic provider that supports SHA-2 (i.e. Microsoft Key Storage Provider)
- For the Intermediate Issuing CA server:
- The CA certificate itself should be using SHA-2.
- Any signing operation done by the server should be done with SHA-2.
- To do signing operations using SHA-2, the issuing CA should be using cryptographic provider that supports SHA-2 (i.e. Microsoft Key Storage Provider)
- For end-entity SSL and Code Signing Certificates
- Should be using SHA-2, and the certificate chain should be using SHA-2 except for the root CA certificate, as the root CA certificate can use SHA-1 or SHA-2
- For code signing certificates, a time-stamp should be included to validate the signature.
Here is what a PKI hierarchy might look like, in order to comply with the SHA-1 deprecation plan.

Here is what a PKI hierarchy might look like, that is affected by the SHA-1 deprecation plan.


Certification authority migration options
The time you spend in designing and planning the migration now, will pay off for many years. I read once that PKI is a 90% designing science, and 10% implementing. So, let us start by listing our migration plan options. I will be using a two-tier PKI infrastructure as an example in the migration options, and the same applies if you have more tiers.
Approach 1: “Side by Side migration using parallel PKI hierarchy with a different Root CA”
This is my favorite approach, as you will not be touching your current PKI hierarchy at all. Instead, you will establish a new hierarchy with a new root CA, and design that new hierarchy to support SHA-2 from the start. Gradually, you will start using the new hierarchy to issue all new certificates, and perhaps replace old certificates issued from the old hierarchy, with new certificates from the new one.
During this side-by-side migration, your end entities (servers, computers, services) should trust the new root CA certificate in addition to trusting the old one. The benefit of this approach is that you can carefully and slowly migrate applications to a new SHA-2 based PKI in a controller manner. Finally, when all subscribers (end-entities like computers, services and users) are now consuming certificates from the new PKI hierarchy, the old SHA-1 based PKI can be decommissioned.
Keep your current PKI infrastructure as is and deploy a parallel PKI infrastructure (on Windows 2012 R2 perhaps or later) that uses only SHA-2 for issued certificates and for CA certificates. Start issuing new certificates from the new hierarchy and re-issue SSL certificates from the new hierarchy.
In this way, you could keep your old PKI hierarchy to support legacy applications and devices that is not SHA-2 ready, while supporting SHA-2 completely in the new hierarchy.
If you are a professional PKI expert, then you might want to create a Certificate Policy (CP) document, for the adoption of SHA-2 and the discontinuation of SHA-1.

Approach 2: “Side by Side migration using same root CA server, and parallel Intermediate/Issuer CA servers”
Normally, your root CA server self-signed certificate is using SHA-1, and we know that this is fine and will not conflict with Microsoft SHA-1 deprecation plan.
But when the root CA needs to sign a certificate request or a CRL, it needs to do so using SHA-2. It might be confusing at first, I know. Again, if you look at the root CA self-signed certificate, you will find it using SHA-1. If the root CA wants to do an action from now on, like signing things, it must do so using SHA-2.
So, we can keep using the same root CA in our PKI hierarchy, but we need to make it a smart root CA, that is, capable of doing SHA-2 operations.
Next, we will create an intermediate/issuer CA server(s) that are chained to the same root CA. Those CA servers are SHA-2 capable from the start and running at least Windows 2012 R2 (as a recommendation). The below picture shows how this approach looks like.
For the root CA to be capable of doing SHA-2 operations, we shall migrate its operating system to one that supports SHA-2 (recommendation is Windows 2012 R2 or later). I wrote a blog post on how to migrate your certification authority root CA to Windows 2012 R2, that you can refer to.
You are still safe if your root CA is running Windows 2008 R2. Next you must check the cryptographic provider for your root CA, and make sure it is supporting SHA-2. Although the root CA certificate itself can be signed with SHA-1, the root CA still need to sign the CRL and the new Intermediate CA certificate request with SHA-2. You can know more about how to check the CA cryptographic provider SHA-2 support and how to upgrade to a provider that supports SHA-2 in this blog post. Now you have your root CA supporting SHA-2.

Cryptographic providers
Why it is a good thing to learn about this cryptographic provider thing, while we are talking about SHA-2 and migration options? Well, cryptographic providers play big role when it comes to supporting SHA-2 and the supported operating systems choice. Let me put it this way, your choice to move away from SHA-1 to SHA-2 depends directly on the type of cryptographic provider you are using in your environment.
What are cryptographic providers?
Now that you know how big the role cryptographic providers play when it comes to supporting SHA-2, let us introduce you to the concept of such providers. I will try to only mention basic things, and avoid using complex definitions and theories, as you can easily use your search skills to learn more.
A Cryptographic Provider is simply a component [software library usually] that performs cryptographic operations, generate keys, provides key storage functionality, and authenticate users. You can implement such providers in hardware, software, or both. It is like having a specialized security expert in the team, whenever you want to encrypt data, you go and ask him to do so, and you don’t need to know how he did it.
Again, I am going to give you simple uncomplicated picture of how to think about cryptographic providers. Imagine that a person called John [John represents an application that needs to do cryptographic operation], wants to purchase a new Kitchen. He can look at the market [Windows] and see what kitchen shops are available near him [Cryptographic Providers]. Each shop can deliver a unique kitchen style and options that distinguish it from other shops.
John does not need to worry about how to install a kitchen at his house, he only calls the shop that suites his taste, and ask them to do the installation. Each shop is specialized in installing a unique style and capabilities of kitchens. Now Alice [another application], John’s neighbor wants to install a kitchen at her house. She just need to pick a shop [cryptographic provider], and she can rest assure that the kitchen will be installed by professionals who know their job.
This is a simple idea I know, but it reflects what is happening in Windows. Applications need to do cryptographic operations, like creating and storing keys. They do not need to know the details of how this is being done, so they can look at what cryptographic providers are available in Windows and choose one to do the job.
Cryptographic providers specify the type, size and storage of key to be used. Each provider can support specific type, size and storage method for keys. Each cryptographic provider can do certain cryptographic functions. So, selecting a cryptographic provider can affect the cryptographic operations we can perform. If we want to use smart cards, then we need to choose a cryptographic provider that can store keys in smart cards.
Cryptographic APIs
Applications also do not talk directly to these provider, they use an API to do so. The original API that was used for this purpose is called Microsoft Cryptography API (CryptoAPI), which is now being replaced by a new version called Cryptography API: Next Generation (CNG).
This abstraction works well. Applications do not need to be concerned about security details, since cryptographic providers are responsible for implementing cryptographic algorithms and standards. Furthermore, one application can define which cryptographic provider it is going to use, by calling an API, that works as a bridge between the application and the provider.

As said before, there are two kinds of APIs that bridge communication between applications and cryptographic providers. Let us talk a little bit about these two APIs.
Microsoft Cryptography API (CryptoAPI)
Listen carefully, the cryptographic providers (those little things doing cryptographic operations), that are called by using the legacy CryptoAPI API are called Cryptographic Service Providers or CSP. So, CryptoAPI can call subset of the cryptographic providers in Windows, and those providers that can be called by CryptoAPI are called Cryptographic Service Providers.
Applications call the API (CryptoAPI), and that API calls one of the Cryptographic Service Providers to do some cryptographic operations.
In cryptography, two things matter:
- How to do cryptographic things (implement cryptographic algorithms).
- How to store keys (key storage).
Now those cryptographic providers used by CryptoAPI (a.k.a CSPs) are considered legacy ones. The same provider can do both operations, it can implement cryptographic algorithms and can also store keys. A list of those providers can be found here. An example of such CSPs are the Microsoft Base Cryptographic Provider v1.0 and the Microsoft Base Smart Card Crypto Provider.

Cryptography API: Next Generation (CNG)
It was first introduced in Windows Vista, and is currently the replacement for the CryptoAPI. It also does provide a lot more extensiblility and options like:
- It has kernel mode API that implements threat safety throughout the stack, provides process isolation for its operations and extensive auditing features.
- Backward compatibility with algorithms supported by CryptoAPI.
- Complies with FIPS 140.2 and supports the NSA Suite B Cryptography.
- Supports Elliptic curve cryptography (ECC) which is a new approach for public key cryptography where smaller keys are used for same level of security.
- Supports SHA-2 family which is the most important thing I believe.
Another thing to notice here is that this API adds another layer of abstraction. If you recall, the legacy CryptoAPI calls CSPs for both cryptographic algorithm implementation and key storage. Well, this API is built to talk to two specialized providers, one that can do only cryptographic operations, and one that can only do key storage.
So, imagine an application that wants to do a cryptographic operation, it calls the CNG API, which then will contact a provider from a specialized provider family [Cryptographic Algorithm Provider], that cannot do key storage operations, but they can do these cryptographic algorithms just fine.
Now, the application needs to do a key storage operation, it calls CNG API, which then will call a different provider from a different provider family [called CNG Key Storage Provider or KSP] to do key storage operations. An example of such KSPs are Microsoft Software Key Storage Provider and Microsoft Smart Card Key Storage Provider.
Simple enough, this API will call different providers when it comes to key storage vs cryptographic algorithm operations. The below figure shows this clearly.
In summary, we want to make sure we are using this new API, as it can call cryptographic providers that support SHA-2 functionality.

What this has to do with SHA-2?
Your certification authority should be using Crypto Next Generation (CNG) to support SHA-2. It is also worth mentioning that CNG was introduced in Windows Server 2008 and higher operating systems.
Two things we need to check here to ensure we can move to SHA-2 PKI hierarchy:
- We need to make sure that our certification authority server is running an operating system that can support CNG (which is Windows Server 2008 or later, but I recommend Windows 2012 R2 or later).
- We need to make sure the certification authority is using a Key Storage Provider (KSP) that supports SHA-2, like Microsoft Key Storage Provider , and not a legacy Cryptographic Service Provider (CSP) used by the legacy CryptoAPI.
Usually, people would have a certification authority deployed on Windows 2003 server, and then they upgrade the Windows version say to Windows 2008 R2. This means that the new Windows version supports CNG, but the certification authority might still be using the legacy CSP set of providers, and not the new KSP way. So, even if your CA is running on Windows 2008 R2 server, that does not mean your CA is using KSP. This happen when you upgrade the O.S from a legacy version that does not support KSP.
Moving forward, we want to go to our certification authority, make sure we have it installed on a Windows version that knows how to deal with CNG (Windows 2008 or later). Now that we know the CNG capabilities exist in the box, we still need to see if the certification authority is using such new capabilities (KSP) or just using the old ones (CSP).
Which provider my certification authority is using?
If your certification authority is running Windows 2003 or a previous version, then for sure you are using the legacy cryptographic providers (CSP). If you are running your certification authority on Windows 2008 or later operating system, then there is a good chance that you are using the new set of providers (KSP). To check which provider your CA is running, just go to your Microsoft certification authority console, then take a look at the General tab of the root CA’s properties and notice the value for the provider and the hash algorithm.

You can see from the picture above, that the cryptographic provider is Microsoft Strong Cryptographic Provider, which is as one of the CSPs used by the legacy CryptoAPI. This is bad as we know this provider cannot do SHA-2 operations. You can also note the hash algorithm in the picture as SHA-1.
You can also confirm this information by running Certutil –store my <Your CA common name>.
The hash algorithm is SHA-1 and the provider is Microsoft Strong Cryptographic Provider even on this Windows Server 2016 Server. This might be because this CA was upgraded from Windows 2003.

If you see in the below figure, you will see a CA using Microsoft Software Key Storage Provider (one of the KSPs). You can also see the hash algorithm as SHA256, which means that this CA will use SHA-2 to sign CA CRLs, and sign certificate requests.

Is my certification authority capable of issuing SHA-2 certificates?
The important question is whether your CA is capable of issuing SHA-2 certificates. By now you know that this depends on the cryptographic provider you are using, which depends on the Windows version your CA is running on.
Even if your CA is running a cryptographic provider that supports SHA-2, you still need to configure your CA to use SHA-2 for future signing operations.
Usually there are three steps that are needed to make your CA start using SHA-2 from now on:
Step 1: Check which cryptographic provider your CA is using
As shown in the previous section, you can know which provider your CA is running by inspecting the general properties of your CA from the certification authority management console, or by running Certutil –store my <Your CA common name>
Your provider should be one of the supported Key Storage Providers that calls Cryptography API: Next Generation (CNG) and not the legacy CryptoAPI CSPs. So if your CA cryptographic provider is one of those KSPs: Microsoft Software Key Storage Provider or Microsoft Smart Card Key Storage Provider, then you are good.
In summary:
- If your CA is using one of these cryptographic providers, then you are using the new CNG KSP (Key Storage Providers) that definitely supports SHA-2.
- If your CA is using one of these cryptographic providers, then you are using legacy CryptoAPI provider, which does not support SHA-2.
- Else, if you are using third party provider, you have to check with the supplier.
Step 2: Configure your CA to use SHA-2
Next, you need to configure your CA to start using using SHA-2 from now on to sign CRLs and certificate requests. On the CA, in a Command Prompt window, run the following command:
certutil -setreg cacspCNGHashAlgorithm SHA256
You might need to stop and restart the certificate services. Note also that this will not affect already issued certificates previously, but will affect any new issued certificate or CRL.

Step 3: Renew your CA certificate to use SHA-2
What about the CA certificate itself. You can check if it is using SHA-1 or SHA-2 by opening the CA certificate, and checking the Signature Hash Algorithm being used to sign the certificate.

As you can see, the CA certificate happened to be signed by SHA1. Now, we need to renew the certification authority certificate to use SHA-2. To do that, select your Certificate Authority and open the All Tasks line, Then select Renew CA Certificate

Accept the request to stop the Active Directory Certificate Service. You can choose to generate a new signing key.

Now, if we check the certification authority certificate, we can see it is using SHA-2. Mission accomplished.

Note: screenshots in this section is taken from Pierre Kennibol blog post.
Migrate your certification authority from CSP to KSP
This section will help you understand one specific scenario. Please skip reading this section if this does not match you case.
We are talking about a CA running Windows 2008 R2 or higher operating system that supports the new KSP providers, but the CA service is still using legacy CSP (cryptographic service provider).
This case is common and happen specially to root CA server. It happened when you migrate your CA from older operating system to a new one, and during the migration, you choose (use existing keys).
Say for example you have a root CA running Windows 2003, and you want to migrate that to Windows 2008 R2 operating system. You can easily backup the CA private key, database, and registry configuration, format the box with Windows 2008 R2, and start installing new certification authority on it. During the installation, you will be asked if you want to create a new key pairs or use existing ones. You would choose to use existing ones of course. Windows 2008 R2 will realize that those keys from your backup, are generated using a legacy CSP, so Windows 2008 R2 will use the same legacy CSP to host your CA private key. Hence, you will be running Windows 2008 R2 that can use KSP, but instead it will use legacy CSP.
This blog post is dealing with say a CA running Windows 2012 R2, and still using legacy CSP. We want to make this CA uses KSP instead. We are not migrating or upgrading the O.S, we just want the same CA to use KSP instead of CSP.
If you are running a CA on Windows 2008 R2, do me a favor and upgrade it to Windows 2016 or at least 2012 R2. This is not a requirement as Windows 2008 R2 supports KSP, but it will make your life easier.
Introduction
Let us review what we know so far:
- Knowing if your CA is using legacy CSP or the new KSP cryptographic provider makes all the difference, as only the new KSP providers support SHA-2.
- If your CA is running any Windows O.S version before Windows 2008 R2, then you should stop reading, and do yourself a favor, and upgrade your CA to the latest Windows version (at least Windows 2012 R2). You can read how to migrate your certificate authority root CA to Windows 2012 R2 in my previous blog post.
- You can be in a scenario where you are running a new operating system like Windows Server 2016 or 2010 R2, but your CA is using a legacy CSP. In other words, having your CA running on new operating system, does not mean that your CA is taking advantage of this and is using the new KSP providers. This can happen if you upgraded your CA from previous Windows version over the years.
- It is not enough that your Windows version is new, and your CA is using the new KSP provider, you still need to configure your CA to use SHA-2 as illustrated previously in this blog post.
Backup is your big hero
Before doing anything to your CA, make sure to back up your certification authority. Let me give you quick hint here. All what the CA cares about when it comes to backup are three parts:
- The CA private key.
- The CA database (contains list of issued and revoked certificates).
- CA configuration (listed under this registry key hklmsystemcurrentcontrolsetservicescertsvcconfiguration )
That’s it. You take care of those three things, and you can go to any server, and re-build your CA in no time. You can read more about certification authority backup in my previous blog post.
How we are going to make yout CA use KSP instead of CSP?
I will do some assumption here. If you are running your CA on Windows 2008 R2, then I will suppose you migrate it to Windows 2012 R2. Now, we have CA running on Windows 2012 R2, and still using legacy CSP. Our goal is to make it use KSP, and then configure it to start signing new requests with SHA-2. Please note that from now on, I will be describing my way of doing this, that is what worked well for me.
Giving these assumptions, here is a summary of my approach:
- Backup my CA server which is running Windows 2012 R2. Make sure you have the private key accessible to you for next steps.
- Delete the CA private key from your CA server.
- Create a new Windows 2012 R2 server with no roles on it. Then import the private key (from step 1) to the KSP provider on the new server (This is a temp server that we will use just to upgrade the key from CSP to KSP). This will make the private key KSP compatible.
- Export the key that was imported in Step 3. We will get now a KSP compatible private key.
- Go to your original CA server, and import the KSP compatible key, and specify KSP provider for key storage.
- Instruct the CA to start using SHA-2 for future signing operations.
Let me explain what is happening here. Your CA currently is running Windows 2012 R2 and using legacy CSP to store the CA private key. What we need to do is to export that private key and go to a staging area (by creating a temp Windows 2012 R2 server with no roles installed on it), and since Windows 2012 R2 comes with a KSP provider that we can use even without CA role installed, then we can import the private key to one of the KSP provider On that temp server.
This will make the private key stored on that temp server and using a KSP provider. Now, we will immediately export that key from the temp server by asking the KSP provider to give us the key back. It will do that, and we will get a KSP compatible key. So, we started with a CSP compatible key, and now we end up with a KSP compatible key, and the role of the Windows 2012 R2 temp server is done now.
Finally, we will go with that KSP compatible key to our original CA server. We want to make sure we deleted the private key from that CA first. Then we will import the KSP compatible private key to our CA server using a KSP provider.
The whole objective of the Windows 2012 R2 temp server is to convert the private key that is created using a legacy CSP, to a private key that is KSP compatible. We do that by importing the private key that was creating using legacy CSP, to the KSP provider on the temp server, and then export it again right away.

Migration deep dive
Let us start by quickly confirming which cryptographic provider our Windows 2012 R2 CA server is running by typing
Certutil –store my <Your CA common name>

As you can see, the provider being used is a legacy CSP called: Microsoft Strong Cryptographic Provider.
This means that the CA certificate private key is stored inside the operating system using the Microsoft Strong Cryptographic provider, which has specific technique in how to store keys.
Step 1: Backup your CA server, and keep the private key accessible for next steps
We talked in previous section on how to backup your CA server. What I want to do here is to make sure that you save your CA private key say at C:RootCA.P12. To do that, open the Certification Authority Snap-in, right click the CA name > Back up CA..> choose only “Private Key and CA Certificate” > Browse to C: to store the private key.
Step 2: Install a new temp Windows 2012 R2 server
Again, there is no reason to do that, but I prefer to do the key upgrade process on a different isolated Windows 2012 R2 server. We will call this the staging server from now on.
Step 3: Delete the private key from the CA server
Now that you have exported the private key to C:RootCA.P12 on the CA server, go a head and copy it to the staging server.
After that, we need to delete the private key copy from the certification authority server itself. To do that:
- In a Windows PowerShell session running with the Run as administrator option, run the following command to stop the CA service:
Stop-service certsvc
- In a Command Prompt window, get the details of your CA certificates, by using the following command that you output to a file so that you can more easily make a note of the values for Cert Hash and Key Container, which you will need later:
Certutil –store my <Your CA common name>

- Delete the existing CA certificate and private key:
- sing a Windows PowerShell session that is opened with the Run as administrator option, run the following command
Cd cert:localmachinemy
- By using the first value that you identified earlier for the Cert Hash as the certificate ID when you ran the Certutil command, now run the following command to delete the certificate and private key:
Del –deletekey <“Certificate ID”>
Now if you open the Certificates MMC snap-in, and browse to the Computer Certificate Store >Personal. You will see that the private key of the CA certificate is deleted.
Instead of doing all these commands, you can just go to the Certificates Computer Store>Personal, and manually deleting the CA certificate.
Do that for all CA private keys, in case your CA has more than one certificates (the case when you renew your CA certificate).
Step 4: Migrate the private key from CSP to KSP
Remember the private key of your CA from Step 1 that you stored in C:RootCA.P12, now move it to the staging server, and run the following command to import the key to the KSP provider on the staging server. Remember that the staging server does not have any roles installed. You do not need to have CA installed in the machine to store keys in KSP.
Certutil –csp <KSP name> -importpfx <Your CA cert/key PFX file>
In our case, this would be
Certutil -csp “Microsoft Software Key Storage Provider” -importpfx C:RootCA.P12

When you are prompted for a password, enter the password that you provided when you backed up your CA.
What just happened? we took a private key that was created using a legacy CSP, and we called a KSP provider to store it on a Windows server. This will cause the key to be stored and be compatible with KSP. This is the whole magic. Now we will call KSP and ask it to export the key, and then we will go to our CA server and call KSP on the CA server to import it.
Now, we are still on the staging server, we will now call KSP to export the new KSP compatible private key by running:
Certutil -exportpfx my <CA Common Name> <PFX file path for export>
In our case, this will be:
Certutil -exportpfx my "Corporate Root CA" C:newCert.P12

Now that you have C:NewCert.P12 , this is the private key of your CA in the new KSP format if I may say that.
Step 5: Configure the CA to use the new Key
Now take that C:NewCert.P12 from the staging server and copy it to your CA server, and run the following on your CA server:
Certutil –restorekey <PFX file path>
In our case, this will be:
Certutil -restorekey C:RootCA.P12

Step 6: Add CSP Registry Keys
Now, we need to create couple of registry files and run them at the CA server. Because it is extremely tricky to create a perfectly formatted registry key, I do the following:
I prefer you go to HKEY_LOCAL_MACHINESYSTEMCurrentControlSetServicesCertsvcConfiguration<CA Common Name>CSP Registry key, and export that key to a registry file called E.Reg for example.

Now, open E.reg using notepad, Keep the header information [Windows Registry Editor Version XXX] , and delete anything else and replace it with the below:
[HKEY_LOCAL_MACHINESYSTEMCurrentControlSetServicesCertSvcConfiguration<Your CA Common Name>CSP]
"ProviderType"=dword:00000000
"Provider"="Microsoft Software Key Storage Provider"
"CNGPublicKeyAlgorithm"="RSA"
"CNGHashAlgorithm"="SHA1"
Do not forget to edit the contents, replacing <Your CA common name> with your CA common name.

Now before you carry on, just let us confirm that the CA was using SHA-1 as hashing algorithm before importing this registry file. To confirm that, run:
Certutil –v –getreg cacspHashAlgorithm
The output will look like this
HashAlgorithm REG_DWORD = 8004 (32772)
CALG_SHA1
Algorithm Class: 0x8000(4) ALG_CLASS_HASH
Algorithm Type: 0x0(0) ALG_TYPE_ANY
Algorithm Sub-id: 0x4(4) ALG_SID_SHA1
If you do not see SHA1 in your output, modify the CNGHashAlgorithm key value in the file to have the appropriate name.
Now save and run the E.Reg file.
Step 7: Add CSP Encryption Registry Keys
Now rename the E.Reg file to E2.Reg file, keep the header information and delete anything else and replace it with:
[HKEY_LOCAL_MACHINESYSTEMCurrentControlSetServicesCertSvcConfiguration<Your CA Common Name>EncryptionCSP]
"ProviderType"=dword:00000000
"Provider"="Microsoft Software Key Storage Provider"
"CNGPublicKeyAlgorithm"="RSA"
"CNGEncryptionAlgorithm"="3DES"
"MachineKeyset"=dword:00000001
"SymmetricKeySize"=dword:000000a8

Before you save the file, confirm that you are using 3DES for the encryption algorithm by running the following command:
certutil -v -getreg caencryptioncspEncryptionAlgorithm
The output will look similar to the following:
EncryptionAlgorithm REG_DWORD = 6603 (26115)
CALG_3DES
Algorithm Class: 0x6000(3) ALG_CLASS_DATA_ENCRYPT
Algorithm Type: 0x600(3) ALG_TYPE_BLOCK
Algorithm Sub-id: 0x3(3) ALG_SID_3DES
If you do not see 3DES in your output, modify the CNGEncryptionAlgorithm key value in the file to have the appropriate name.
Finally, save and run E2.reg
Step 8: Change the CA hash algorithm to SHA-2
Now that your CA is using CNG KSP, you can instruct the CA to use SHA-2 whenever it signs something, like CRLs and certificate requests. To do that, just run:
certutil -setreg cacspCNGHashAlgorithm SHA256

net stop certsvc

net start certsvc


References
-List of cryptographic providers and their supported functions.
-Microsoft documentation on how to migrate Windows CA from CSP to KSP and from SHA-1 to SHA-2.
-Microsoft documentation:Migrating a Certification Authority Key from a Cryptographic Service Provider (CSP) to a Key Storage Provider (KSP)